"A hunting we will go, a hunting we will go, heigh-ho the junk we'll show for all to see and know"...er something like that. tee hee! You know I love a good thrift store haul, and this little bit below is from recent trashure run. I'm going to attempt to turn it all into an upcycled photo holder. Here's hoping! Thrifted Finds Before Repurposing | prodigalpieces.com You may be wondering why I picked these items in the first place. First, the sign and the "blessings" word are made of metal. Metal is always fun to work with as it's very versatile. You can see my past projects HERE. However, the sign was supposed to look vintage, but in my head I was like, "nice try". In addition to the metal goodies, the roll of contact paper was too pretty not to buy. Nuff said.

DIY TIME

To get this upcycled photo holder party started, I use my crackle medium. No prep needed, just stick it on and let cure. Applying Crackle Medium to Thrift Store Art | prodigalpieces.com While the crackle cured for about 2 hours, I decided to take off that blucky, chunky glitter on the "blessing" word. Isn't it awful? Even the base paint color was a funky yellowy white. It made me think it was dirty. Glitter on Metal Art Before Makeover | prodigalpieces.com And, if I haven't said it before, glitter is like a curse word in this house. I say almost because we don't swear, but boy do I want to when I find it everywhere. haha!! It gets on EVERYTHING. Am I right? I used a paint scraper to take the glitter off, and then sprayed with a semi-gloss white spray paint to give a fresh feel. Rustoleum Spray Paint for Upcycled Photo Holder | prodigalpieces.com

CRAFTINESS

While that paint was curing, I went about adding some scrapbook paper to some mini clothespins I had laying around. They're so handy to have on hand and make for wonderful ways to store your extra embroidery thread. Just wrap around and put the floss number on the end. BAM! How to Store Embroidery Floss with Clothespins | prodigalpieces.com Finally, I'm able to add my topcoat of white paint once the crackle cure was done. Next, I put the paint on with a heavy coat using my Square Brush again. Painting Thrifted Metal Sign | prodigalpieces.com Incidentally, I only needed to apply one coat of paint. It was fun to see the crackles appear while the paint was drying. Once the paint had cured it was time to add the beautiful Laura Ashley contact paper into the mix. I cut a piece large enough to fill in the center panel. Cutting Laura Ashley Contact Paper | prodigalpieces.com

TIDBITS

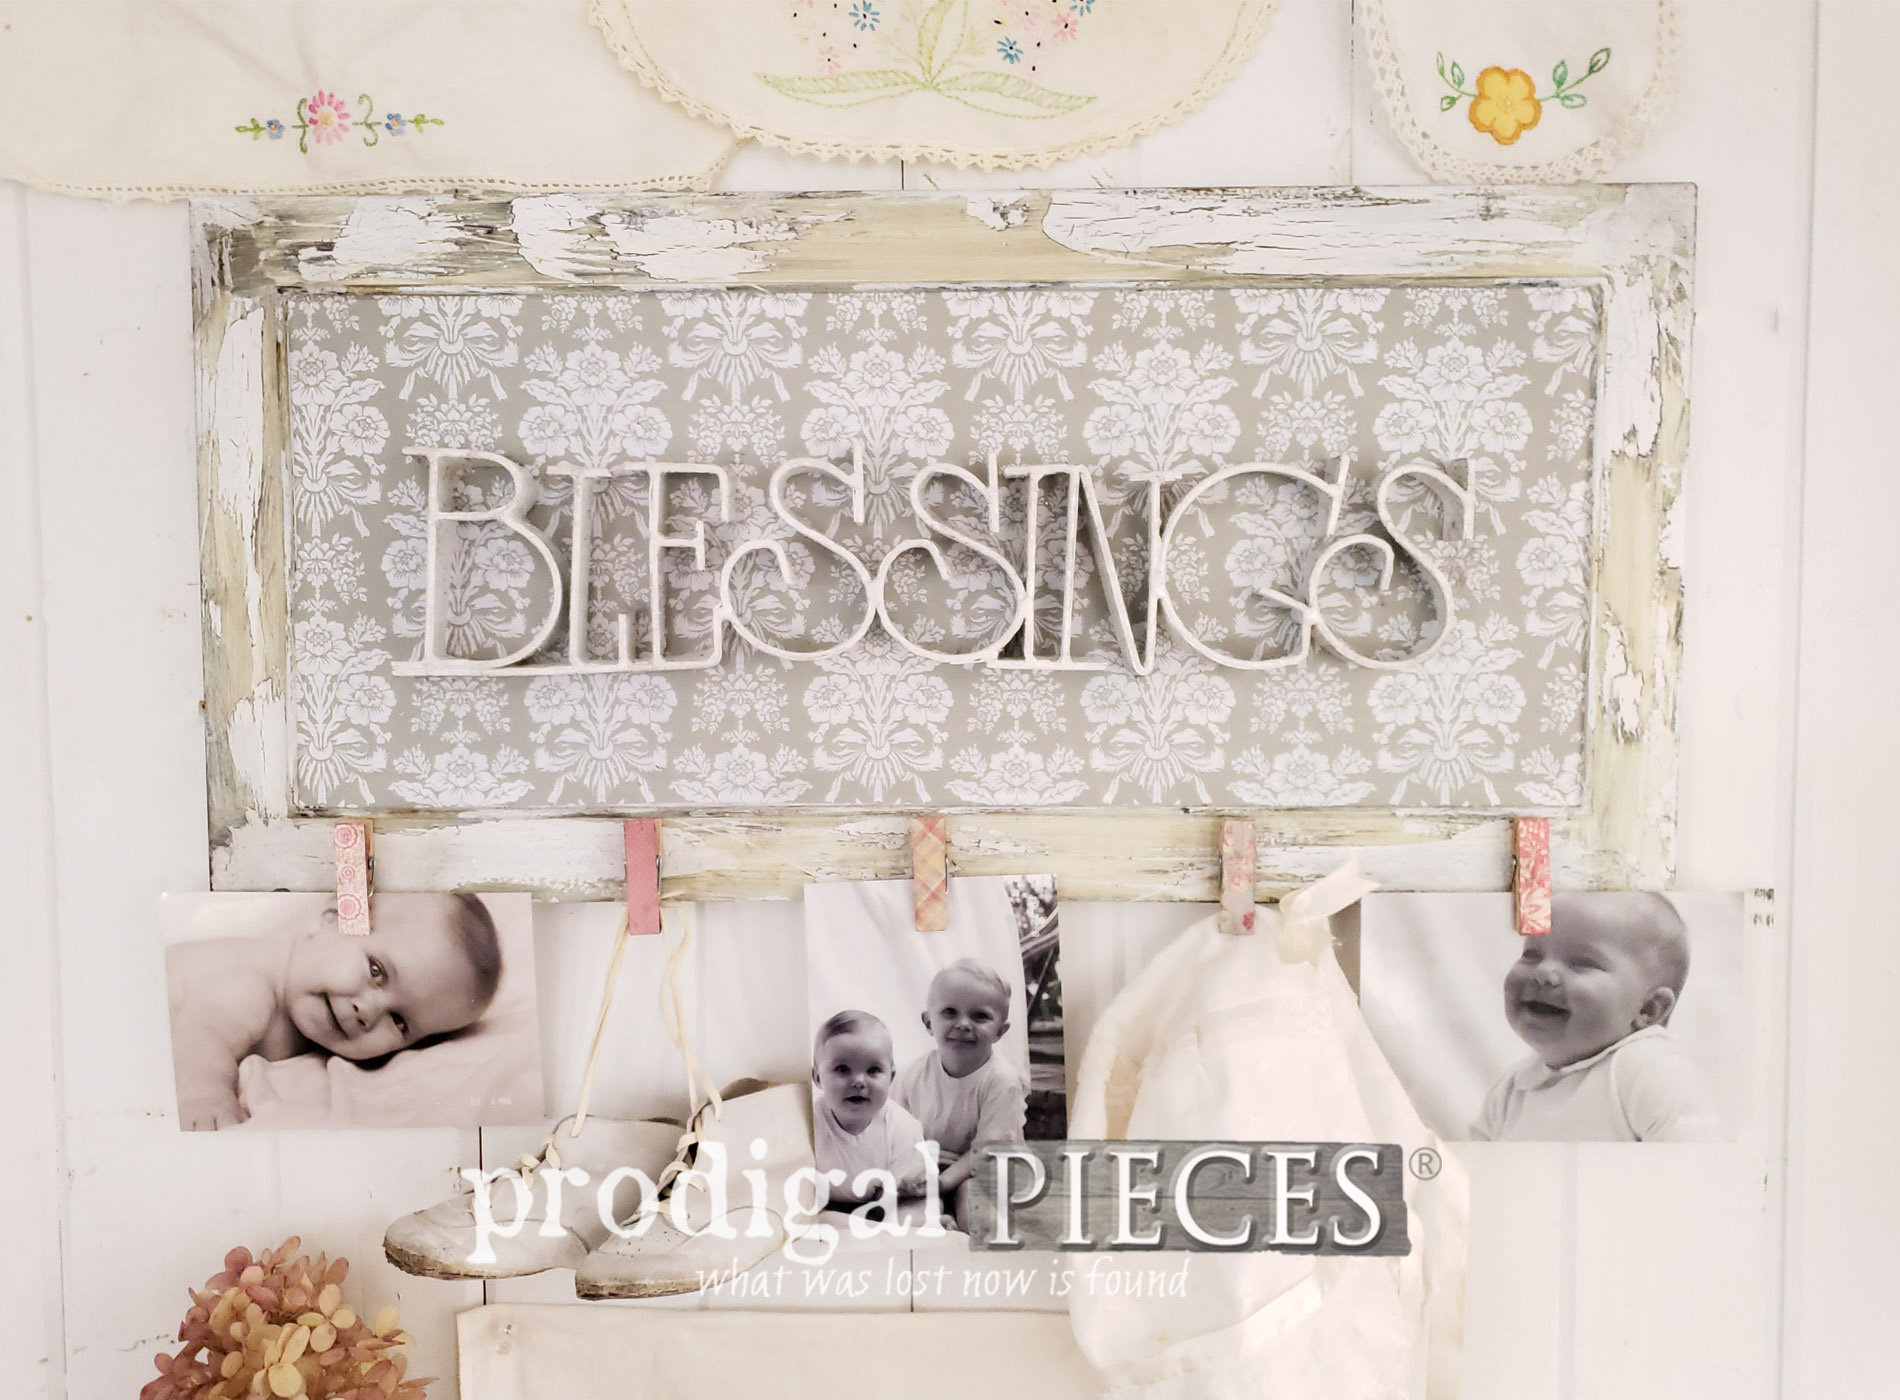
Last, after the paper is on, I use my hot glue gun to attach the clothespins to the bottom and the text to the middle. Here's my upcycled photo holder in action... Repurposed Photo Holder Made from Thrifted Finds | Home Decor by Larissa of Prodigal Pieces | prodigalpieces.com Blessings Wall Art Photo Holder for your Home Decor by Larissa of Prodigal Pieces | prodigalpieces.com Vintage Baby Walker Shoes in White Leather | Available at Prodigal Pieces | prodigalpieces.com For staging, I chose to fill it with pics of a few of my own sweet babes and a few momentos, though it could be used for practically anything. Oh, how quickly they grow...sniff. Texture Paint Layers Using a Crackle Medium | Wall Art by Larissa of Prodigal Pieces | prodigalpieces.com Upcycled Memory Photo Holder Wall Art by Larissa of Prodigal Pieces | prodigalpieces.com You can see all the yummy textures that came about from just a bit of crackle and the one coat of paint. Nothing else needed as the metal finish did all the work. The clothespins and contact paper add a bit of color and whimsy too. Mixed Media Wall Art with Photo Holder by Larissa of Prodigal Pieces | prodigalpieces.com This was a super fun project to share with you and I hope you'll take some time to shop thrifty and create some DIY projects of your own. If you'd love to own this upcycled photo holder, you can find it and many more created and vintage finds available in my online shop. (SOLD) Always feel free to ask questions either in comments or via email. Shop Prodigal Pieces Furniture, Vintage Finds, Handmade Goods, & Supplies for your home | shop.prodigalpieces.com prodigalpieces Beautiful Upcycled Photo Holder Wall Art for your Home Decor by Larissa of Prodigal Pieces | prodigalpieces.com In addition, pin and share this creation to inspire others to give DIY a try. Who knows...you might just be the one who needs to do it. wahoo!! Upcycled Photo Holder DIY Tutorial by Larissa of Prodigal Pieces Using Found Thrift Store Objects | Details at prodigalpieces.com prodigalpieces handmade diy home homedecor vintage homedecorideas crafts Up next, this room divider screen is going to get some much needed love. I'm excited to show you. Head HERE to see! Vintage Room Divider Screen Before Makeover by Prodigal Pieces | prodigalpieces.com To get these DIY tips & tricks in your inbox, be sure to sign up for my newsletter. PLUS, you will get your FREE Furniture Buying Checklist and special discount to my shop. Until next time! blog signature

let's get socialMEWE  |  PINTEREST  |  GAB

Also, more fun projects like my upcycled photo holder:

Don't throw out your old glass! Turn it into a Coordinating Collection ~ Perfect for Weddings, Parties and more! | Prodigal Pieces | prodigalpieces.com1950's Kitchen Shelf Repurposed into Rustic Storage Bins by Prodigal Pieces | prodigalpieces.com


Susan Homeroad Stevenson

Shared publicly - 2018-11-01 05:56:52

Larissa that is just precious!

Larissa

Shared publicly - 2018-11-01 06:38:41

Thank you! Fun to think outside the box store...haha. I know you know what I mean! :D

Kim

Shared publicly - 2018-11-01 07:50:32

Really creative, Larissa! You have so many great ideas! Keep em coming!

Kimbelry

Shared publicly - 2018-11-01 11:46:21

Yes, our blessings grow up way too fast.

Larissa

Shared publicly - 2018-11-01 12:51:24

Thanks! I'm a tryin'! :D

Larissa

Shared publicly - 2018-11-01 12:52:35

sigh...so true.

Jan

Shared publicly - 2018-11-01 19:32:04

Really super sweet piece! Baby pics and momentos are always in style.

Elaine

Shared publicly - 2018-11-01 20:00:04

Wow, my crackle pieces never look that awesome. Beautiful job! May I ask what paint you used for this project?

Debra A Wise

Shared publicly - 2018-11-01 21:29:27

I was cracking up at your "A hunting we will go". Great makeover! You always inspire me with the pieces of ugly junk that you turn into beautiful trashure, as well as with the fun you bring into these makeovers. Definitely excited to see what you do with the divider screen. Always looking forward to receiving your blog in my email!

Larissa

Shared publicly - 2018-11-02 05:33:00

Thank you. I love that a piece like this can work for any age too.

Larissa

Shared publicly - 2018-11-02 05:33:11

Thanks! I just used a basic latex.

Larissa

Shared publicly - 2018-11-02 05:33:45

hee hee! I tend to make songs when I work. It helps keep the fun coming. Hugs for the smile! :D

Cheryl Hurst

Shared publicly - 2018-11-03 12:06:41

What a wonderful imagination you have. I love that project. Now I want to know, did you have it in mind when you bought these things or did you just come up with it when you saw what you had taken home?

Becky

Shared publicly - 2018-11-03 14:15:38

Wow, that is some amazing crackle! I'll have to try that. We grab all the metal words we come across 2nd hand hunting too, haha! Nice project here!

Larissa

Shared publicly - 2018-11-04 05:27:25

Thank you! I had the idea at the store, which made it even more fun to bring them all home.

Larissa

Shared publicly - 2018-11-04 05:27:53

It's so fun to use and see how it's going to play out. So glad you like it!

Naomi S

Shared publicly - 2018-11-07 16:34:23

That is very cool, Larissa! Did you know what you were going to do before you started? It's really inspired, I think!

Larissa

Shared publicly - 2018-11-08 06:08:17

Thanks! Yes, it's how I like to shop...with purpose. :D

Sign Up To Comment