 Why on earth would I be interested in this folding screen, you ask? Well, me and my crazy self has always loved the drama they add to a room, plus they are super functional. You can use them simply for accent, to create a divide, or as intended, like a changing room screen. So many possibilities!
It's not a vintage goodie, but a "Made in China" reproduction with MDF inset panels and that awesome fake time-worn wear characteristic to this era of furniture. See the sticker in the bottom left?
Why on earth would I be interested in this folding screen, you ask? Well, me and my crazy self has always loved the drama they add to a room, plus they are super functional. You can use them simply for accent, to create a divide, or as intended, like a changing room screen. So many possibilities!
It's not a vintage goodie, but a "Made in China" reproduction with MDF inset panels and that awesome fake time-worn wear characteristic to this era of furniture. See the sticker in the bottom left?

DIY TIME
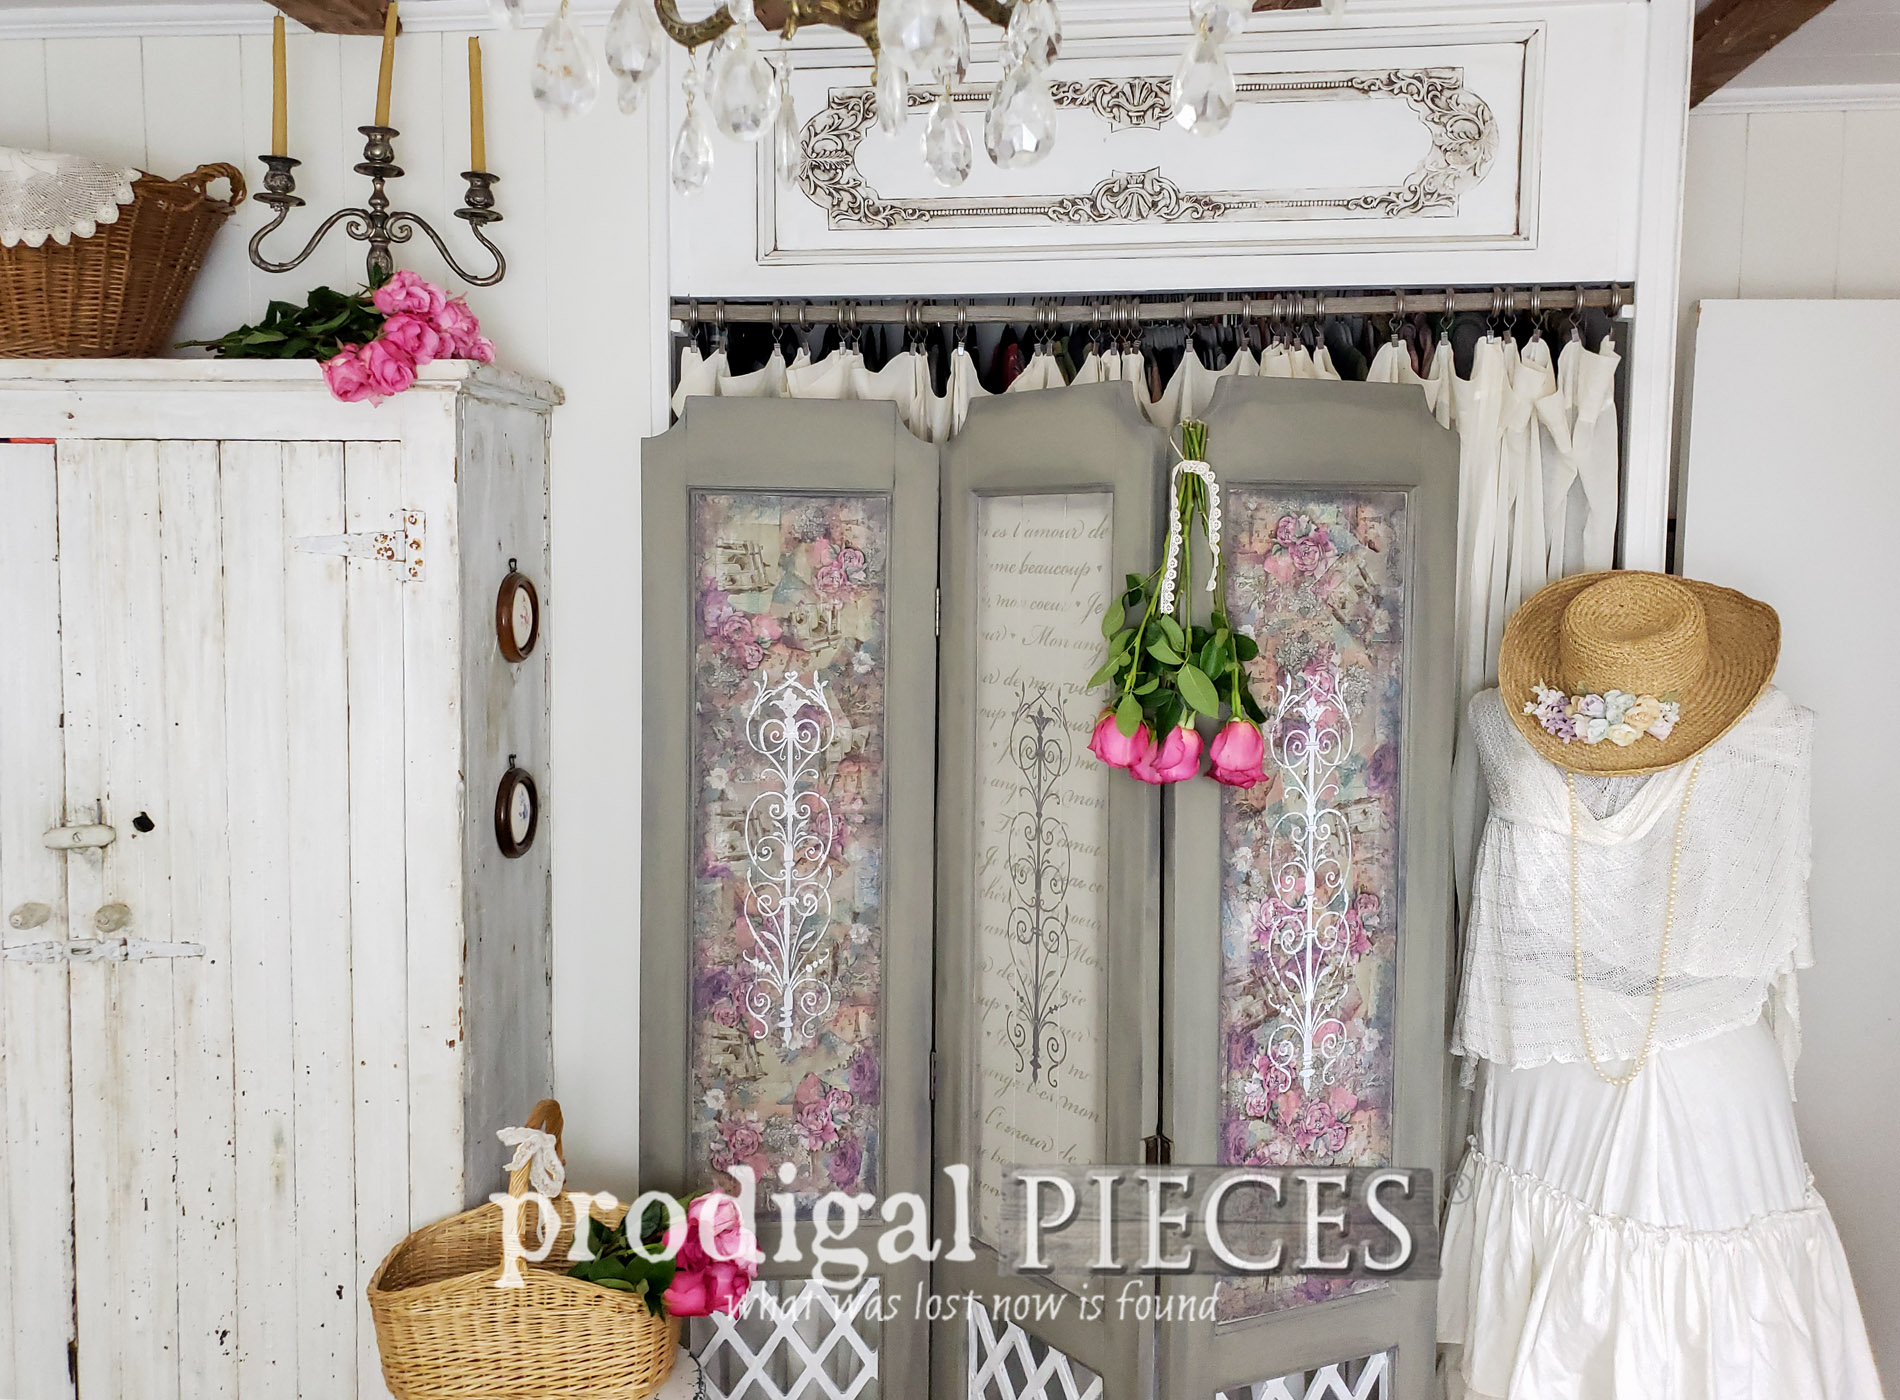
I have no need for these things other than I needed to check a "wanted to do" off my list. I've always wanted to rework a set of these. This particular folding screen seemed to be the perfect candidate. Keep in mind, I can totally appreciate the Asian influence and they would look cool in the right Boho or flea market style setting. However, I could also see them in a totally reworked state. First, I used my sander to lightly buff the surface to give it a bit of tooth and take care of some wear issues. After that, I began with my paint brush and a few coats of soft green to the frames, while the inset panels and back got a lighter shade of that green.
DECOUPAGE
Once the paint had cured, it was time for me to make use of these beautiful napkins. I've long been a fan of decoupage and use it often my makeovers. Also, you can see a few past ones HERE. If you're new to the term decoupage, it's basically the art of cut work that includes paper and glue that originated in France in the 17th century though some say the Chinese may have used it as far back as the 12th century. Either way, it's fun, super easy, and creates such magnificent drama.
This budget-friendly art is addictive - really! I don't buy the expensive decoupage supplies, but prefer to use basic school glue in a slightly watered down form similar to creamy milk.
To apply my napkin art, I cut them up in pieces and applied as I went.
If you're new to the term decoupage, it's basically the art of cut work that includes paper and glue that originated in France in the 17th century though some say the Chinese may have used it as far back as the 12th century. Either way, it's fun, super easy, and creates such magnificent drama.
This budget-friendly art is addictive - really! I don't buy the expensive decoupage supplies, but prefer to use basic school glue in a slightly watered down form similar to creamy milk.
To apply my napkin art, I cut them up in pieces and applied as I went.
- Brush on a light base layer of adhesive
- Apply napkin (or tissue paper) cutout or sheet.
- Brush over the napkin piece to seal it in. Simple!

TIME FOR PAINT
Time for some textural fun! Since I left the center panel in basic painted form, I had planned to give it a bit of drama with stencils. First, I used my French Script stencil as a base layer. Additionally, you can see how I've used that in these past posts too. Next, I applied this door panel stencil for added fun. And, dare I say I'm having soooo much fun! The two panels I added decoupage to also got a stencil in a white for contrast. Last, when all the stencils were done, I create more drama by using gray wax to create depth and time-worn wear.
THE REVEAL
Finally, with everything complete, I'm excited to show you the after of this vintage folding screen fun.
 The paper really gave it texture and dimension, and the stenciling that little bit of extra touch it needed.

 With that, I'm glad I didn't do all three panels the same. The contrasting middle one gives it a nice touch, don't you think?

 Happily, this folding screen has been donated to a local ministry to aid people who are leaving the Amish order and looking to start a new life. Likewise, you can read about my furniture donations to help those in need - Finding Home program HERE.
[metaslider id=30251]


 In addition, pin and share this fun folding screen makeover. You will have it for future reference and inspire others to give DIY a try too. That's what it's all about, right?
 Up next, I'll be taking these two cast-off finds and giving them new purpose. Do you know what they are? See their new life HERE.
 To get these DIY tips & tricks in your inbox, be sure to sign up for my newsletter. In addition, you will get your FREE Furniture Buying Checklist and special discount to my shop. Until next time!
 Also, more DIY projects like my folding screen makeover:


