 Can you see my vision for this? Well, no worries if not. I'm here to show you my nutty ways. mwahahaha...
When I say this thing was hardworking, I wasn't kidding. I put this in my boys' room hoping to help them stay clean and organized. Well...my good intentions went down the drain. All they did was use it to cram it full of junk, so I yanked it out. I have found (as a mother of 6) that the more I created storage places for my kids, the more "stuff" they hang on to. That was NOT my goal was. So, over the years, I've removed much of my storage places so they have less storage - less junk, less clutter and more freedom. Freedom to not have a heartache of cleaning up "stuff".
Can you see my vision for this? Well, no worries if not. I'm here to show you my nutty ways. mwahahaha...
When I say this thing was hardworking, I wasn't kidding. I put this in my boys' room hoping to help them stay clean and organized. Well...my good intentions went down the drain. All they did was use it to cram it full of junk, so I yanked it out. I have found (as a mother of 6) that the more I created storage places for my kids, the more "stuff" they hang on to. That was NOT my goal was. So, over the years, I've removed much of my storage places so they have less storage - less junk, less clutter and more freedom. Freedom to not have a heartache of cleaning up "stuff".
DIY TIME
Back to my upcycled map cabinet project... This chest is made of a basic pine with no bells and whistles. It has much wear and needs some TLC. However, it is at least solid wood, which makes it a perfect candidate. At this point I claim fair game to let my creative side take control. tee hee. I've created a video tutorial for you below so you can see the steps in action. Meanwhile, I'll take you through my process step by step.
First, I took out the drawers and removed the wooden drawer pulls. No worries. I'm saving them for another project - SEE HERE. Once the pulls were off, I began to build up the bottom of the chest to prepare to accept some legs. I felt adding height would not only increase the stature of my desired upcycled map cabinet, but also provide a stance to make it more stable. This chest is kinda lightweight and the legs would add heft.
I've created a video tutorial for you below so you can see the steps in action. Meanwhile, I'll take you through my process step by step.
First, I took out the drawers and removed the wooden drawer pulls. No worries. I'm saving them for another project - SEE HERE. Once the pulls were off, I began to build up the bottom of the chest to prepare to accept some legs. I felt adding height would not only increase the stature of my desired upcycled map cabinet, but also provide a stance to make it more stable. This chest is kinda lightweight and the legs would add heft.

*post sponsored by HomeRight. (see full disclosure)
I dug into my stash to get some 1"x 4"'s and cut them to length with my miter saw. Then, I used my Kreg Jig to add pocket holes so I could attach them to the bottom of the chest. I love these tools.NEXT STEPS
I've installed the slats installed on the bottom using my drill. Eventually, I'll be adding legs once the rest of my process is complete. Next, the drawers on on my list of makeover fun. In order to get to the upcycled map cabinet status, I need to create the visual of many drawers. To do that, I used my circular saw and my Rip Cut jig to make shallow cuts in the drawer front. You can see my demonstration in the video below.

 Do you see the shallow cut I made down the length of the drawer? The jig helps my blade stay straight. I could have done the same thing by setting my table saw blade at a shallow depth and then run the drawer over it too. I'm just trying to show you how you don't need BIG power tools to get it done.
 I used wood filler to fill the old drawer pull holes and any dings and dents too. Once cured, I then use my sander to get it ready for the next step...paint.
 Also, before I could move on to the next step, I couldn't let a boogery thing go without taking care of it. The top of the chest had a missing chunk out of the back corner. I knew wood filler wouldn't hold in there, so I took off the top and cut it down on my table saw. Getting rid of that damage made me feel so much better...aaaahhh.
 I used my nailer to reattach the top and the back panel, filled the nail holes with wood filler, sanded, and away we go!

PAINT TIME
Time to break out more of my favorite tools! Oh yeah...{{happy dance}} My motto is still toolsoverjewels since I was a teen and this is why. The HomeRight products are so easy to use that they pop up before your very eyes. Here I have my DIY Furniture Turn Table (aka. Lazy Susan). You can get the tutorial for the Turn Table HERE. Also, to join my in my DIY fun is my paint sprayer. I have a blast with this thing...literally! You can see my past posts using these tools HERE.
 In seconds I am able to coat the chest of drawers with my custom color mixed paint. The finish is superb and done in a flash. My video demonstrates how to adjust the tip for different sides, and how to move from your shoulder, not your wrist. In addition, you can always practice your flow and spray on a piece of scrap wood or cardboard. You can see my video tutorial how to set it up HERE in this post.
 I let the first coat cure, and then add a second coat. Between coats it is important to clean the sprayer. Just pop the lid on the canister of paint to save it for later, and then clean the rest. It only takes a few minutes of time. Yay!

REVEAL TIME
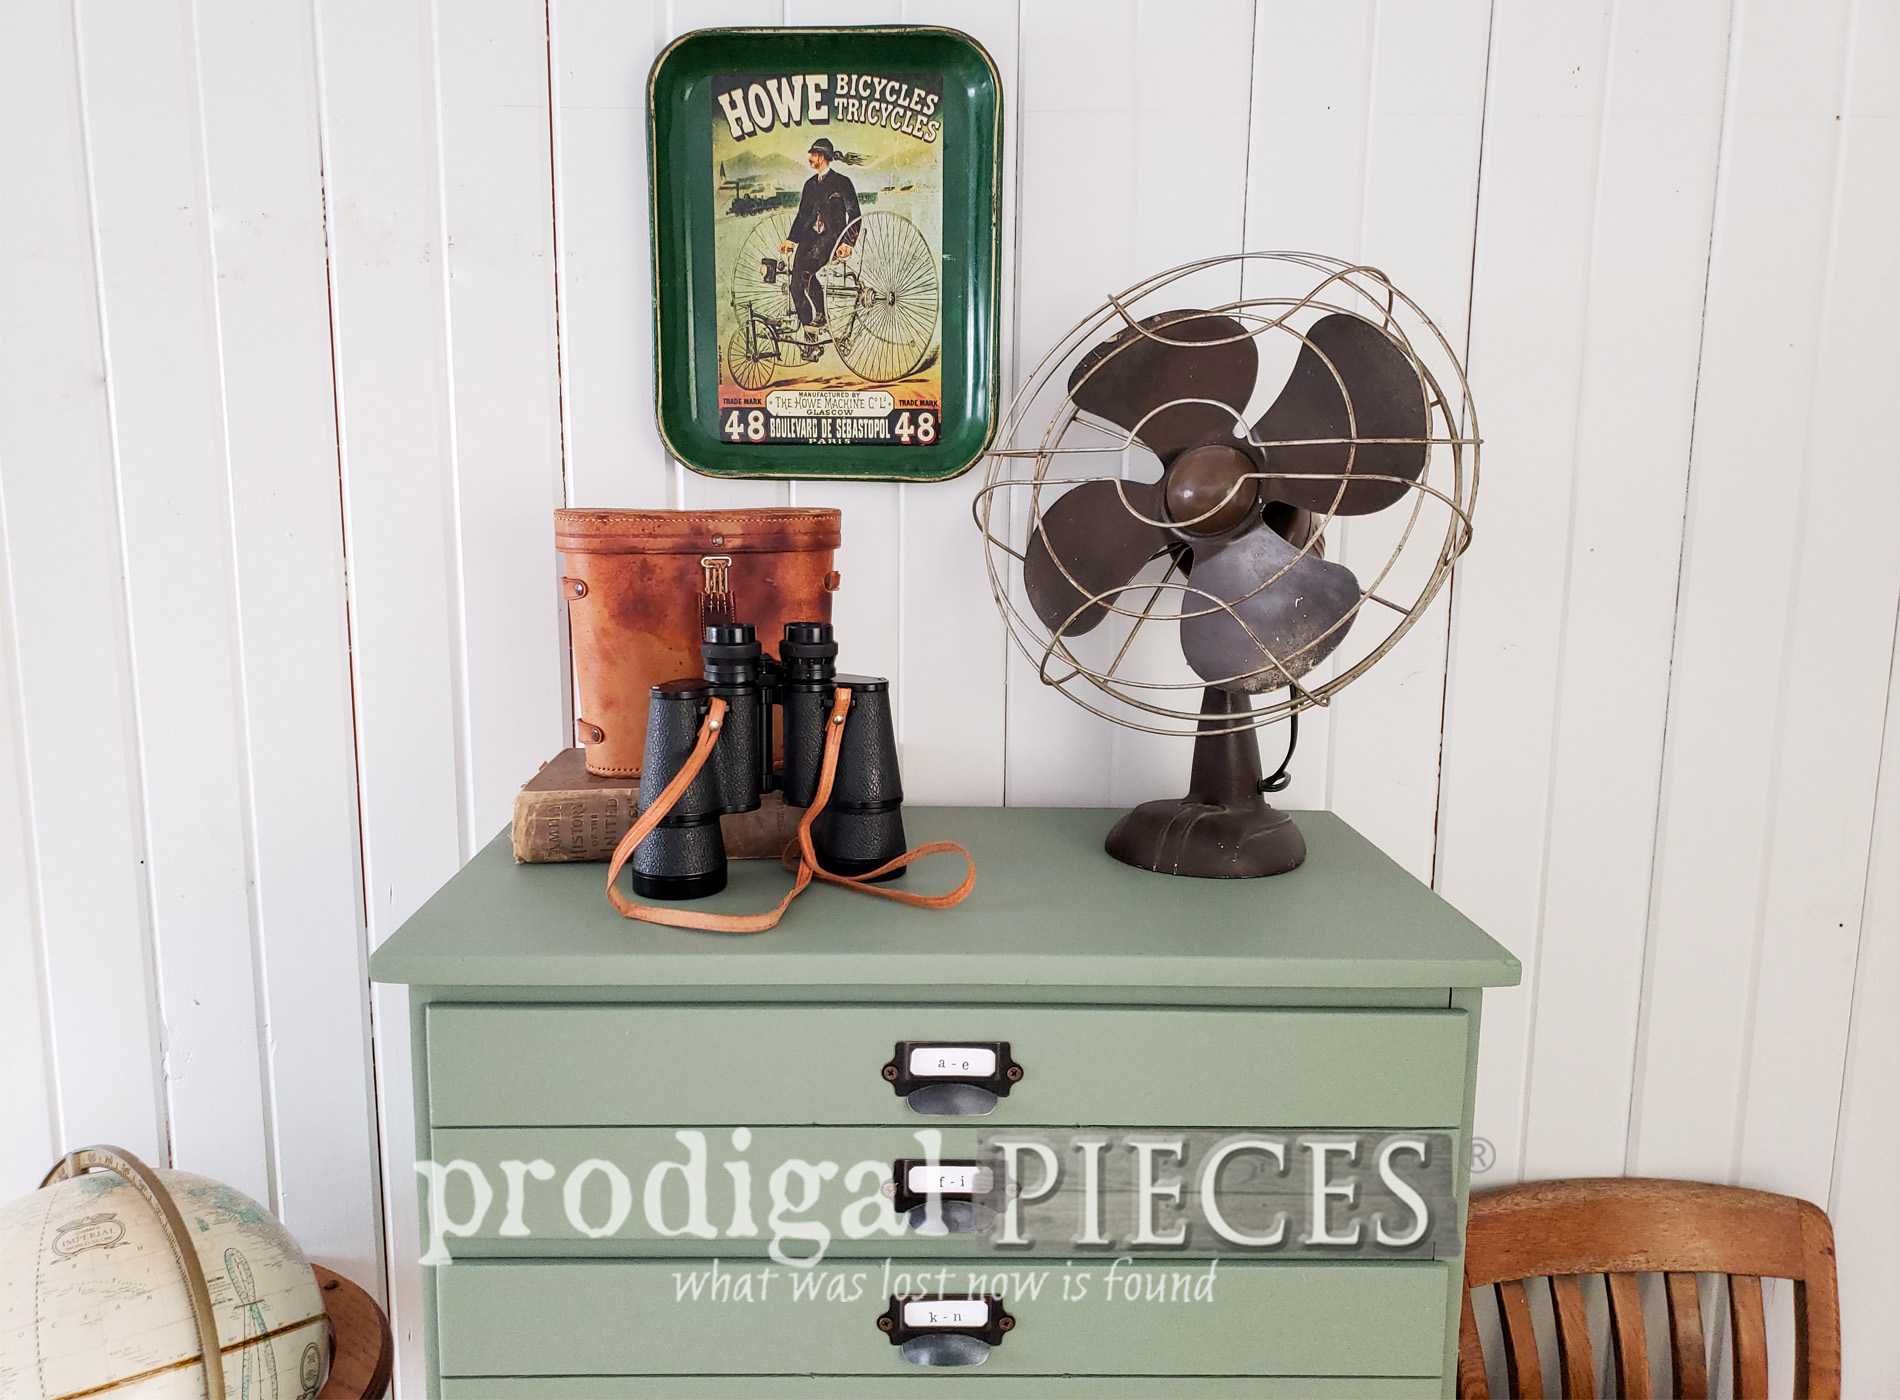
Last, when my paint is cured, I added apothecary label hardware and the hairpin legs I prepare the chest of drawers for. Meet my new upcycled map chest complete with a fun style.
 This little gem is no longer meant to be stuck in a closet but is ready to shine. Isn't it fun?

 What is the icing on the cake for me is that when JC (aka. husband) came home he was puzzled at how I got all those drawers in there. I got this done in a day and he was floored. Yeah, baby! {{fist pump action}}


 I even painted and lined the drawers for added peek-a-boo fun. A girl's gotta finish all the details, right? Even the apothecary pulls have alphabetic and continental labels.

 I do believe this chest is thanking me. haha. If you'd love to own this upcycled map cabinet, you can find it and much more available in my online shop.


SHARE
In addition, pin and share this fun upcycled map cabinet project to inspire others too. Up next, this pink bin is going to be relieved of its pinkness and get a whole lotta fun. hee hee. See the new look HERE.
 To get these DIY tips & tricks in your inbox, be sure to sign up for my newsletter. Until next time!

While you're at it, here are more projects like this upcycled map cabinet:

