It's a common endeavor of mom's across the world to find ways to add storage to their home, don't you think? We love to be organized or at least have the appearance of such a goal. Having cute storage makes it even more fun. This pink bin may be a tad too cute. ahem. In order to free it from its Pepto Bismol state, I'm giving it a DIY makeover into some farmhouse bathroom storage.

First of all, bins are super handy, portable, and can hide our daily-grind necessities. I just may not want a bright pink bin in my bathroom. To remedy that, I begin by wiping down the surface with either a vinegar wash or rubbing alcohol. That preps this already painted piece so that I can paint.
Yes, PAINT. We love paint, don't we? It can make a world of a difference in a few strokes. However, before I begin to paint, I also wanted to give this bin a little more stature. I dug into my stash and pulled out these four drawer knobs. They make great feet and are easy to add on. Oh, and I've created a video tutorial for you below for those that like more of a visual.

DIY FIX
Just use a bit of wood glue and let cure for a bit. It's at this point I begin to giggle and call my kids into the room to see what looked to me like a pig gone belly up. ahahahaha!!

Okay, now before you think I've lost it...ahem. The glue alone will not totally secure the feet, so I use my stapler to anchor them from the inside.

Next, my farmhouse bathroom storage bin is going to get a complete facelift. I take it out and use my small spray shelter and turn table, along with two coats of a flat black paint. Just make sure to let the paint cure well between coats.

NEXT STEPS
While my exterior paint is curing, I gave the interior a coat of a light gray.

Once my paint has cured, it's time to create some texture. I've demonstrated in the video how I make my thin strips of low-tack tape. Since they don't sell various widths to my liking, I make my own. tsk.

I wanted a wide plank feel, so I just randomly chose the width. My goal is rustic, so exact spacing is not required.
Now for the fun part. If you missed my
Winnie the Pooh play table makeover, it's a must see to see how this graining tool works for stain too. I paint on my white paint first using my paint brush.

FAUX GRAIN FUN
Then, working quickly while the paint is still wet, I grab my graining tool. The key is to rock it back and forth while dragging it across the bin. The video shows the best demonstration for this.

It's best to work one direction, then flip the head of the tool and go the opposite direction to get the most realistic turnout. As soon as I make my passes on this side, I use the other tool with teeth to drag in a wiggly sort of way to make it look like my wood grain has aged and pulled open.

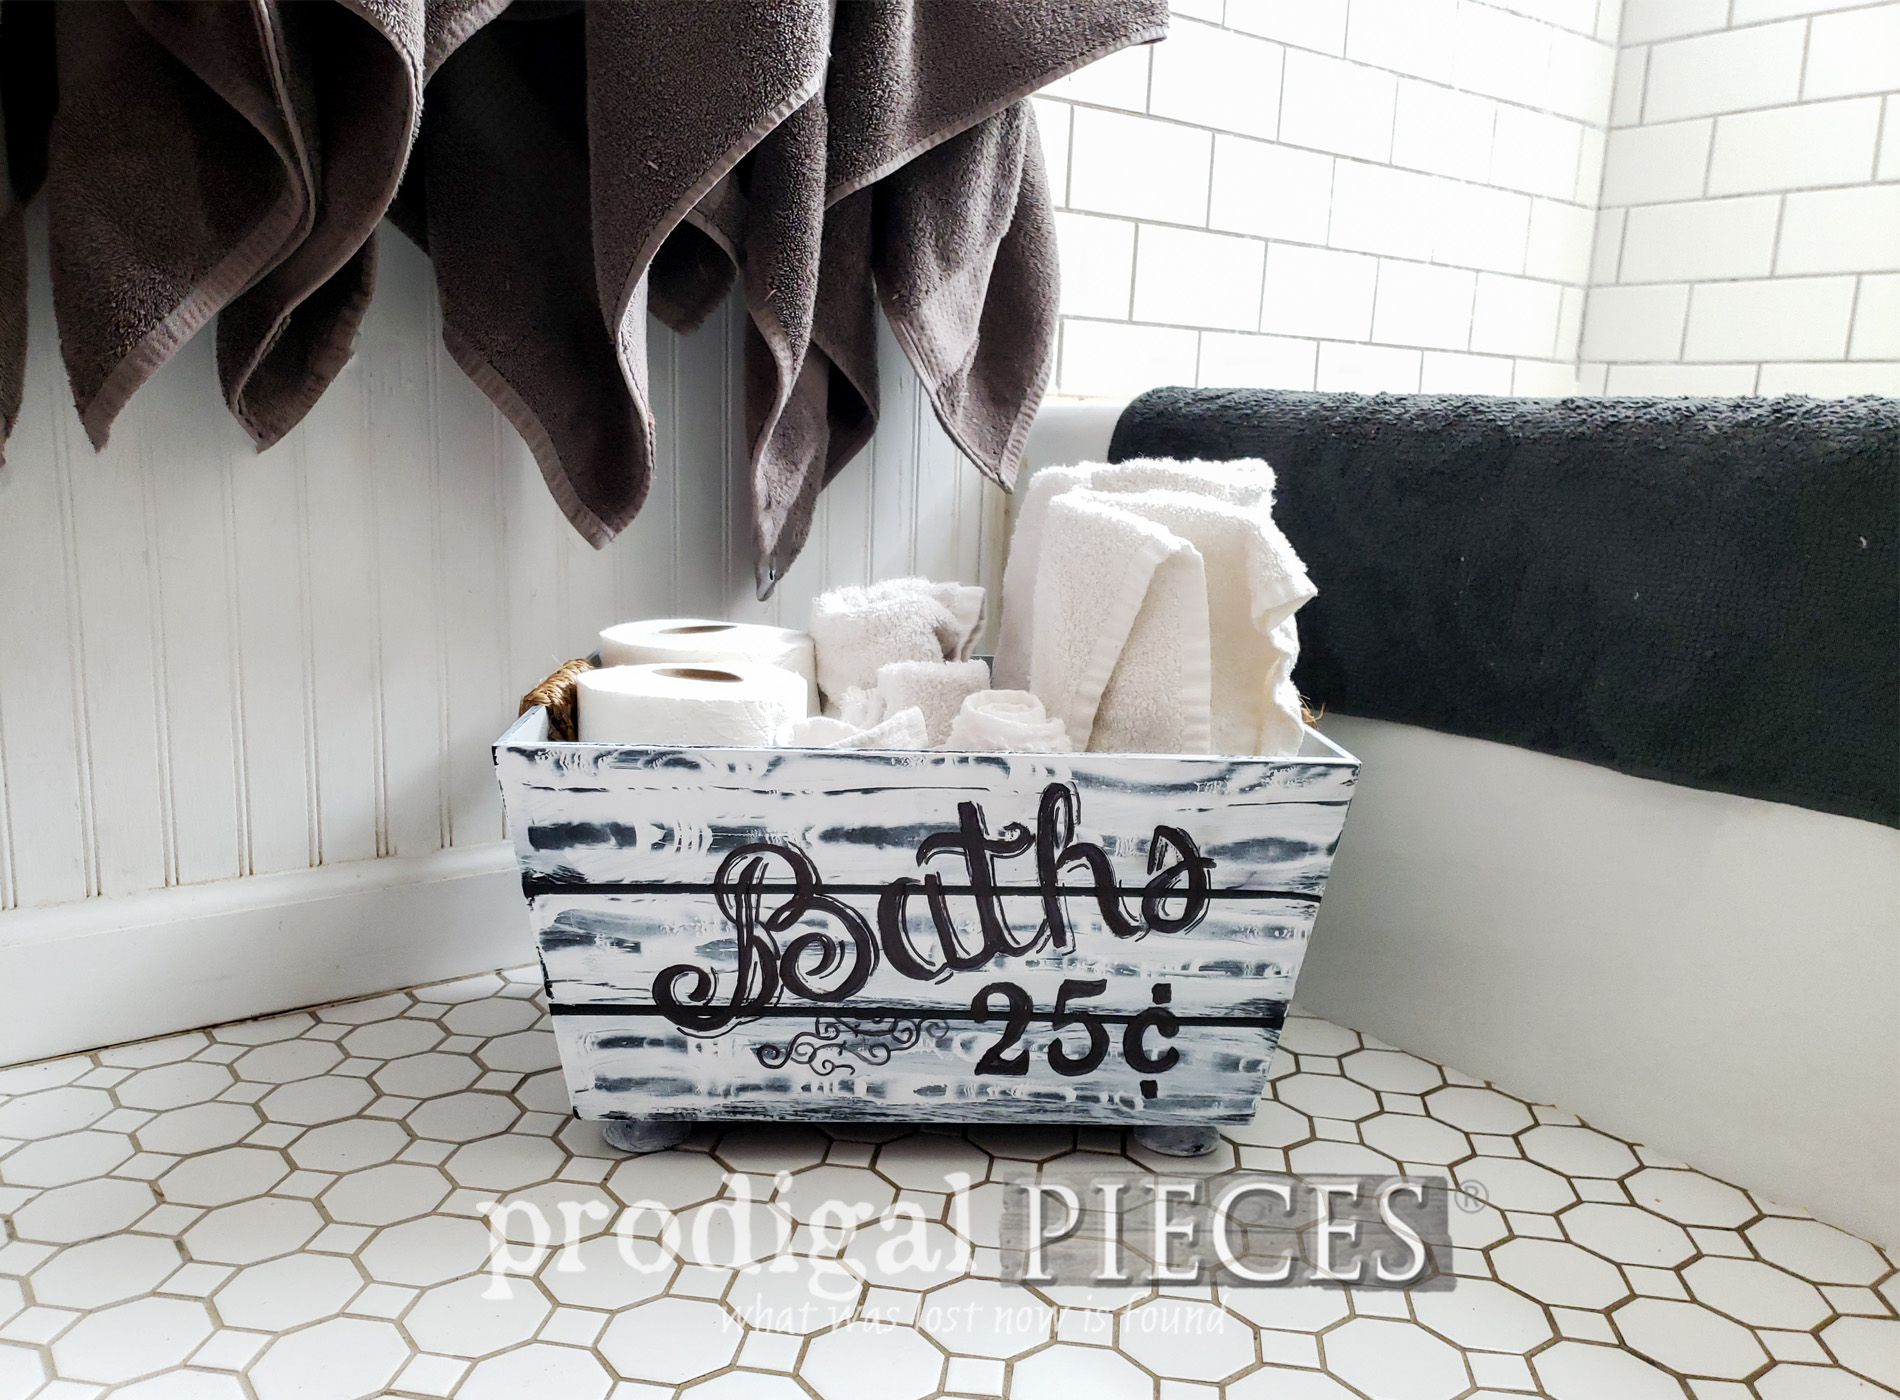
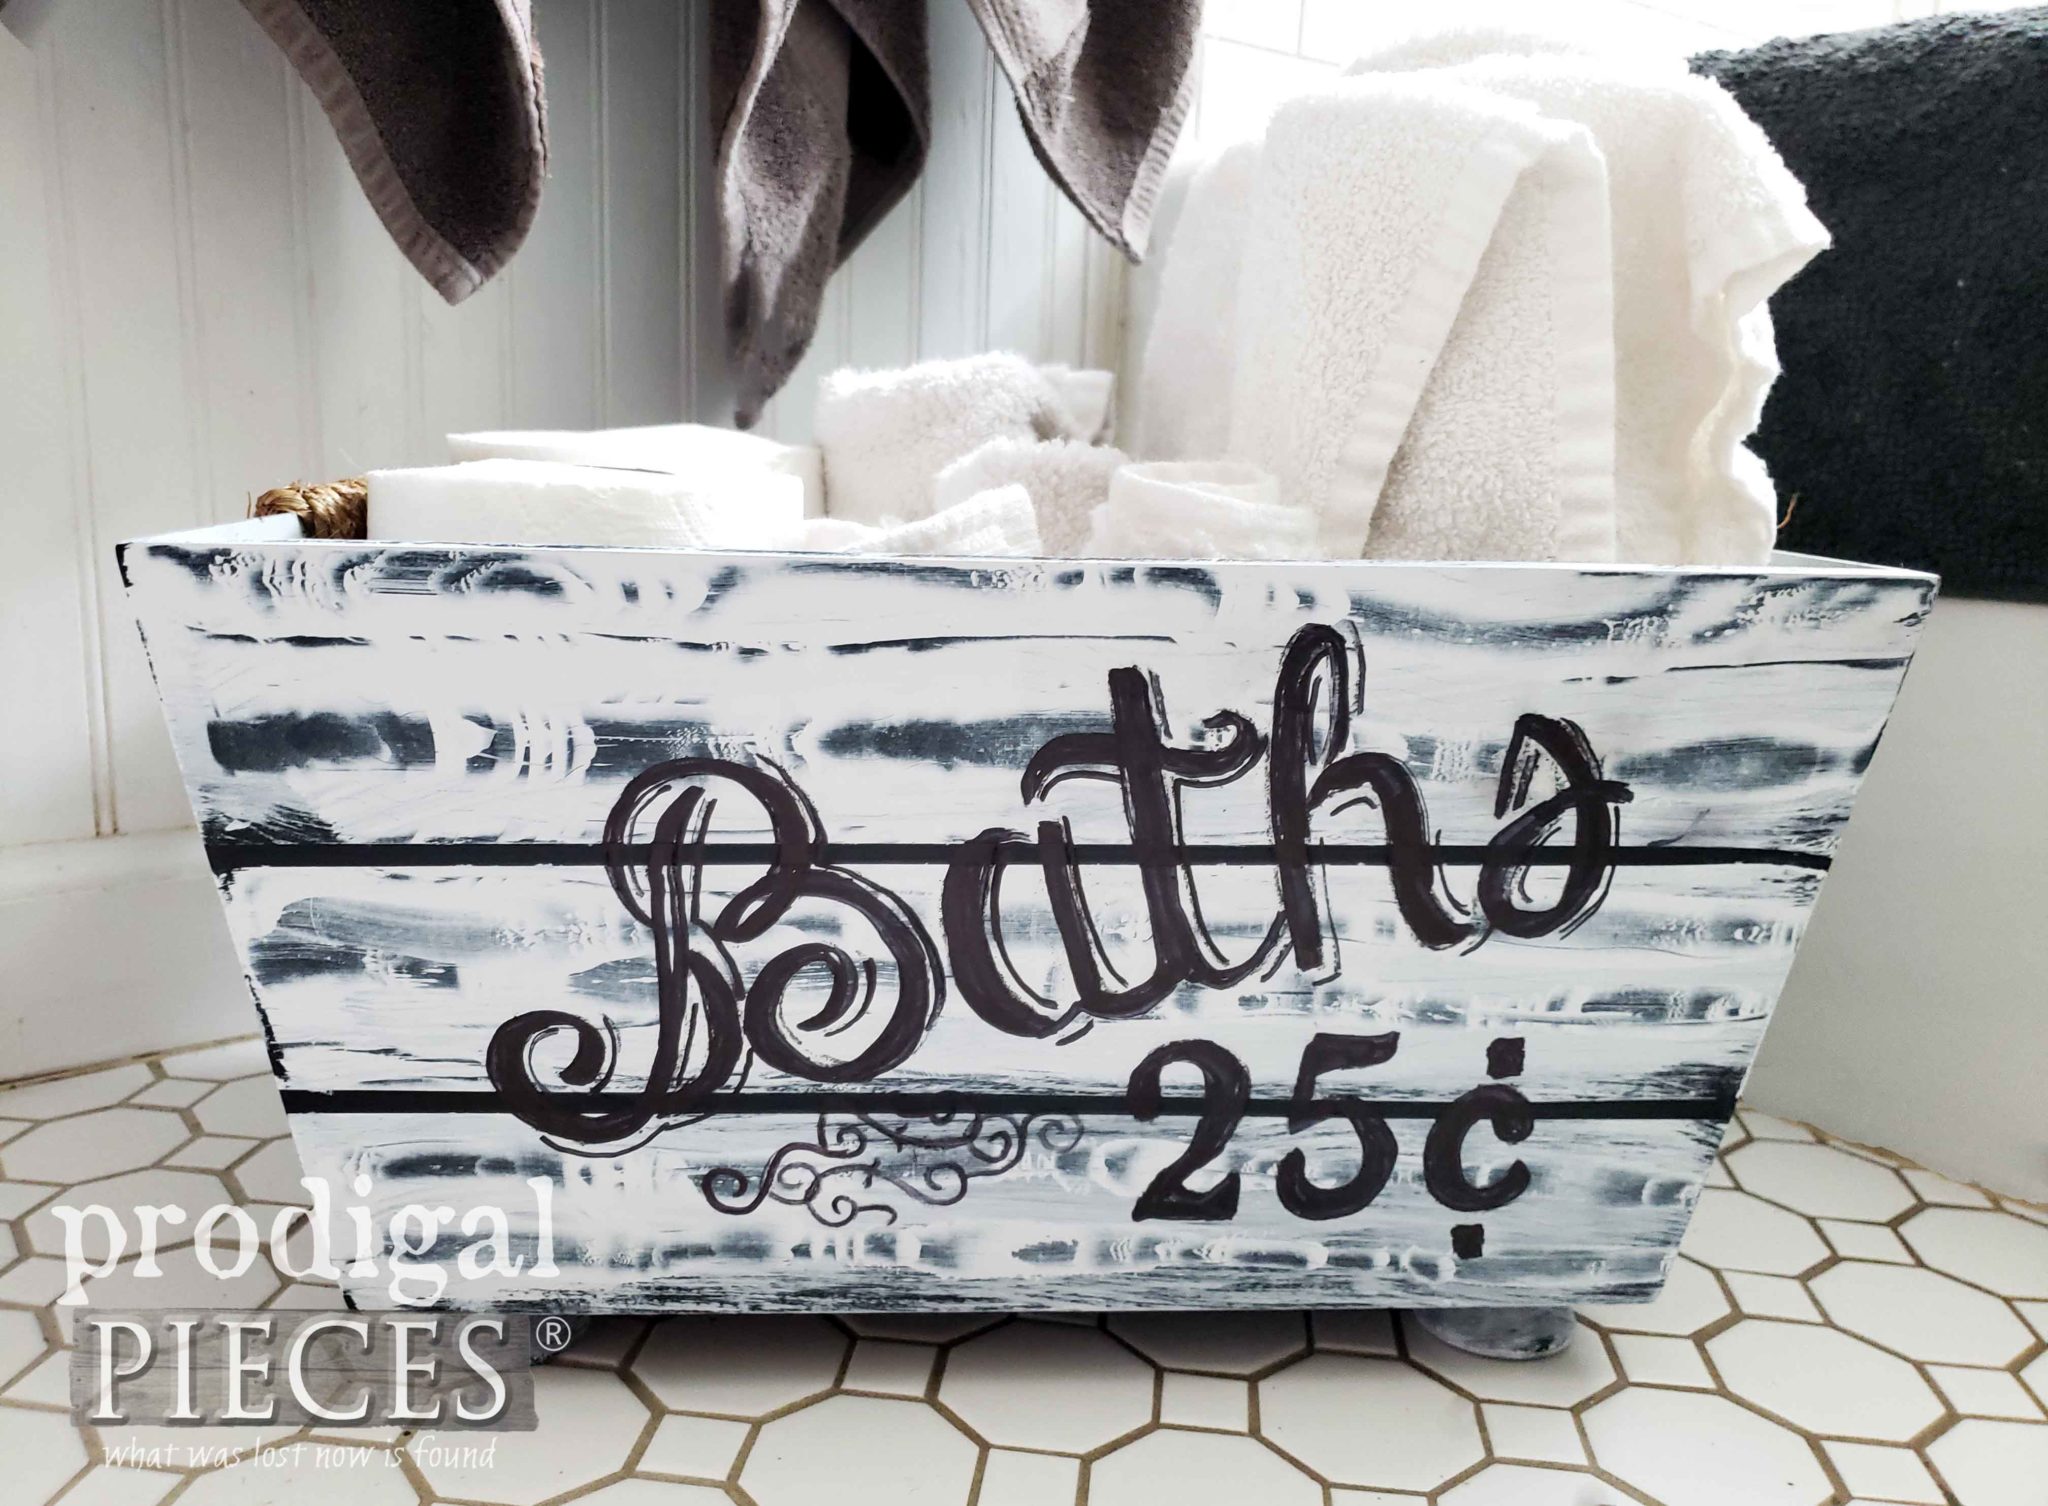
I tell ya, this tool set is so fun! Then, while the faux wood is curing, I create a graphic to apply to the side of my farmhouse bathroom storage bin. I used the same graphic as the one I used to create wall art in my bathroom. Keep in mind, at this point you can use this bin for any room in your home. You could create any text or even just leave it at faux wood. I'm a typography addict, so you know I had to.
TYPOGRAPHY
I use
my transfer method to get my design prepped.

Once it's ready, I tape it on and use a colored pencil to trace the design.

After that, I use my large and medium Sharpie markers to fill in the design. I do like to hand-paint most often. However, for the sake of keeping this simple, I chose the markers. You can see how I've used Sharpies on past projects
HERE.

Last, but not least, I added a bit of sisal rope to the handles with my hot glue gun. It creates a bit of texture and breaks up the black and white color scheme.


ALL DONE
Now our farmhouse storage bin is done and ready to work.


We said so long PINK and hello fun farmhouse. Do you love it too?


I got such a kick out of the fact that my daughter was just sitting talking to me and saw the bin. She asked a few questions then her jaw dropped when she realized there wasn't slats on it. haha... Win for mama!

While I would love to keep this for my bathroom, I already have an old freezer locker for my TP storage, so this is now available in
my online shop.

So tell me...would you have kept the pink? Or would you have done something completely different? Either way, I hope you are inspired and that you had fun reading about my crazy adventures.
SHARE
Do pin and share my farmhouse bathroom storage idea. I know I'm not the only one that loves cute storage!


Up next, it's
Trash to Treasure Tuesday and I'll be sharing what I do with this. Any guesses?
Take a peek at the new look HERE.

To get these DIY tips & tricks in your inbox, be sure to
sign up for my newsletter. PLUS, you will get your FREE Furniture Buying Checklist and special discount to
my shop. Until next time!
 More projects like this farmhouse bathroom storage: