'Tis the season for finding good junk for not only cheap, but free! Spring is the time when people, like me, are ready to clean house and de-junkify their homes. Thrift stores start to bulge at the seams from the garage sale leftovers and curbs showcase
trashure to be had. Such a fun time! These two pieces below may not look like a match made in heaven, but they will become upcycled farmhouse decor. Stay with me now. tee hee.

What you see on the left is a piece I picked up at the thrift store and had no idea what it was. It seemed to me to be a part of a piece of furniture, like an Adirondack chair. While the piece on the right was from our city spring clean-up
I mentioned before, and is a broken floor lamp. So, I have to ask...would you have picked them up?
DIY TIME
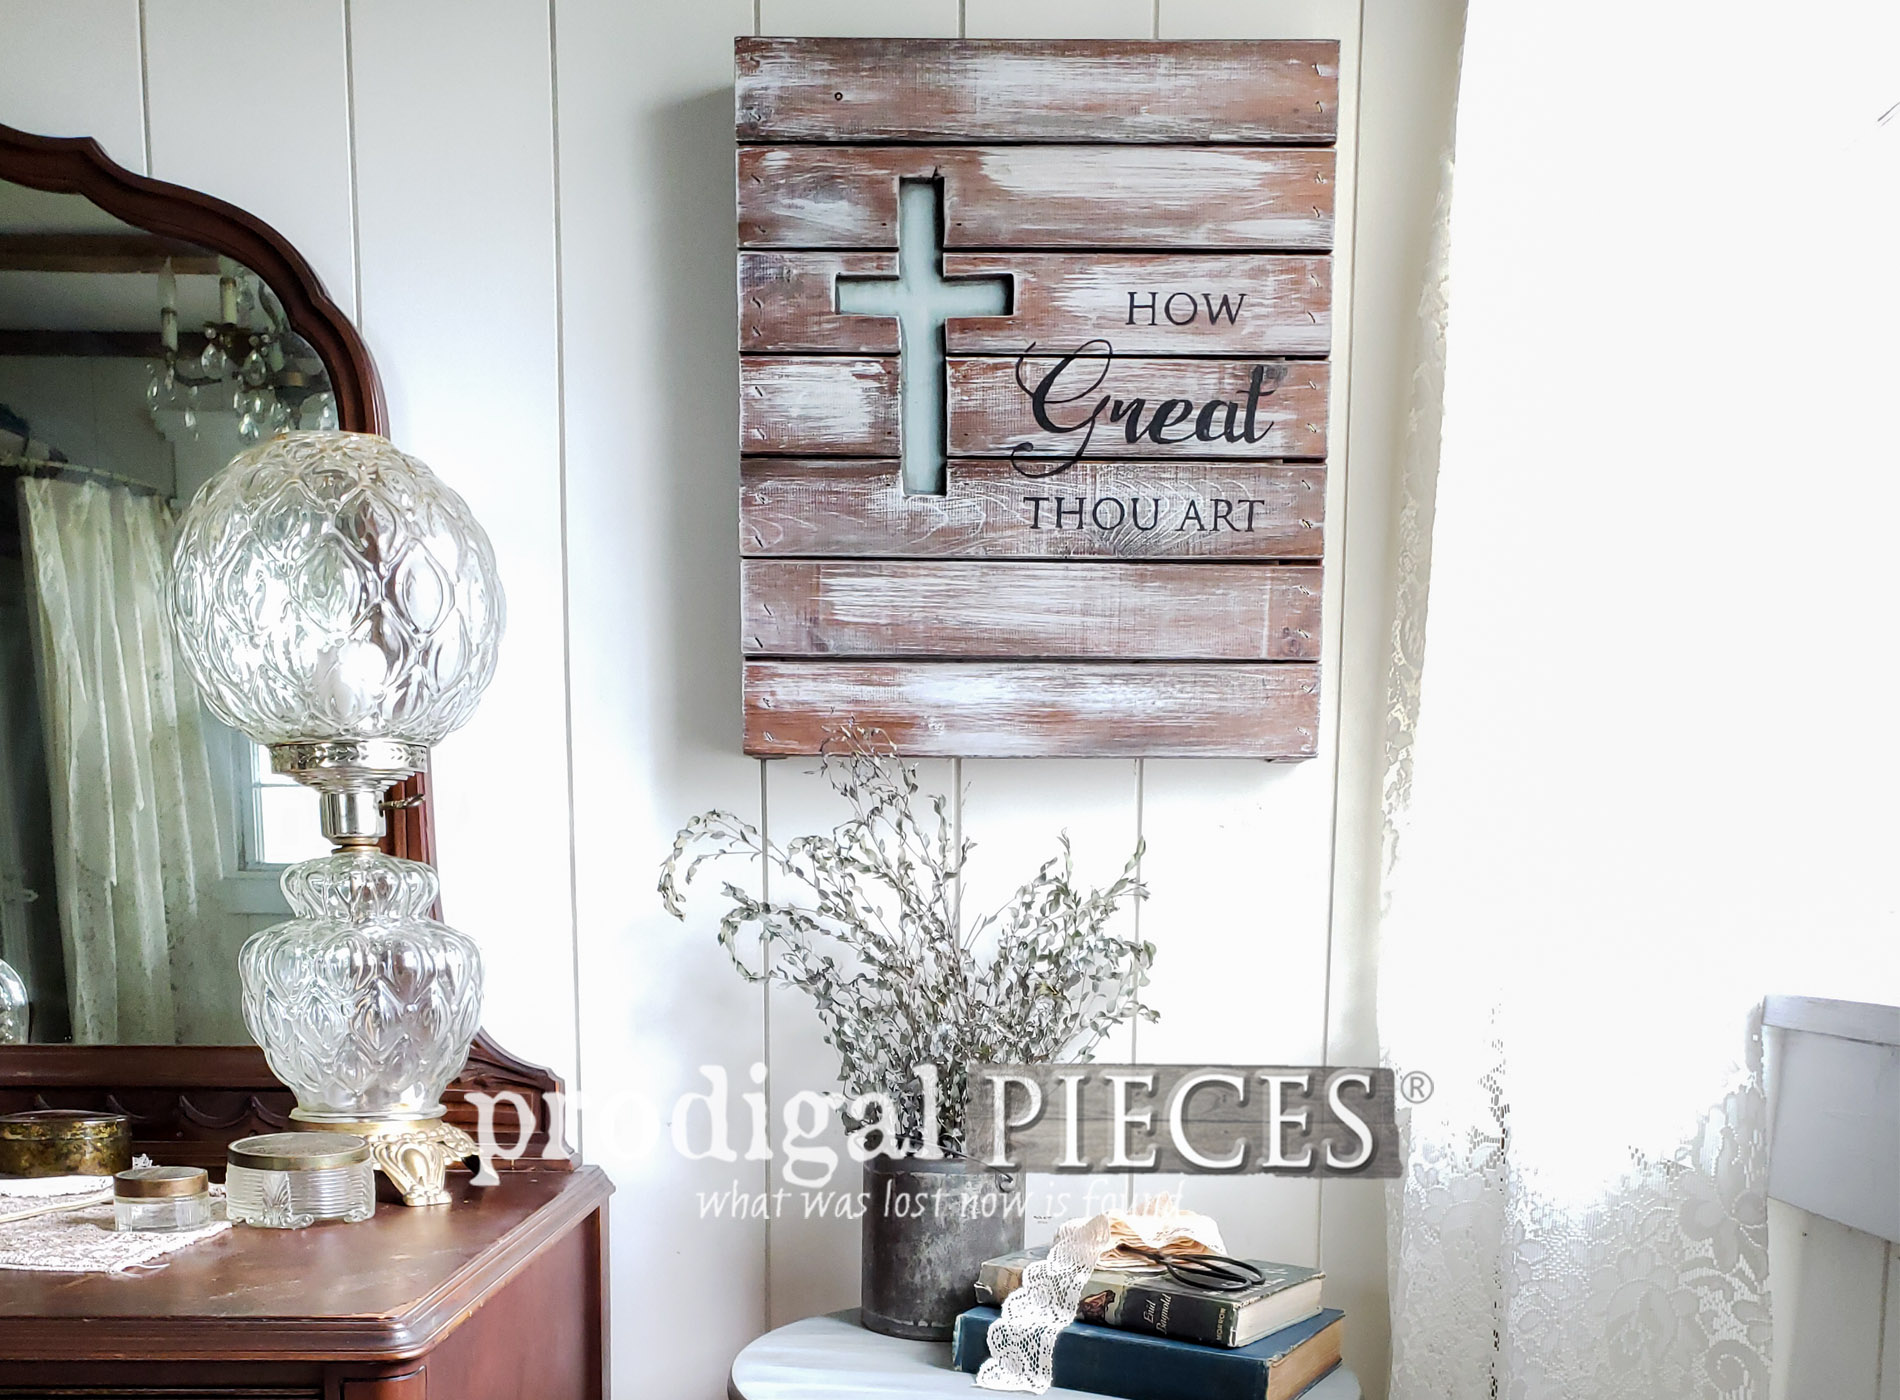
The pallet looking piece was what I chose to start with. I liked the simple lines of it and it looked perfect for creating wall art. The slats were attached to two arched pieces that had jutted out ends where it used to connect to something.

To remedy that, the first order of business is to break out my jigsaw and cut them square. No problemo. After I cut the ends off, I supported the pallet piece with a few scrap pieces of wood from underneath and cut out a shape.

My goal was to create a cutout and attach a piece of 1 x 6 wood to attach from behind. Before doing that, I re-stained the pallet piece to deepen the color and make everything look unified since my cuts were fresh. After that, I did a dry brush of white paint and also painted the 1 x 6 piece I would attach in my cutout with a fun color called Vintage.
Once all was cured, I attached the 1 x 6 using my nailer and nailing from the front. Then for a bit of fun, I created a design and hand-painted it on my pallet piece. You can see my DIY method for transferring images
HERE in this tutorial.

I will show you what the finished upcycled farmhouse decor looks like in a bit. But before I do that I'd like to talk about the broken floor lamp and how it got a new life too. Since it looked like a pedestal table base, it made sense to me to add a tabletop and create a plant stand.
NEXT STEPS
These simple rounds come in various sizes, and they make for all sort of fun uses. I used a giant one to make
my DIY pallet table as seen here. However, for this one I went with this size round. To stabilize the top, I also used another piece of that 1 x 6 board I cut for the pallet piece.

I found center on the 1 x 6 square and used my drill and forstner bit to make a hole the same diameter as the dowel sticking up from the lamp base. Next, I attached the 1 x 6 to the center of the wood round with screws in each corner. I again, used my drill and bit to make another hole in the wood round using my 1 x 6 centered hole as a guide and setting the depth accordingly.
BRING ON THE PAINT
Once all was dry fit and ready to go, I used my wood glue and put it on the lamp base.
note: Sorry for not having more pics. I was having too much fun! woot!
Now, because I was combining different wood species and new with old wood, I chose to use the same Vintage paint to give it two coats with my Round Brush. You can see how I've used this color paint
in these past posts too.

After the paint had cured, it was time to apply a gray wax.

THE REVEAL
Okay...are you ready to see these two pieces of upcycled farmhouse decor in the final state? I am!

Now we have some sweet pieces that can be used in any room of the home. Isn't it fun to think outside the obvious and make new?

I enjoyed creating both of these pieces, but my favorite is the wall art. The entire time I'm creating this piece, I was singing and praising my Lord with this favorite hymn of mine. The day I was creating these things, I had many tears flowing as things all over the place were going wrong, but...I chose to praise and be thankful that things weren't worse. It truly brought me out of my slump that I could have allowed myself to sink deeply into.


The table came out as I had envisioned and that makes a person happy, ya know? It suits to fill any spot in the home making a sweet statement.


If you'd like to own either of these pieces, you can find them available in
my online store. Also, stop by to see what else is new!


Additionally, do pin and share this fun take on upcycled farmhouse decor. Ya never know what you may find that on the curb, at a garage sale, or at the thrift store that will inspire you!

Up next, I'll be FINALLY getting to the last of my curbside door. You can see what the other pieces became:
see the screen here and
the door here. I can't wait to show you the glass insert!
Head HERE.
 | Prodigal Pieces | prodigalpieces.com")
Before you go, be sure to
sign up for my newsletter. Until next time!

 PINTEREST | EMAIL
Also, more projects like this upcycled farmhouse decor for fun: