Seasons change and so does our decor along with it, right? One could easily take a shopping cart and head to the nearest box store and fill up with what's in stock. However, I love the challenge of creating my own decor from unwanteds, thrifted finds, and incorporating natural elements. To share with you how my mind's eye works, I'm going to demonstrate what I did with this upcycled cheese dome and a few other cast offs. Let's have some crafty fun!

What you're looking at is the aforementioned cheese dome, a large candle pillar, a broken leaf rake handle, and an empty mint tin. Now, before you think I've fallen off my proverbial rocker, hang with me. I'm looking to create a whimsical centerpiece for my fall tablescape and this loot is gonna help me do it. {{fist pump}}
CRAFTY TIME
First, I yank the lid off that mint tin and spray paint the bottom with a fun red paint color and let cure. Do you see a little red wagon forming?

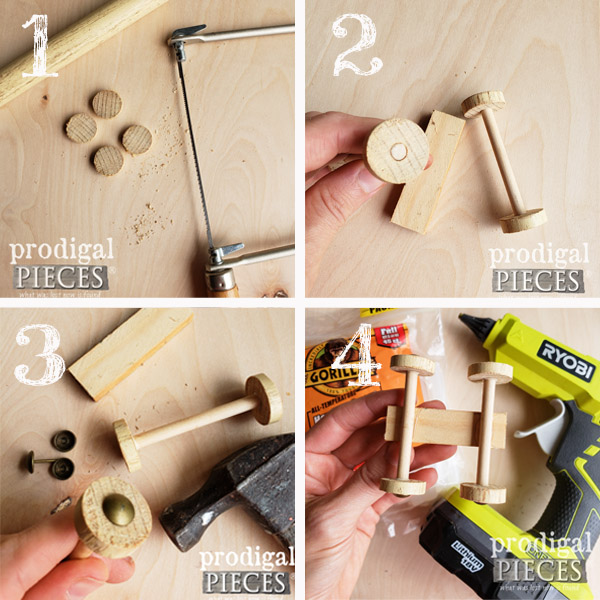
Meanwhile, while I'm waiting on the paint, I begin to assemble the base of my wagon.
TERMS OF USE: when you build these wagon and pumpkins, you agree to the following: it cannot be shared or distributed for monetary gain in any way, it may not be modified in any way, and you may not claim the work as your own.
- Use a coping saw to cut wheels from the rake handle.
- Use a coping saw to cut dowel axles, and a drill to make center holes. Add wood glue to wheels and let dry.
- Tap in upholstery tacks to make wheel hubs.
- Use battery-operated glue gun and glue sticks to assemble axle to chassis. These glue sticks are the best! Set the chassis aside until later.
Once my little chassis setup was cured, I chose a couple of different spray paints to make an aged layer look.
NEXT STEPS
Afterward, I began to assemble my upcycled cheese dome cloche. Simply use the hot glue and attach the large candle pillar to the bottom of the cheese dome base as shown.

In addition, to get a feel for the look I'm after, you can see my process
in this post.
Next, it's time to flip it over and make it look cohesive using this soft brown spray paint. Isn't it a pretty color? It makes the perfect neutral base. To begin, I clean the base and wipe down the gold pedestal with rubbing alcohol to remove any residue.

I set up my turntable and give it two coats of paint, letting it cure in between. Once all is ready, I use this a whitewash to give it a glazed look. It helps add texture and dimension I'm after.

Last, I brushed it on with my paint brush and the gently wiped off any excess with a soft cloth. In the meantime, while it's drying it's time for more crafty fun. Yeehaw!
CREATIVE FUN
Does anyone else have a strong affinity for Sculpey? In particular, my kids and I are sure addicts and love to use to create most anything. We typically buy this sampler pack of colors, but I also couldn't resist this beautiful color called Tranquility. Big surprise it's aqua...right? tee hee.

Since we're going for an autumn vibe today, I'm all about making mini pumpkins for my mini wagon we're assembling up above. Likewise, if you want to make some too, just roll up a small ball until soft and malleable. Next, press a small indentation in the top, and then use a toothpick to run down the sides creating those yummy pumpkin creases.

I chose to use the Sculpey colors for pumpkins, gourds, and stems: translucent, sweet potato, tranquility, dark brown, jewelry gold, and leaf green. Making gourds are fun too! Last, simply add a stem when your pumpkins are made and bake following the instructions on the packaging.
THE REVEAL
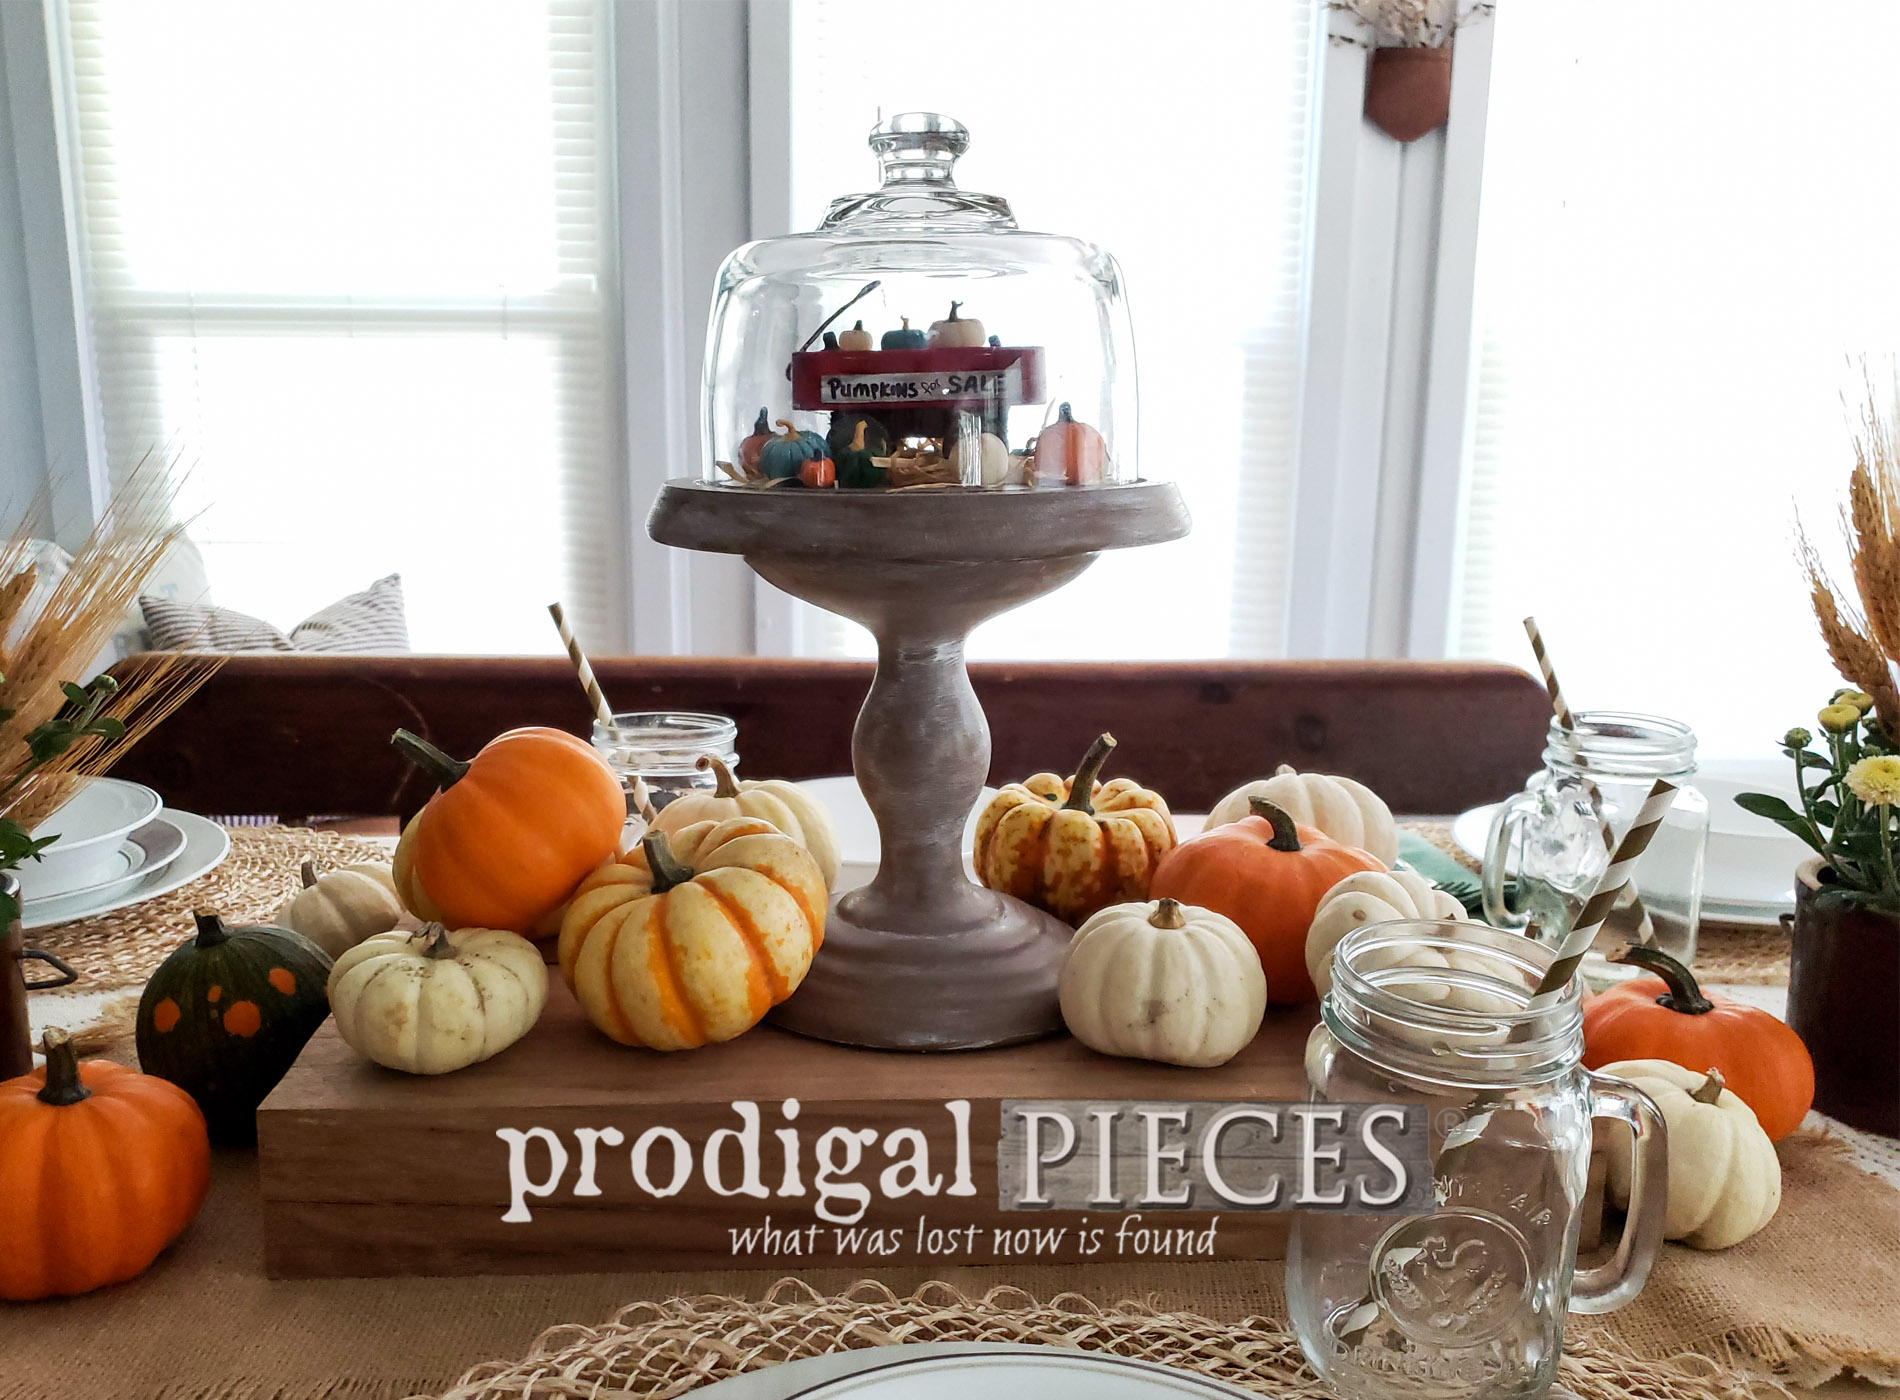
Once all your pieces are painted, baked, glued and ready to go, it's time to assemble it all. Are you ready to see my fall tablescape fun?


Oh what fun I had creating this upcycled cheese dome into a multi-purpose cloche. The best part is that it doesn't have to be filled just for fall. I can use it in my kitchen decor, any holiday or season, or even in the bathroom or bedroom as a touch of whimsy. What would you fill it with? I'm thinking a nest, mini books, music pages and a tiny collection. So many ideas!

Meanwhile, take a peek at what's under the cloche...


In addition, my little wagon got a bit of wax, a handle made from an old wire hanger, and a couple of Popsicle sticks made into tiny signs. eep! I love it! Even my tiny pumpkins got a bit of wax for depth too.
Just for fun, I even made a mini hay bale using raffia. Of course, I couldn't resist layering bit on the bottom of the cloche.


My tablescape includes a runner made from a vintage tablecloth cut lengthwise, a burlap runner layered on top with a piece of scrap from our kitchen countertops (reclaimed hickory) as a base. In addition, I have natural abaca placemats under my plate setting, the same as I offer in
my shop. My antique canning crocks are filled with wheat and chrysanthemums.


FALL DECOR
All in all, it's extremely fun for me to create decor using my imagination and what's at hand. Also, I'd love to hear some of your favorite decor tricks and stories.


While we are fast approaching the turning of summer to fall (my favorite season), I hope you find joy wherever you are. Likewise, it truly is a wonderful time of harvest, the earth taking a rest, and time to rest ourselves too.

Well, I hope you are inspired to give your own decor a big DIY try. Invite others to join you in your adventure - make it a group thing!

Likewise, if you'd like to purchase my upcycled cheese dome cloche, you can find it and my other handmade goodies in
my online store.

SHARE
Additionally, pin and share my upcycled cheese dome creation to inspire others to try too. Thanks for joining me in my fun!

Up next, this pile of "would be trash" (aka.
trashure) will be getting a whole new life.
See their new life HERE.

Before you go, be sure to
sign up for my newsletter. Until next time!

 PINTEREST | EMAIL
Meanwhile, more fun DIY projects like my upcycled cheese dome: