 Since I am really puzzled why it is still there, I gave it a good look before I decided to claim it. All I saw was missing hardware and some cracks in the frame. But that didn't phase me. (little does, right? hee hee hee) How could I? Just look at those spindles, and it's already naturally distressed!

DIY TIME
First order of business was to dig into my hardware stash and find some replacements. Thankfully, I had just what I needed, but had to cut them shorter with my Dremel. Next, I used my wood glue and clamps to repair the busted slats that held the sides together. Easy-peasy.
After that, I dug into my wood stash to find the bits and pieces to create a potting bench, Yep. I totally saw a potting bench when I picked this thing up.

Those tall oak boards have been in my stash for quite some time, since back when we built our kids our mud bar. This was from the part of the story when I was racing to beat the trash truck to get them in. It's a good read over HERE. I have used them for various items, like my custom signs and such for my shop and this DIY coat rack. But today they are finding their ultimate purpose for my repurposed changing table turned potting bench.
NEXT STEPS
Before I get to the boards, first let me show you what I did to the changing table to beef it up for its new purpose. I used my miter saw to cut pieces to length, and then used my Kreg Jig to make pocket hole screws to attach those cross pieces. The top already has a support, so I just cut a few side supports for reinforcement. I predrilled the slats so I could attach the boards later.

Okay, now back to those gorgeous oak boards. First order of business was to cut them to length. I used my miter saw, but I also wanted to show you how easy it can be with my little circular saw.

I know not everyone has the bigger tools. However, this job is easy with fun ones like this one. This little gem whips right through all the boards I cut and battery is still going strong. woot, woot!
ASSEMBLY
Though I'm cutting the boards to length, they are dirty, warping, and twisting. But, it's nothing that our bench-top planer couldn't handle. JC helps me run them through a few passes to get the job done quickly.

After the planer it was time for me to hit them with my sander to finish them off. We're almost there!
Last was to install the boards by attaching them with my drill from the bottom up. Then add a few coats of a matte poly to give them a nice topcoat. I love that stuff for a nice finish that doesn't diminish the rustic look. You can see what other pieces I've used it on in these posts.
THE REVEAL
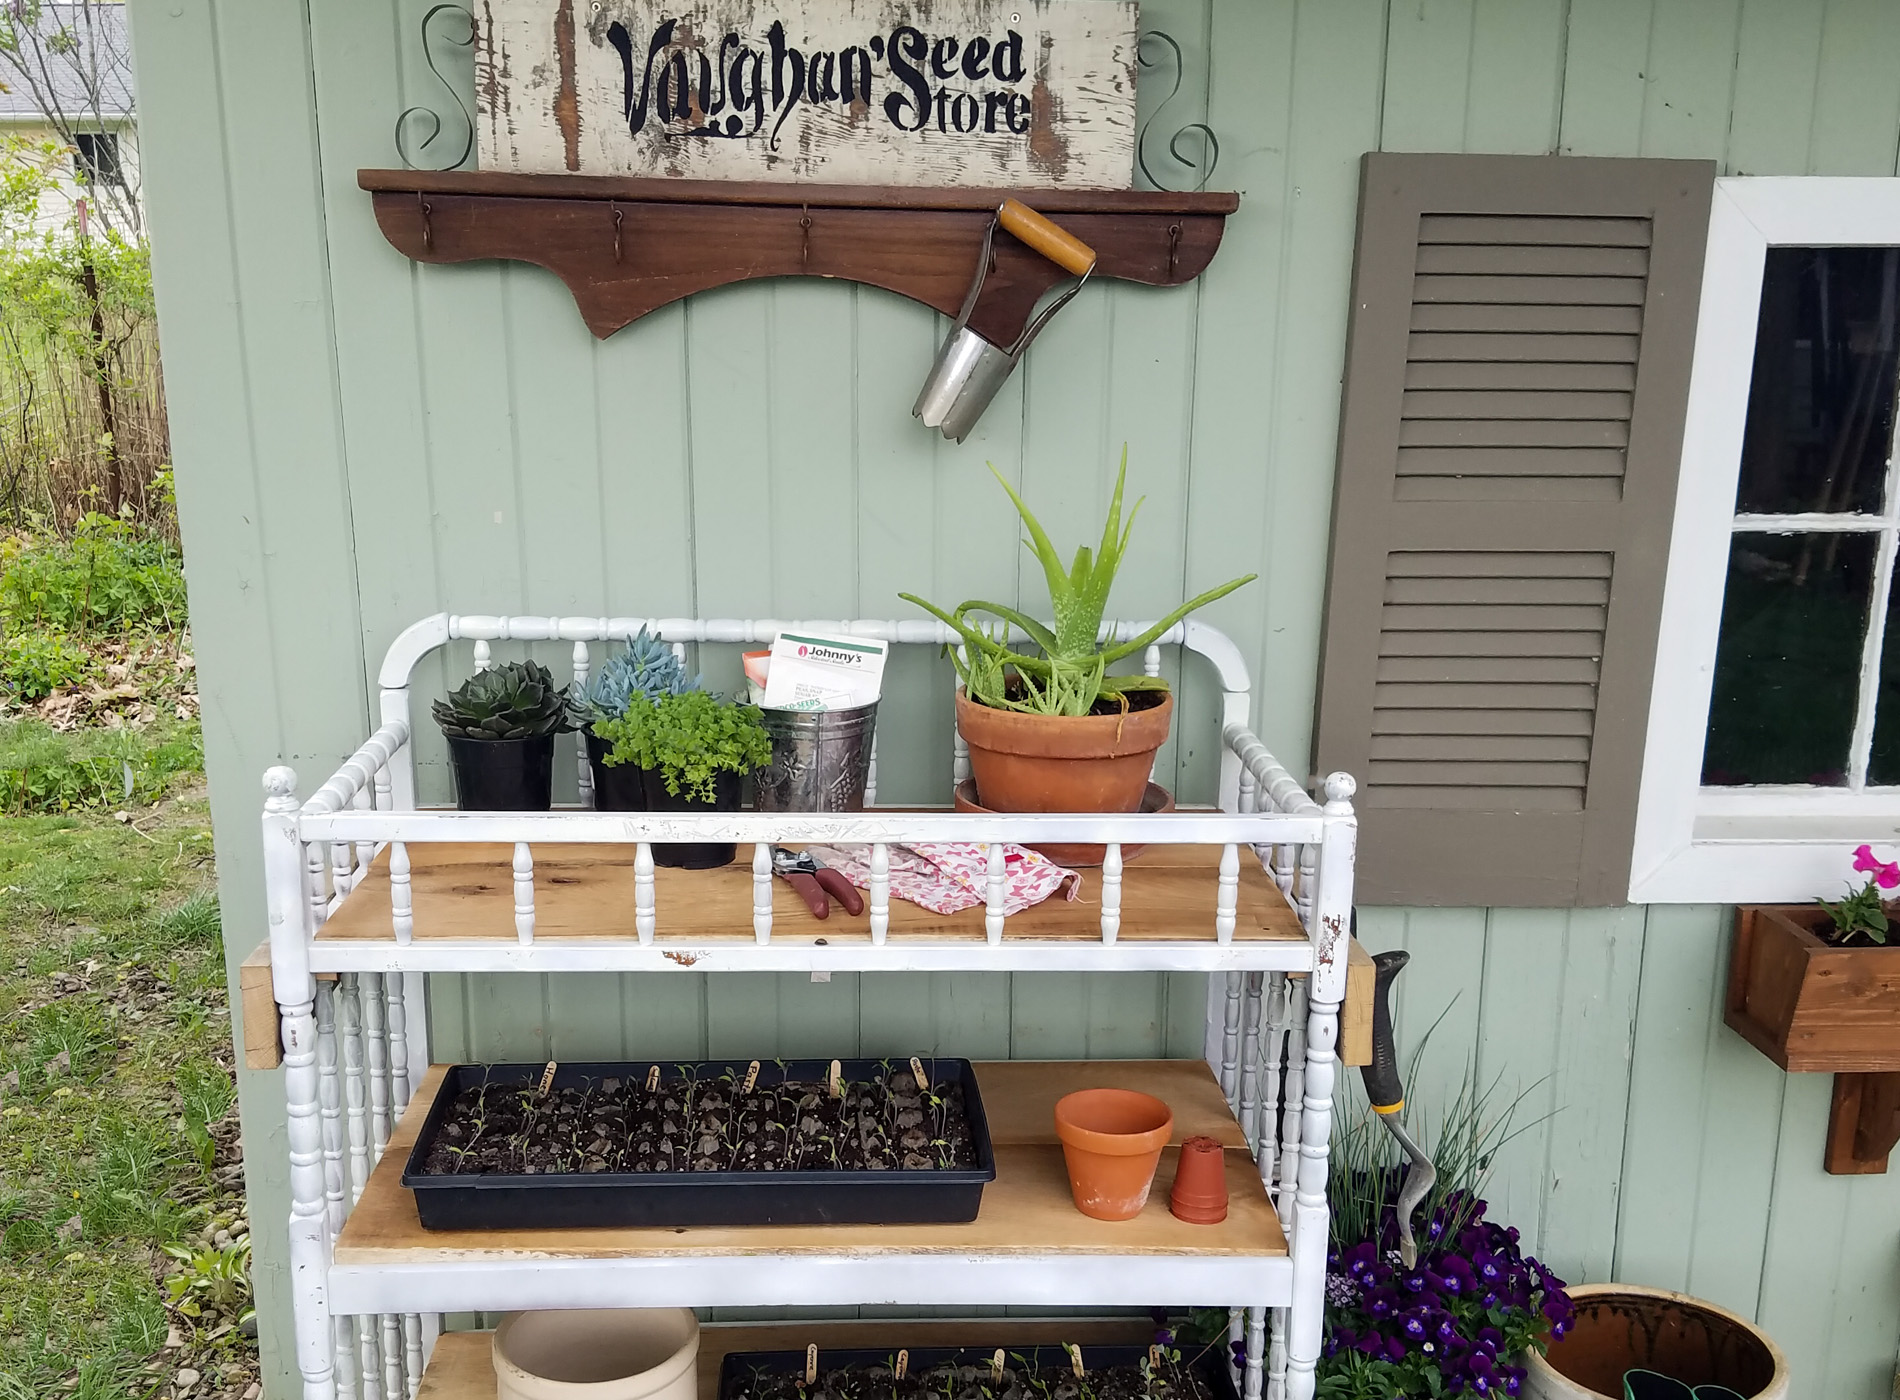
Ready to see it completed? Here is my repurposed changing table turned potting bench.


It looks perfect on my shed, don't you think? The addition of the oak boards really made this thing solid and just perfect for getting ready for the gardening season. I'm keeping it, otherwise you can find it in my shop.
[metaslider id=30251]

Gardening is my therapy and I dive in each spring to not only my vegetable garden, but also love to tinker with my indoor plants. Succulents are by far one of my favorites all year long. How about you?

MORE FUN
It was a couple of years ago I made that seed sign from repurposed materials. I share all in this post. It's fun to see how things come together. Can you guess the parts?

I even added some tool racks to the side to keep all those garden necessities handy. Gotta have a little bit of rusty nails to give it that time-worn feel. Want to make your own rusty square head nails? I have the tutorial HERE.

So, next time you have a changing table that needs new life, I hope you'll see it in a whole new light. There are so many uses for things like this, we just need to have vision.

I invite you to pin and share this repurposed changing table to inspire others to get their DIY on and create. You never know when someone could use this idea, and you may need it too!

Later on this week I'll be showing you what I did with this set of prints also found curbside. See...I told you I love me some trashure. tsk. {{wink, wink}} See what they look like now...HERE.


More projects like my repurposed changing table:

