 A few years back (too many to count) my husband found these in the trash at his workplace. {{gasp}} We're looking at solid, thick, and gorgeous pine that is waaaay too good to throw away, right?!? I mean, check out that routed edge.
 However, they've sat tucked away in my workshop because I was saving them for a special project for my kids. Unfortunately, the fact that it appears we are not moving to the country anytime before my kids all grow up, so I am giving them up for this new project. Let's get started!
DIY TIME
First, let's have a little history lesson. What is charcuterie? BTW... you can pronounce it with a French accent: shar-koo-ter-y. The original translation of the word means "pork butcher shop" as the first charcuterie boards were filled with curated meats and cheese. However, in modern day they are filled with nuts, fruits, breads, olives. YUM! I'm the kinda gal that says fill it with what you love. Okay, back to our DIY fun. I need to remove that blucky orange finish. I whip out my sander and have at it in the balmy 32° since I have no heat in my workshop...still.
*post sponsored by Wagner (see full disclosure for details)
Anyhoo, it sands up beautifully and I can bring it in to warm up for the next paint pouring fun. If you've never tried your hand at this technique before (like moi...ahem), you're in for a real treat. Paint pouring allows your creative juices to flow. Not only is it a fun kinda messy, but it's also relaxing too. Here's what we need to get our pour on:Tools & Supplies
- Wagner HT400 Craft Kit
- your choice of acrylic paint (either pre-mixed or regular craft paint)
- paint pour medium (only if you're not using pre-mixed paint pour paints)
- paint pour topcoat (optional)
- stir sticks (or popsicle sticks)
- cups for mixing medium and paint
- solid wood board
- feet for board (optional, but fun)
- drill/drill bits
- screws to attach feet
- a pan or cardboard to catch spills
- scrap wood

STEP 1
Ready to get started? First, follow the directions on the paint pour medium to get your base color ready. When mixing the paint and medium, we're after a consistency of milk - a nice flow but not too runny. Add more medium if mixture is too thick. Likewise, add more paint if mixture is too runny.
STEP 2
Now, set up your board on scrap wood over a pan or cardboard so it can catch the excess. Then, take your paint mixture and begin pouring. While there is no law about where to place your paint, you want to aim for an accent feature so that you leave most of the wood bare for food. Also, it's appealing to use a natural line in a free-form motion when you pour. Use a liberal amount, but not so much you're losing most of it off the board. I only pour over the corner of my charcuterie board for a sweet accent. After you pour, tip up the board to run off most of the excess and let it flow over the edge.
STEP 3
Next, this is when you can add your other colors. Feel free to have fun with it! For me, I'm going for a marbling effect with simple ripples. My choice of accent is gold, but I'll add a fun touch in a minute.
STEP 4
Last, when you've poured to your heart's content, you want to grab that awesome Wagner HT400 Heat Gun and the flare nozzle included in your craft kit. Notice the kit comes with two nozzles, and a heat resistant pad. Plus, it can be used freestanding!
 Then use the heat gun to pass over it moving the paint into a design while at the same time it brings out bubbles to aid in a perfect pour. Win-win! This tools is handy for many things in baking, gift wrapping, home repair, and even in crafts like my resin necklaces (SEE HERE)
 It's at this point, I want to add a little bling-bling, so I sprinkle gold glitter into my paint. Finally, at this point, we want to let our wood and paint cure. It can take up to 24 hours to set and up to 72 hours to fully cure, so keep that in mind.
STEP 5
Meanwhile, we want to work on the other elements of our DIY paint pour charcuterie board. That means I need to add the feet mentioned before. This will give the board a lift (literally) and also make it more functional for cleaning. Also, consider adding handles/pulls for added function. For the feet, you can use scrap wood, actual small feet, or even repurpose knobs. I'm using up my stash for my creation. In order to do that I need to pre-drill with a spot for counter-sinking a screw head. As you can see, my knobs are already painted red from my boys' bedroom remodel and need to be updated to coordinate my colors. So, I use a dowel and dip them into the same paint as I used for the gold accents.Then, I allow them to cure on a wire rack. Finally, we add a natural oil like hemp or grapeseed oil or 100% beeswax to finish the natural part of our board. In addition, the board can be wiped clean with a soft damp cloth and oiled when needed to keep it supple.

THE YUMMY REVEAL
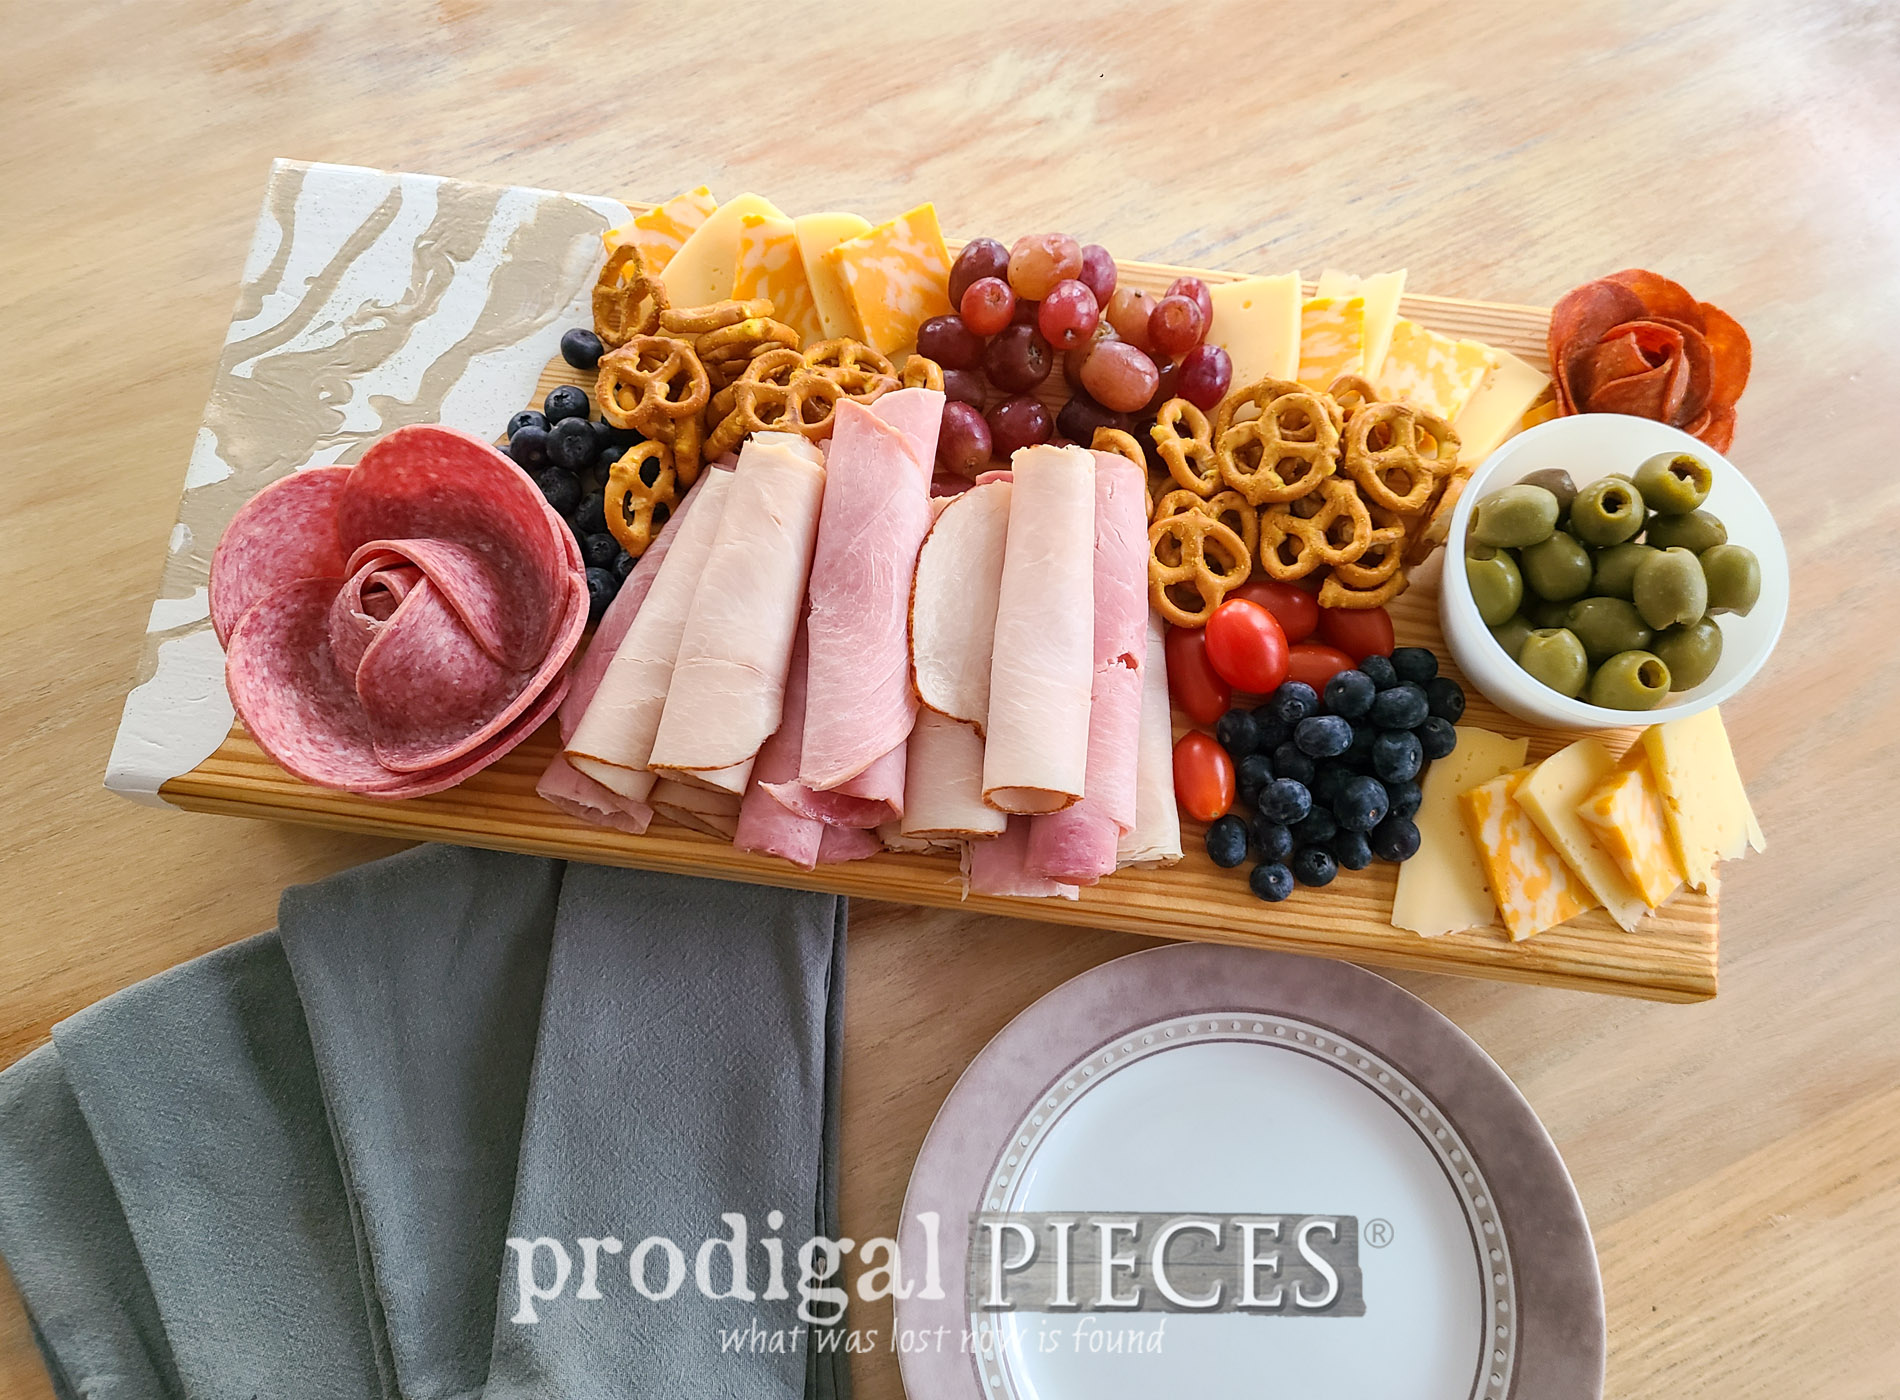
At long last we can finally sit back and enjoy the yummiliciousness of our labor. {{happy dance!!}} You know I had a pack of wolves (aka. children) just waiting for me to be done staging this. I can't blame them!
 As you can imagine, this particular size DIY paint pour charcuterie board for my crew of 8 doesn't last long. With that in mind, you can create a board as long as your table if you want. The options are limitless, really. If you like those salami or pepperoni roses, those are easy to whip up. Simply use a jar to fold the pieces overlapping over each other...

 Doesn't it look lovely next to the marbled paint pour? And it's delicious too! This setting is perfect for any holiday, birthday, or just-because day.
 Additionally, here's a closeup peek of the feet and the oiled wood. If you look close, you can see I used bits of felted wool from my refashioned sweaters as pads. Did you hear that? My belly is rumbling...hungry!

 If you don't have the grum-bellies yet, you're not normal. just sayin'. tsk. With that, you need to create one of these or purchase one from my online shop.
[metaslider id=30251]

GIVEAWAY TIME
Wagner, and I are always wanting to assist you in your own DIY adventures. We are giving away a HT400 Craft Kit so you can create too. Merry Christmas!! All you need to do is fill out the widget below for as many entries as you like - daily even. Giveaway open to U.S. & Canada residents 18 years of age and older. Also, winner will be notified via email and will have 24 hours to claim the prize. Be sure to check your spam!
In addition to leaving some comment love, do pin and share my DIY paint pour charcuterie board to inspire others to create too. Up next, I'm a sucker for tufted things, what can I say...see it NOW!!
 To get these DIY tips & tricks in your inbox, be sure to sign up for my newsletter. PLUS, you will get your FREE Furniture Buying Checklist and special discount to my shop. Until next time!

Also, more gift ideas like this DIY paint pour charcuterie board:

 pocket pillow this holiday. Full tutorial at Prodigal Pieces | prodigalpieces.com prodigalpieces refashion diy upcycled giftidea christmas")