If you are just joining in, we have been working in our back yard this summer giving it a much needed facelift. First, was our
DIY compost bin, then our
DIY fire pit. Today we are sharing the next stage of our renovations - our DIY garden arbor with play area. It began like this...

A HOT MESS
Yep, a hot mess. Each winter we run through a WHOLE LOTTA firewood. This is our wood pile that is normally full to the brim. However, I snapped this at the beginning of spring when we can break out of our cabin fever and get outside to clean up winter mess. Normally this is covered with a giant tarp, so my kids stick their bikes here to keep them out of the weather as our shed is full too. (next on my hit list)
Since 2003, I have had the pleasure of looking out our dining area and seeing this...

DETAILS
Mind you I consider it a full blessing to be able to have a full supply of wood to keep us warm. It makes a heart happy for sure. However, we do enormous amount of work each year to harvest, split, stack, and prepare our wood. So, when a storm blows through and takes that tarp off soaking all our hard work, I get upset...we all do. It gets old running out in the rain or blistering snow to cover it back up. I have been scheming for years how to make it less work and more profitable.
In the spring, I began to clean up our area as I always do, but began mulling ideas over on how to make this less stress for us in the coming winter. Plus, make it more desirable to look at as well as hide some things.

To the right of the wood pile we have
our kids mud bar and
sand table that were displaced ever since
we built our pergola over our patio. This was only to be temporary as you can tell this is not the best place for them up against our neighbor's garage. Remember, this was taken after winter had done its duty. (no judging...hahaha...)

DIY TIME
I mentioned we first started by building our compost bins out of pallets. Well, we kept on accruing pallets and are building a new wood shed complete with garden shed attached. Here is what we've come up with - or the start of it at least.

MORE MOVING
Lots of wood moving, stone moving and gettin' 'er done(ing). haha.

Once the wood was moved, we needed to pull up all the concrete pavers and brick we had put down to rest the wood on. Not only was it messy, but feels so good too.

Since we already had some stone just outside our back door, we just wanted to extend the area using the red brick as border and fill it in. First, we graded it and then put down a landscaping fabric. Then, topped with more stone like we used in our fire pit makeover recently.

ROCKIN' IT
Lots of stone hauling was in the game for me this summer. That's just fine by me as I prefer to work to get exercise.

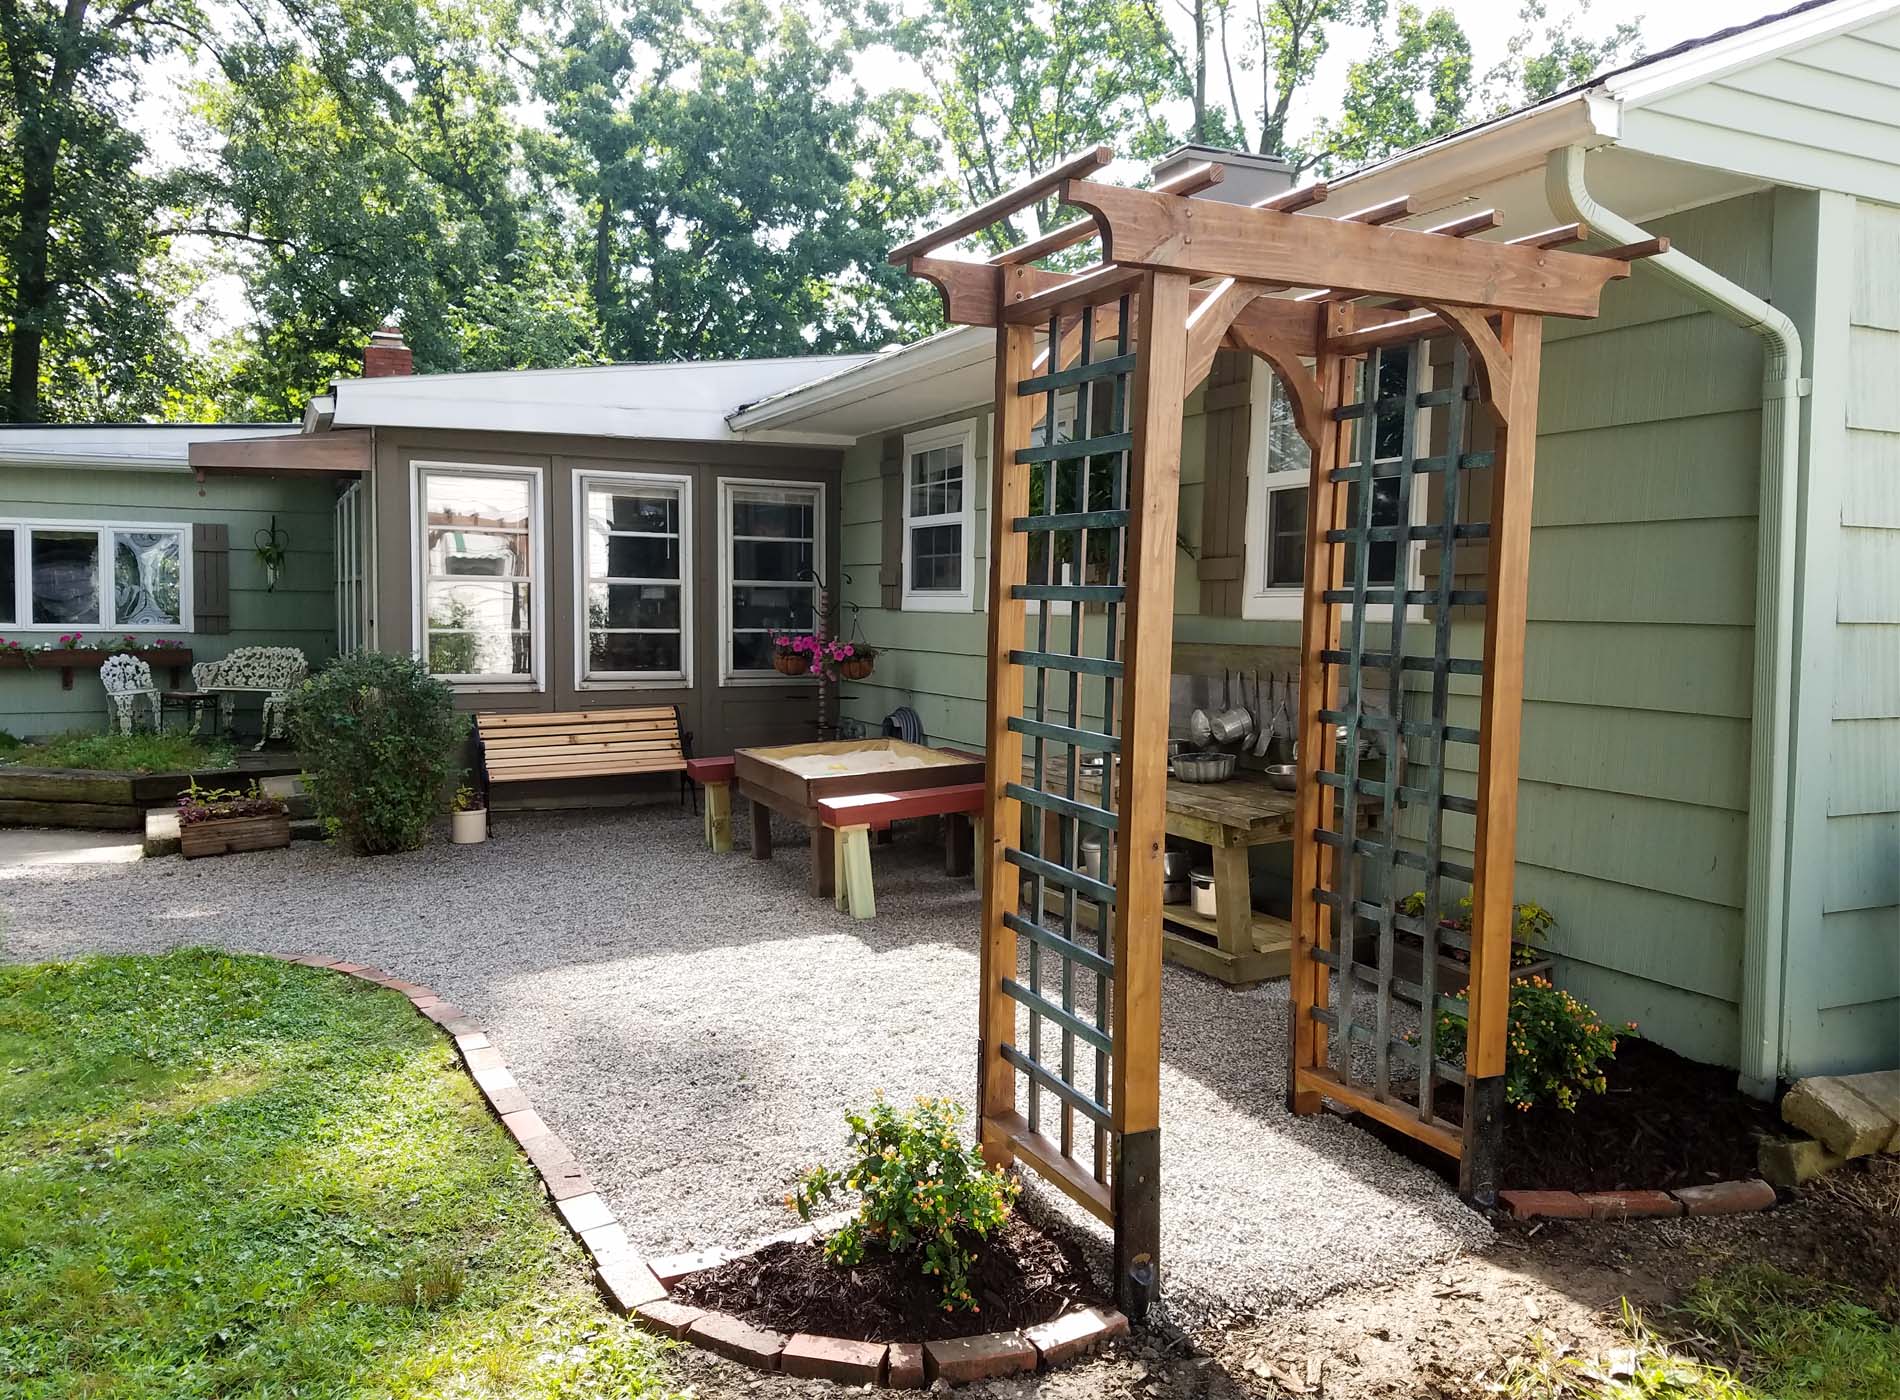
While the kids and I were doing that work, JC was busy building the DIY garden arbor I mentioned earlier. We wanted to add a feature that gave us something nice to look at from our side and privacy from the other.
Here is what we designed and feel totally suits our new area. Complete all-in cost to build this was less than $120. Not bad when you consider buying one like this brand new is over $300. Cha-ching!! haha.

I share more picture reveals at the end of this post, so be sure to read through to see what else we did to our space, see my latest video, and enter to WIN!
STEPS TO BUILD
Want to build one of your own? Here is what you'll need:
Materials: (see cut list below each)
- 5 - 2" x 4" x 8' cut into:
- 4 - 2" x 4" x 84" uprights
- 4 - 2" x 4" x 24" horizontal cross pieces
- 2 - 2"x 6" x 8' cut into:
- 2 - 2" x 6" x 60" headers
- 4 - 2" x 6" x 17"(see diagram below for details)
- 13 - 1" x 2" x 8' cut into:
- 10 - 1" x 2" x 69" trellis vertical pieces
- 22 - 1" x 2" x 24" trellis horizontal pieces
- 3 - 2" x 2" x 8' cut into:
- 9 - 2" x 2" x 32" top slats
- 3" decking screws
- 2 ½" decking screws
- 8 - 3 ½" x 5/16" carriage bolts with 8 washers and 8 hex nuts
- 1" crown staples for air nailer
- patina kit in choice of finish (bronze, iron, copper)
- E-Z Mender Brackets
- stain of choice: we used Behr Waterproofing Stain in Chocolate
Tools:
- paint brush
- jig saw
- miter saw
- drill / drill bits
- air stapler
- tape measure
- quick square
- sawhorse pair
- level
- safety equipment - safety glasses, dust mask, hearing protection
Step 1
First, you want to build your frames. Grab your cut 2"x 4" and 1" x 2" pieces and assemble them like the diagram shows:

Step 2
Once your frames are assembled, set them up on sawhorses or work surface. Next, you are going to make the trellis using the frame as a template, but are NOT attaching it to the frame. Ideally, you want to do the faux finish seen in video below before attaching. If you only want to stain the trellis same as the frame, reverse the layout below beginning with the vertical pieces.
However, if you want to accent the trellis with a faux patina or paint or contrasting stain, follow these steps: Place your trellis horizontal pieces into the frame at 6 ½" spacing. Do not attach to the frame.

Step 3
Place your trellis vertical pieces on top of the horizontal pieces at 6", 12", and 18" intervals. Attach only the vertical pieces to the horizontal pieces using your stapler and staples, but not to the frame. This is the back side of the trellis facing you.

Step 4
Then, remove the trellis from the frame and complete it as you desire. I chose to create a faux patina using my patina paint kit as mentioned above. I'm all about texture and dimension, so these paints are going to help me create a wonderful aged look to our DIY garden arbor.
The process is simple and amazing! I show it all in the video below.


Step 5
While you are waiting for you coats of paint to dry, you can finish the assembly of your arbor. Begin by, attaching your headers using the carriage bolts. Feel free to make your header have any decorative element you wish. We cut a notch out of our header for a decorative touch. Then, measure 2" down from top edge, and 4" in from outside bottom corner.

Step 6
Now to add your top slats. Find center and place your first slat and attach using the 2 ½" screws. Place the next two flush to each end. Then, add the last four evenly spacing them at approximately 8 ½" apart.

Step 7
Next, cut your corbels with your jigsaw from your 2" x 6" x 17" pieces using the diagram below as a guide. You will need to cut off 1 ½" from the top edge.

Once cut, attach your corbels as shown below:

Line up your corbel against the upright 2" x 4". That will cause the top of the corbel to go behind the 2" x 6" header. Using a 3" screw, attach at the bottom of the corbel into the upright 2"x 4". Next, use a 5/16" drill bit to drill into the arched portion of the corbel. Attach with a 3" screw. Finally, using two 2 ½" screws, attach the corbel from behind to the header.

Step 8
Fun part! This is the best time to stain your arbor if you are going to do so. Your trellis is still set aside if you did a faux treatment and by staining now you will avoid having to painfully cut in around it. Now, depending on what stain you use, it may only take one coat, but ours took two.
Step 9
Time to anchor this puppy! We are enamored by the Simpson Strong Tie E-Z Mender products. These brackets can help repair broken down fences, etc and are so easy to use! Perfect for 4" x 4"'s or 2" x 4" studs like we're using. Just attach them to the arbor and set the arbor in place using the studs sticking out to hammer them level. Notice we attached a couple of scrap pieces between the legs to keep the from splaying. (moving apart) We left the trellis off until after installation to make it easier to handle.

Step 10
Now your DIY garden arbor is ready for those gorgeous trellis' you made earlier. Just set in place with the horizontal slats facing out. Last, attach using your stapler and staples.

ALL DONE
And we're done! Give yourself a pat on the back for a job well done. We did!

While I haven't chosen what to grow on those trellis' yet, I'm leaning towards climbing roses, but may wait until next spring. For now I'm enjoying that amazing patina.

Plus, these gorgeous new bushes I found really caught my eye with their yellow blooms in the spring followed by the pumpkin color berries in autumn. Aren't they beautiful? I know our birds will love those berries. They are called Pumpkin Hypericum.

The outcome of all our efforts sure has paid off. Undeniably, this space is no longer an eye-sore.


Likewise, we reused my curbside created bench tops from our fire pit makeover to make benches for the sand table. Also, the mud bar got an addition of a bottom shelf for extra storage.
Even my absolutely sad looking park bench was needing a major overhaul.

In addition, there's a new coat of paint on the iron, and replaced the boards with fresh cedar. I moved it to the play area and it suits that spot perfectly.


The corner where the bench used to sit still needs an overhaul and repairs. However, for now my new (old) cast iron set fills the corner with a vintage vibe.

WRAP-UP
And, the best part...my kids. They love it and have been waiting oh-so-forever to have their things back. Seriously, I can't tell you how many times they asked to dive into that sand while I was taking pictures. However, I don't blame them - I love it too!


Do pin and share this DIY garden arbor to inspire others to take their home to a new level...literally.

Up next, this antique dresser that was left for dead gets a new lease on life for
Furniture Fixer Upper time.
Head here to see the after!

To get these DIY tips & tricks in your inbox, be sure to
sign up for my newsletter. Until next time!

While you're at it, here are more projects like this DIY garden arbor:


 To the right of the wood pile we have our kids mud bar and sand table that were displaced ever since we built our pergola over our patio. This was only to be temporary as you can tell this is not the best place for them up against our neighbor's garage. Remember, this was taken after winter had done its duty. (no judging...hahaha...)


 Once the wood was moved, we needed to pull up all the concrete pavers and brick we had put down to rest the wood on. Not only was it messy, but feels so good too.
 Since we already had some stone just outside our back door, we just wanted to extend the area using the red brick as border and fill it in. First, we graded it and then put down a landscaping fabric. Then, topped with more stone like we used in our fire pit makeover recently.

 While the kids and I were doing that work, JC was busy building the DIY garden arbor I mentioned earlier. We wanted to add a feature that gave us something nice to look at from our side and privacy from the other.
Here is what we designed and feel totally suits our new area. Complete all-in cost to build this was less than $120. Not bad when you consider buying one like this brand new is over $300. Cha-ching!! haha.
While the kids and I were doing that work, JC was busy building the DIY garden arbor I mentioned earlier. We wanted to add a feature that gave us something nice to look at from our side and privacy from the other.
Here is what we designed and feel totally suits our new area. Complete all-in cost to build this was less than $120. Not bad when you consider buying one like this brand new is over $300. Cha-ching!! haha.
 I share more picture reveals at the end of this post, so be sure to read through to see what else we did to our space, see my latest video, and enter to WIN!


 Once cut, attach your corbels as shown below:
 Line up your corbel against the upright 2" x 4". That will cause the top of the corbel to go behind the 2" x 6" header. Using a 3" screw, attach at the bottom of the corbel into the upright 2"x 4". Next, use a 5/16" drill bit to drill into the arched portion of the corbel. Attach with a 3" screw. Finally, using two 2 ½" screws, attach the corbel from behind to the header.


 While I haven't chosen what to grow on those trellis' yet, I'm leaning towards climbing roses, but may wait until next spring. For now I'm enjoying that amazing patina.
 Plus, these gorgeous new bushes I found really caught my eye with their yellow blooms in the spring followed by the pumpkin color berries in autumn. Aren't they beautiful? I know our birds will love those berries. They are called Pumpkin Hypericum.
 The outcome of all our efforts sure has paid off. Undeniably, this space is no longer an eye-sore.

 Likewise, we reused my curbside created bench tops from our fire pit makeover to make benches for the sand table. Also, the mud bar got an addition of a bottom shelf for extra storage.
Even my absolutely sad looking park bench was needing a major overhaul.
Likewise, we reused my curbside created bench tops from our fire pit makeover to make benches for the sand table. Also, the mud bar got an addition of a bottom shelf for extra storage.
Even my absolutely sad looking park bench was needing a major overhaul.
 In addition, there's a new coat of paint on the iron, and replaced the boards with fresh cedar. I moved it to the play area and it suits that spot perfectly.

 The corner where the bench used to sit still needs an overhaul and repairs. However, for now my new (old) cast iron set fills the corner with a vintage vibe.


 Do pin and share this DIY garden arbor to inspire others to take their home to a new level...literally.
 Up next, this antique dresser that was left for dead gets a new lease on life for Furniture Fixer Upper time. Head here to see the after!
 To get these DIY tips & tricks in your inbox, be sure to sign up for my newsletter. Until next time!


