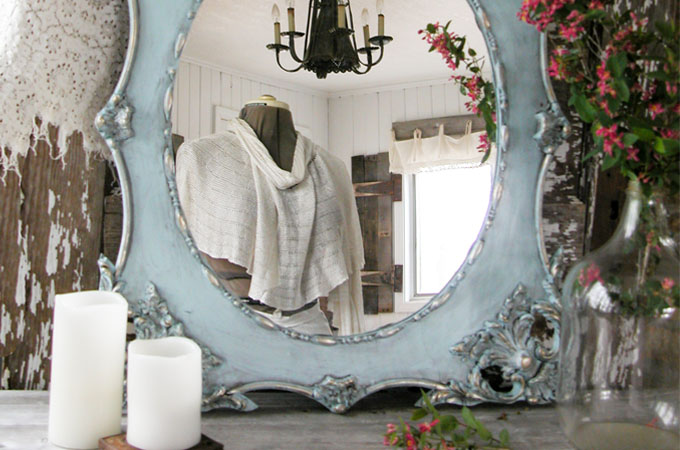
One of the most often questions I get asked by readers about my work is how I create an aged finish on my pieces. The kind of effect that tells a story of days gone by and looks as though it has been around for years. I recently acquired this vintage mirror with gorgeous ornate carvings from a good friend, and I thought it would be the perfect candidate to show you a quick and effective tutorial.

Now, don't judge me by the mess in the reflection since we are still plugging away at our
kitchen remodel, okay? If you want to stay updated on what we're working on next in our remodel, just follow me on social media via the buttons on my sidebar.
This mirror had wonderful cracks in the carvings here and there and I love to see that for the character and charm alone, but the cowboy red had to go. Because it was missing pieces in several spots, (I don't mind that at all) paint is one way to unify the piece.

To me, this mirror was begging to get the gilded treatment I gave my very first big vanity project and is my favorite thus far.

I called this gem My Painted Lady and have her story
HERE and also on
my gilded chest of drawers. The color on that dressing table is still my favorite paint color that came from a seconds paint at Home Depot. I have used it on several pieces, like
this table and
rocking chair, and it never fails.
DIY TIME
To get started on doing this type of finish, you will need to understand that a dry brush technique is best when dealing with intricate carvings. What I mean by "dry brush" is that for the most part you are only going to pick up enough paint on your brush to lightly coat the paint and work it in. This method prevents awful build-up that can fill those carvings and create drips and puddling.

This light coat will also help to achieve the aged finish we're after. Here is the mirror after a light dry-brush coat. It has a bit of thinned appearance, but that is okay since we're looking for a worn effect.

GILDING
Next, it's time for the gilding. With an artist's brush, lightly coat the pieces you want to highlight. I chose the leaves and beads for gilding and left the feathers for the next step.

Next, to create dimension, use a basic white acrylic paint to highlight the feathers and crevices.

To highlight and draw out all that gorgeous carving, you are going to use a metallic glazing in Espresso. The glazing doesn't have to be metallic and can even be handmade just like I used on
my faux wood garage door using paint. I wanted a gilded effect so I used the metallic.
In this step, brush on the glaze in small batches and have a lightly dampened rag ready. Working in small amounts will allow you to work with the glaze before it sets. Brush it on into all the nooks and crannies and edges to give a shadowed effect.

Once applied, lightly wipe off the glazing allowing it to remain in those crevices. You will see how the carvings will pop and come to life, creating the aged finish we're after. Just like it did on
this bedroom set.

For my mirror I stopped at this point. If I distressed like I usually do, the red would peek through. So, if you want to add time-worn distressing to your piece, sand the places that would receive normal wear. I typically wax and buff my pieces after the distressing, but the mirror I left as-is.
THE REVEAL
Here is my finished aged finish project...

Much better, don't you think? I even got rid of the junk in the reflection for you. tee hee hee.


I am happily enjoying my spring-time blooms and relish every moment of their beauty. It is even spring clean-up time and I scored this awesome cedar chest that has been left for dead outside. That gorgeous, weathered patina was calling my name. swoon... It too will be getting new life soon.

I hope you found this tutorial helpful and inspiring. If you're not into DIY, but love this mirror, you can find it available for purchase in
my online store.

Also, pin and share this tutorial so others can create their own aged finish too. ♥

Next up, my oldest daughter is reviving this Art Deco nightstand. You can see the after
HERE.

Before you go, be sure to
sign up for my newsletter. Until next time!

 PINTEREST | EMAIL
While you're at it, here are more DIY projects for you like this aged finish: