There's only one thing better than doing what you love, and that's when you get to do it with other like-minded folks. Today is
Furniture Fixer Uppers day and my blogger friends and I have quite the assortment of makeovers for you. My project begins with this thrifted side table and ends with a child's tea cart. Let the fun begin!

This cutie-patootie table came home with me and it sat for a bit because I wasn't quite sure what to do with it. I had many ideas, but I couldn't pick one that jumped out at me. I had done one like it before as seen
in this table post. Sometimes when I need to decide I will bring the piece in question into my home and just let it be there so I can stare at it, walk by it, and let it "talk" to me.
I didn't have it in the house long when I asked one of my kids what they thought it should be. While still speaking I said, "Ya know, it looks like a mini tea cart to me." BINGO! That was all I needed to jumpstart my brain.
If you missed my vintage tea cart makeover, it's truly one of my favorite pieces I've done and encourage you to take a peek
HERE. That cart is what inspired this creation today - a child's tea cart. This little side table was so cute with it's flared legs, curved shelf, and event the pie crust edge. It was perfect for keeping a little one's treasures at bay while wheeling a cart around. I am a toy nut since I thoroughly enjoy creating them and seeing a child go nuts over them. You can see my past creations
in these posts.
DIY TIME
So, here we go... First, I had to add some wheels since carts have wheels, right? ding! Well, the thing that made it a little tricky were those cute legs and their curve. See what I mean?

That's nothing that my jigsaw couldn't handle. I just buzzed off the part that stuck out and tapered it back to the foot and sanded it down. Now, I needed to add the holes to the legs so I could insert a dowel to use as an axle. I found placement of my wheel by measuring up from the bottom of the leg ½" - just enough to get the table off the ground. I used my drill and spade bit to make holes for the dowel axle. You want to make sure your placement is exact so the wheels turn properly, so take your time.

ASSEMBLY
Once I have the holes, I cut my dowel to length making sure to take into account space needed for the wheel to rotate as well as the width of the wheel. I needed to increase the size of the hole in the wheels I had as it wasn't big enough. (note: I got my wheels from
this site in case you want to DIY a table of your own.) Wood glue was added to the end of the axles and wheels were placed on making sure to check for balance and level. I should also add that I lubed the axle holes and the axle itself with a bit of my furniture wax so everything would turn smoothly.

Time to add some more fun! This child's tea cart needed a handle/towel bar so the wee one can push the cart from there to there. I simply gathered a few bits and pieces and created a handle.

I decided to attach it into the outer edge of the table using screws. First, I created the hole by pre-drilling and then also pre-drilling into the handle blocks so the wood wouldn't split.

MORE FUN
Next, I measured the length between the blocks and added the depth of the forstner bit for each block and cut the dowel to length. So, for instance, let's say my space between the handle blocks is 12". I added ½" (¼ + ¼) to the length for the depth of the bit I was using. My total length then wold be 12 ½" for the dowel. Make sense?

Once all was cut and prepped, I assembled with more wood glue and screws and the handle is good to go.
Since the bottom shelf didn't have a rail to hold essentials while the child's tea cart was in use, I decided to add my own. This galley rail is often seen on hutches and such to hold dishes on shelving. I must say, I paid way more for this stuff than I did the table. However, I think it is too cute and added so much more function. In order to attach it, I had JC help me cut them into a mitered box on our miter saw while I prepped the table. Attaching them from the bottom with screws is how I planned to make it stable. So, I needed to mark where the rails would sit and then pre-drilled the holes. Then attach with screw from the bottom up.

WRAP IT UP
For the mitered corners, I used my nailer and brads to tighten everything up. I love my tools!! toolsoverjewels is my motto.

Since my table was a cherry/mahogany stain, I did stain the raw wood to match the table before proceeding since I planned to distress, but I didn't want any bleed through. To prevent that, I used a stain-blocking primer and my paint brush to seal it all in. It also seals in any odors that may be present as well.
TIME FOR PAINT
First, I painted the wheels because I knew I would most likely get some on the table legs. That's where I had a little artistic fun that I'll show you in a bit. For the main part of the table, I used a soft pink.

I fell in love with that soft pink color when I first used it on
my vintage vanity. Then, I used it again on
this Ethan Allen table. It's just so sweet! After the first coat cured, I added another coat and let it dry. Next, I added some panels of vintage wall paper to the shelf and top. Then, I used white wax to seal the paint, as well as soften it and add dimension to the nooks and crannies. Simply brush it on and the buff off with a soft cloth.
I seriously could have when crazy detailing this thing because it's so fun. However, I reigned in my vigor and decided to add a few elements to those turnings in the galley rail.

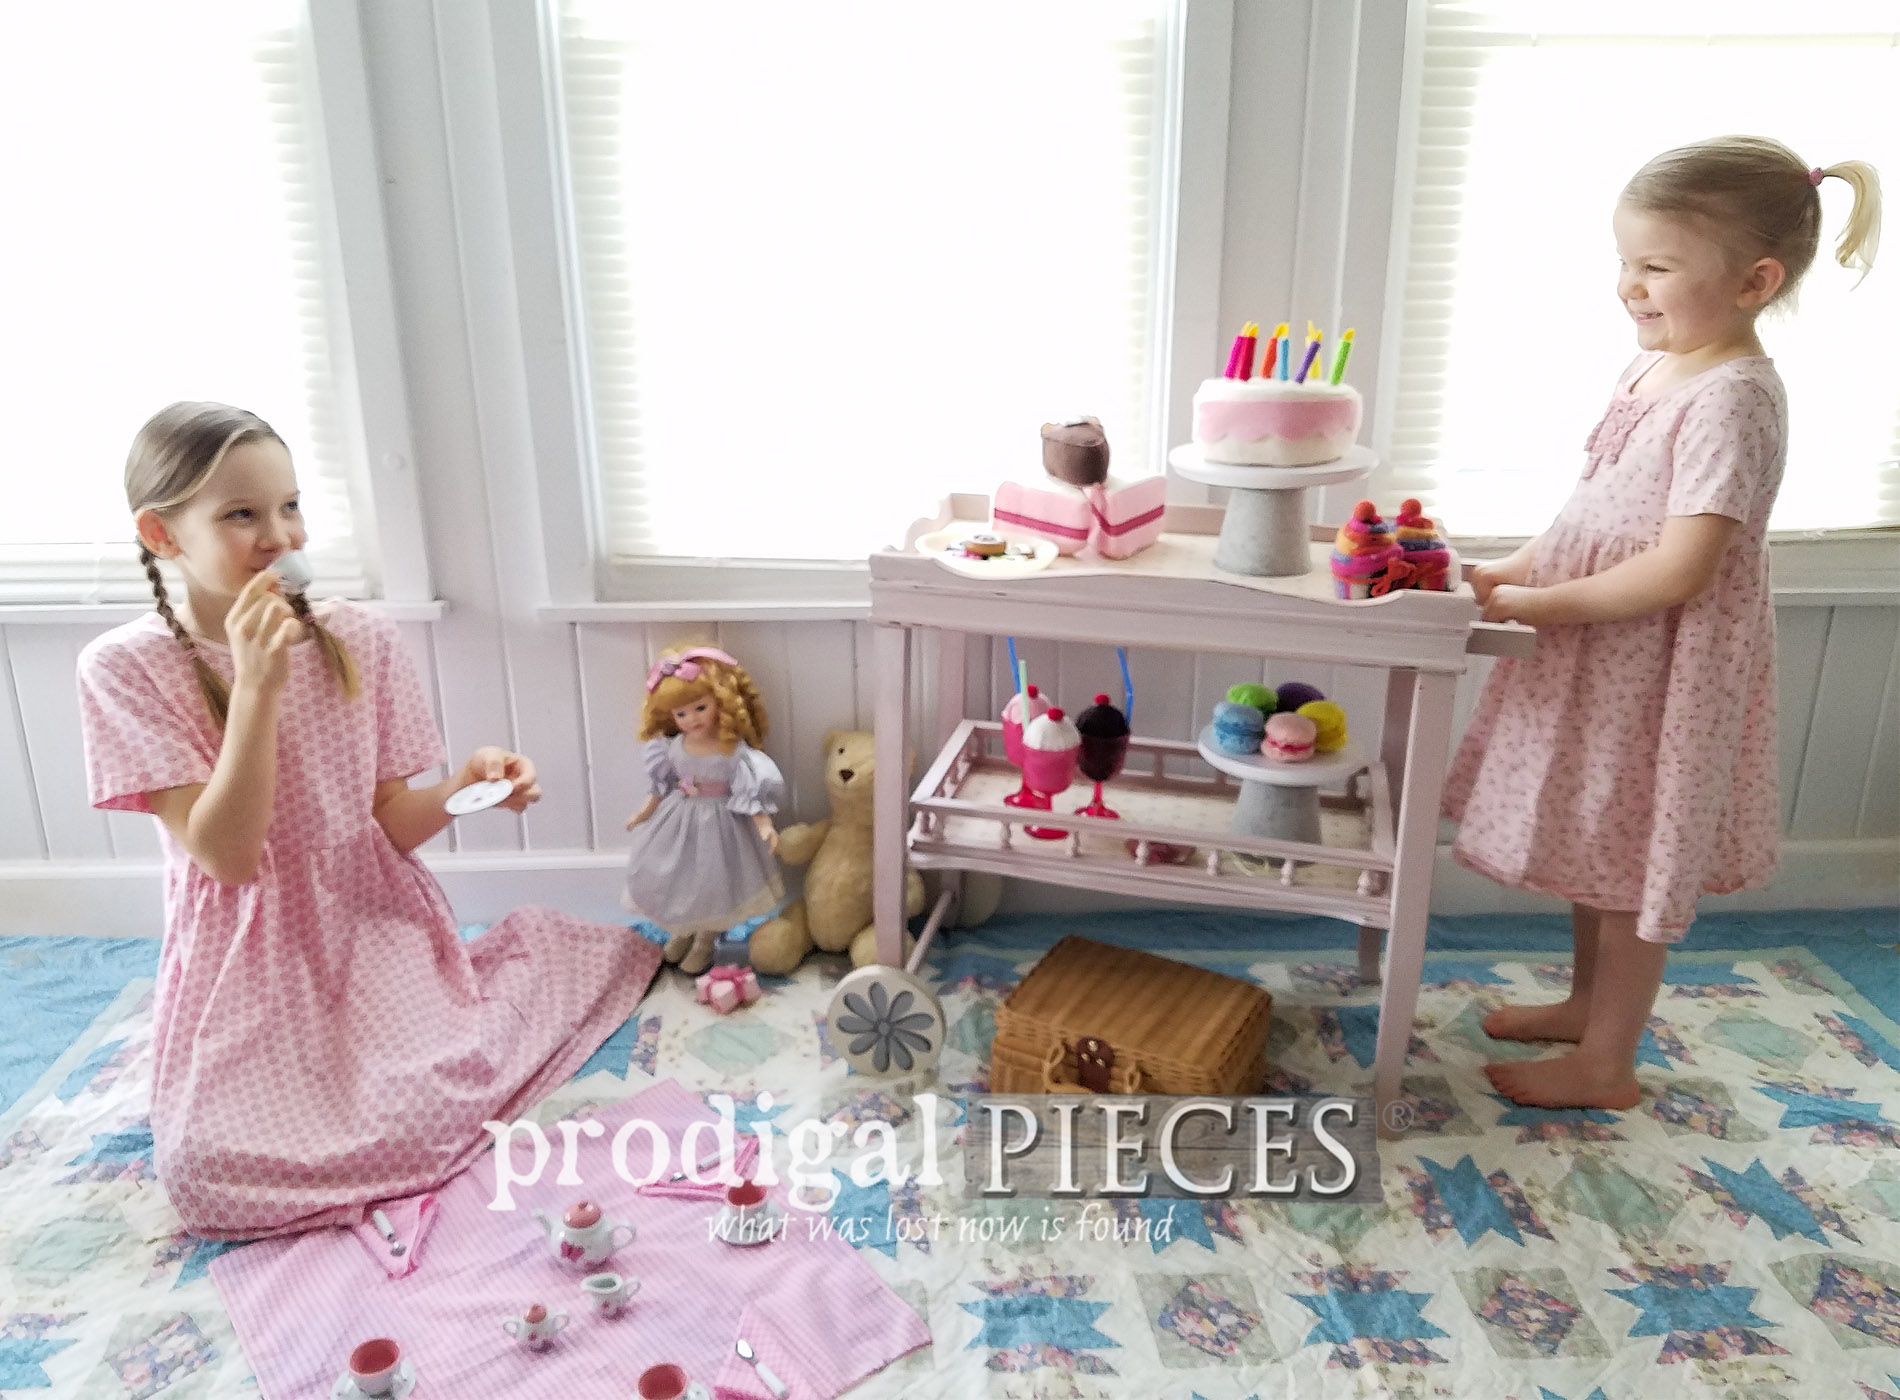
THE REVEAL
So fun, right? I hope you love it as much as my kids and I do!


Needless to say I had such fun repurposing that side table into this child's tea cart. My heart is in creating, especially for kids young and old. Yes, I made just about everything in this picture, including the kids. haha. If you remember a few years ago, I shared how I used many of these food items as therapy while I was pregnant with
my little girl that was born too soon. I was on bedrest and created and created to keep myself from going crazy with worry. Tears flow each time I think of her and my other baby we lost as well. But...this is a happy time.

These precious two are my youngest girls and they had such a hoot helping me stage this scene. They couldn't wait to play. So sweet they set extra settings for their sister and sibling in heaven. Sweet reunion one day!

MUSIC
And...to make it even more fun, I created those little cake/dessert stands from a couple metal planters and wood rounds. Aren't they the perfect size? One more thing...for another treat, I added a music box underneath that plays, "What a friend we have in Jesus". There has been many a toy that I have made with music boxes, and they are one of my favorite things. I purchased them from the same place I got the wheels.


I do believe that soft pink paint is the perfect color for this and the white wax gave it a soft glow I was after. So fun to see it come to life. As much as you may think I should keep this for my girls, we have no need for it as they have plenty of things I have made for them as you can see. So...if you would love to make this your own, you can find it available in
my online store.


I don't know about you, but I'm ready for a tea party! Care to join us?
INSPIRE
Do pin and share this repurposed child's tea cart to inspire someone else to think outside those thrift store tables to create something new. It really is fun!


Up next, I'm going to be taking these thrifted finds and turning them into something new - BIG surprise! haha.
See what they look like now - head HERE.

To get these DIY tips & tricks in your inbox, be sure to
sign up for my newsletter. Now it's time for some more sweet makeovers. Head below to see more Furniture Fixer Uppers fun!

 PINTEREST | EMAIL

- Just the Woods
- The Interior Frugalista
- Girl in the Garage
- Confessions of a Serial DIYer
- Petticoat Junktion
Also, more fun projects like my child's tea cart: