 Here's the story: My gaggle of kids go with me everywhere I go. Yes, even to the grocery store and all errands - we have a blast! This day in particular, as we headed out to get some food essentials, I noticed it was trash day and I turned and told the kids that today would be a good day to keep your eyes peeled for some trashure set out.
BACKSTORY
At that same exact time I was speaking, one of my daughters, Miss S, said, "Mama, there's a dresser!" Apparently, I totally missed it as my head was turned to tell them to keep an eye out. I braked and turned around and here is what she found.
*Post sponsored by HomeRight, product provided by D. Lawless Hardware (see full disclosure)
Isn't it cute? It's got some damage to the drawers, missing some of the skirt, but really not too bad. I do believe it was handmade at some point and full of charm. Now, we couldn't let that go into the trash, could we? I will admit, we found this last November (gulp) and I told her we would get to it as soon as I could. Well...I wasn't lying and now is the time. Since most people don't have use for a tiny chest of drawers - this thing is less than 3 feet tall - we decide to give it new life as a vintage card catalog.DIY TIME
First, we took off that decorative piece on the top, and removed the broken bottom skirt. Then I removed the decorative piece between the top two drawers and cut the center spacer with my jigsaw . Miss S and I wanted to make the top two drawers into one, so we were removing the tracks to make that possible. Next, we added some scrap wood with my drill between the two drawers to make them the appropriate width.
 I love that my daughter is old enough I can hand her the tools and watch her light up. She's becoming fast addicted. hee hee hee.
NEXT STEPS
Since we removed the front skirt, we needed a replacement. We used the decorative top piece that we removed earlier as a stencil to create a matching board. So far so good, right? Now to attach the skirt, I show Miss S how a Kreg Jig Master System makes pocket screw holes that allow us to easily attach the skirt. This is where she becomes hooked. I don't blame her!
 I use my jigsaw to cut the decorative design out of the skirt and then Miss S give it a light sanding with my sander Using our Kreg Clamp Trak on our DIY workbench makes the job so much easier.

NEW HEIGHTS
We attach the skirt and now it's time for the legs. I have a glorious stash of table legs that I got at the garage sale to end all garage sales, and have used them to make tiered stands, wooden totes, and our floor lamp. This set would be perfect to take this child's dresser turned card catalog to new heights. Miss S and I use my miter saw to make corner braces. I just have to say how much I love that saw! My project was made so much easier because it is a double bevel sliding saw with a 12" blade so now the sky's the limit!! (sorry...I got lost in the moment. ahem) After using the Kreg Jig again to make pocket screws, we attach the legs.
 Now for the drawers. In order to create the card catalog effect, I used my table saw and miter saw to cut some scrap luan I had leftover from our bathroom remodel.
RAW
We attach the faux drawer fronts with my nail gun and some wood glue, and when finished it looks like this in the raw. At this point, Miss S and I give each other a high-five because we've worked our fingers to the bone and our vision is finally coming together.
Now for the fun part! You know I love my paint sprayer that I used on this dinette set, this highchair, and my patio furniture, so of course it was the perfect way to finish this card catalog. But, just like when I sprayed our dining room chairs, the spray shelter came to our rescue.
At this point, Miss S and I give each other a high-five because we've worked our fingers to the bone and our vision is finally coming together.
Now for the fun part! You know I love my paint sprayer that I used on this dinette set, this highchair, and my patio furniture, so of course it was the perfect way to finish this card catalog. But, just like when I sprayed our dining room chairs, the spray shelter came to our rescue.
PAINT TIME
Here in Ohio our leaves on the trees are just budding which makes for some cooking sun rays. Miss S and I are able to get the shelter up in about 10 minutes with the easy-to-follow instructions, and we are ready to rock 'n roll. We just snap together the poles, attach the hooks, and anchor it down with anchors provided. Easy! Now for photo's sake, I have the shelter pointing towards the sun so you can see how it looks set up, but ideally you would turn it away. We were having some gusts of wind that day and the shelter was also turned away from the wind so we could paint. It worked like a charm!
Miss S is no stranger to the sprayer as we used it on her Mid Century Modern starburst table, so she had at it like an old pro. She did the sides, and I finished the rest because that's what mama's do, right? The color we used was the same seconds paint I used on our bathroom vanity.
Now for photo's sake, I have the shelter pointing towards the sun so you can see how it looks set up, but ideally you would turn it away. We were having some gusts of wind that day and the shelter was also turned away from the wind so we could paint. It worked like a charm!
Miss S is no stranger to the sprayer as we used it on her Mid Century Modern starburst table, so she had at it like an old pro. She did the sides, and I finished the rest because that's what mama's do, right? The color we used was the same seconds paint I used on our bathroom vanity.

 We got one coat in 10 minutes, and then used our HomeRight Rapid Clean Kit for a 5-minute clean-up. You can't get much better than that!
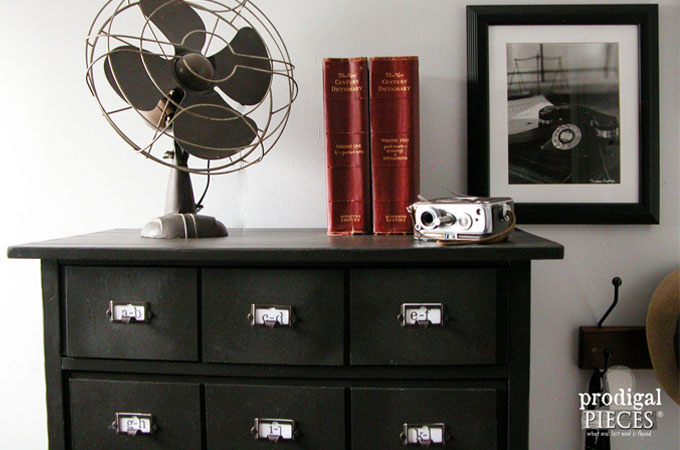
A second coat was applied after an hour or so, and then our card catalog bin pulls from D. Lawless Hardware and my self-made labels.
We got one coat in 10 minutes, and then used our HomeRight Rapid Clean Kit for a 5-minute clean-up. You can't get much better than that!
A second coat was applied after an hour or so, and then our card catalog bin pulls from D. Lawless Hardware and my self-made labels.
THE REVEAL
Ready for the reveal? We are so excited to show you our curbside child's chest of drawers turned vintage card catalog. We totally had fun with it and love how it turned out.

 Likewise, this fun piece is now available in my online store, and we even deliver to your door.

SHARE
While I adore hearing from you on projects, it also is wonderful when you pin and share to inspire others. It's what we're all about!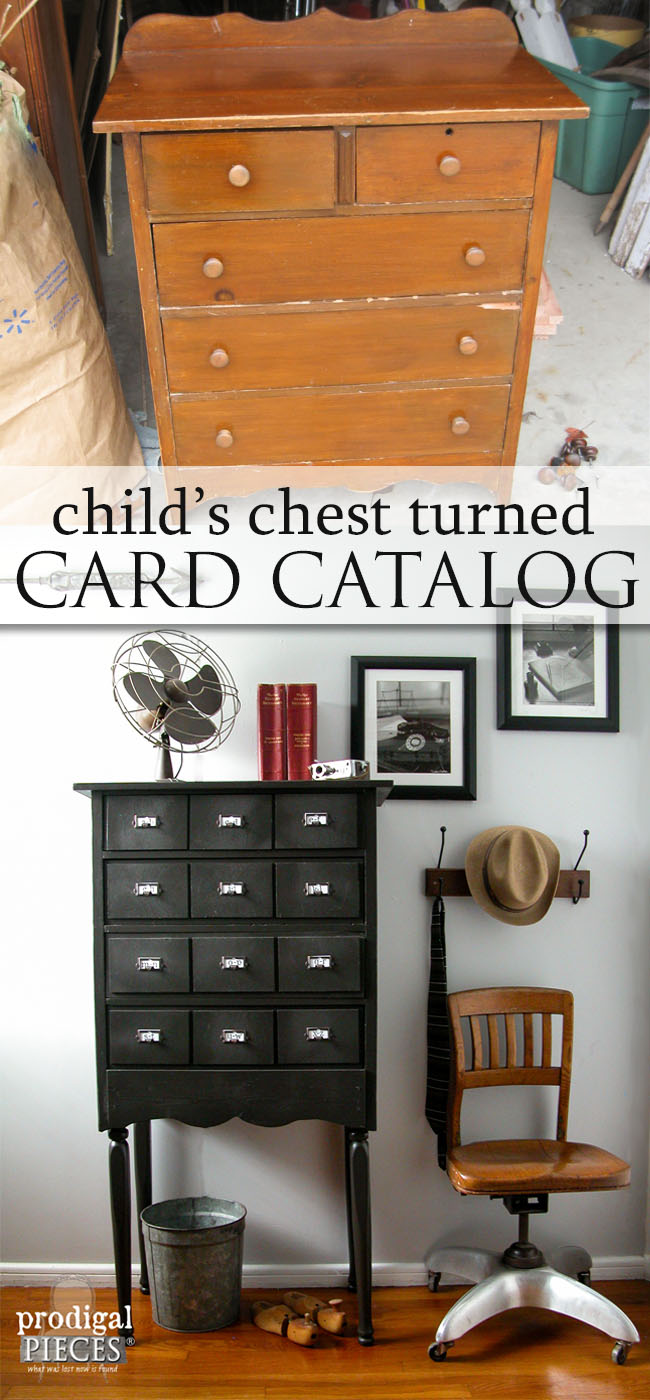 In addition, we hope you've enjoyed our card catalog project and want to inspire others to think outside the trash. Also, pinning and sharing shows love. What is more, to get these DIY tips & tricks in your inbox, be sure to sign up for my newsletter. Until next time!

WAIT! You don't want to leave until you see what my fabulous blogger friends have recreated for you!
 Artsy Chicks Rule Artsy Chicks Rule |
 Confessions of a Serial DIYer Confessions of a Serial DIYer |
 Girl in the Garage Girl in the Garage |
 Bless'er House
 |

