Being a junker can have so many perks, but certainly one of the downfalls is having enough room for all that you find. I make a rule that if I bring it home it has to find new purpose within six months, or it doesn't come home with me. Well, rules are made for breaking, right? That's because I've had this mirror backboard for a few years (before I made my rule) with good intentions of turning it into a chalkboard menu.

Here's the story: a couple of years ago, I'm junking during our city-wide spring cleanup and find a broken-to-pieces vanity. Mirrors are all shattered and only one part of the side mirrors are left. This had to have been glorious in its prime.
I originally intended to give the vanity new life but decided to let the base go. (full story
HERE)

The main mirror backboard became a new vanity mirror for
my Rustic Chic bedroom set.

Now, all I had left was the side mirror backboard. While I kept thinking it would make a great chalkboard menu, I also had always envisioned of turning it into a church attendance record board. You know, where they would show the offerings, and such with those fun numbered cards?
DIY TIME
Well, since I decided that I wasn't going to keep it, that a chalkboard menu was the better option. It needs a bit of trimming since it is broke on one side and on the bottom. That's an easy fix with my table saw.

Because the finish is cracking and there are holes from the mirror mounts, I use wood filler to cover up any blemishes.

After letting the filler cure, I used my orbital sander to not only sand down the filler but give the wood surface teeth so that paint would have something to adhere to.

I wanted a rustic, yet chic look, so I used the same gray from
our bathroom and
boys' bedroom as a base coat. After that, I decided to whitewash the board just like
my dining room table, to draw out those hand-carved accents. While creating the wash I applied a bit more pressure to wet distress. Wet distressing is the alternative to using sandpaper. It works just as well but can be a little unpredictable.

GET CHALKY
To make the chalkboard, I have always used a couple of coats of basic flat black paint. It works just as well as chalkboard paint and is a fraction of the cost, like on
my cabinet door turned message center.
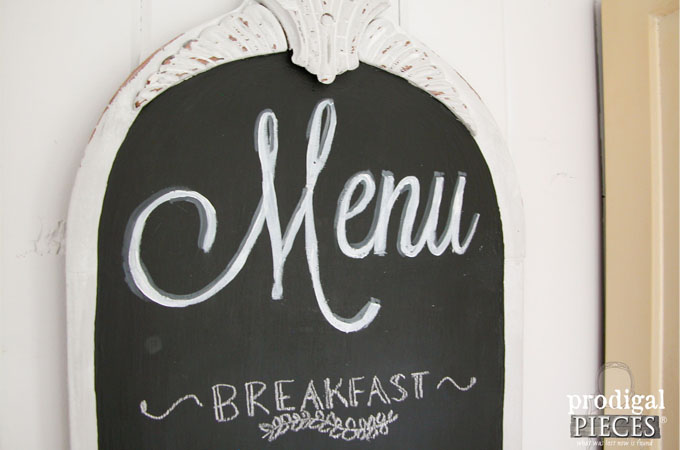
I wanted the "Menu" text to be permanent, so I hand-painted the words on with a white and gray acrylic craft paint after using
my transfer method. I then lettered my chalkboard menu with regular chalk.
TIP: Did you know you can skip the cost of those expensive chalkboard markers and just use a regular pencil sharpener to make a pointed tip on classroom chalk?

THE REVEAL
How's that for a junker repurposed makeover?

The chalkboard menus are fun and functional, perfect for home and special events like weddings, dinner parties, birthdays, etc. If you're not into DIY or simply love my creation, you can find it in
my online shop.


Although I sorta, kinda stretched my self-made rule, I thought I was keeping it for me. I at least made use of it, right?
Do pin and share to inspire others to get funky with their junk too! ♥

To get these DIY tips & tricks in your inbox, be sure to
sign up for my newsletter. Until next time!

 PINTEREST
More projects for you like my chalkboard menu: