 The faux front was cute, but those awful plastic knobs were killing me. Overall, it was in really great shape and even had the inside bottom replaced at one time. Oh, and I know that this is a previous secret weapons retreat as inside is written, "Rex and Tim. Don't touch. Weapons here." Rex and Tim better watch out!

DIY TIME
Since the top was made of mostly pine, it had oodles of wear and tear. And, since it's a soft wood, just like the cabinet I recently refinished, I wanted to draw out those imperfections. First, I started by using my sander to take off the original finish and stain. See all the dents and dings starting to pop out? (a delightful giggle emerges...tee hee hee) Yes, I am easy to entertain. ahem.
Next, once I got that finish off using a dozen or so sanding pads, (it seriously took more to get that wood revealed than my last two projects combined!) I was able to have it in the raw. Likewise, nothing needed but to give it a coat of my own furniture wax. See how it is warming up?
See all the dents and dings starting to pop out? (a delightful giggle emerges...tee hee hee) Yes, I am easy to entertain. ahem.
Next, once I got that finish off using a dozen or so sanding pads, (it seriously took more to get that wood revealed than my last two projects combined!) I was able to have it in the raw. Likewise, nothing needed but to give it a coat of my own furniture wax. See how it is warming up?
 Afterward. it's time for the base. To begin, I remove those hideous plastic knobs and decided to replace them with some vintage wooden ones from my stash.
 Further, all I needed to do was make the holes a tad larger with my drill and stick them on.

PAINTING
Then, after giving it all a light sanding to help the paint have tooth, I used one of my favorite paints, Antique White. I've used it numerous times, like on my feed sack chair or this curbside vanity. Also, note there is no priming, just straight out of the can and painted the knobs while on as well. To finish it off, I gave it a distressed feel and topcoat of my furniture wax as well. However, while working on this wooden chest, I stopped at a garage sale and came upon a box of wallpaper with about a dozen rolls in it for $1, including this... I gasped and grabbed the box and ran. Okay, maybe I didn't run, but I forked over my dollar bill straight away. What a score, right?? Of course, I decided to line the chest with the paper.
THE REVEAL
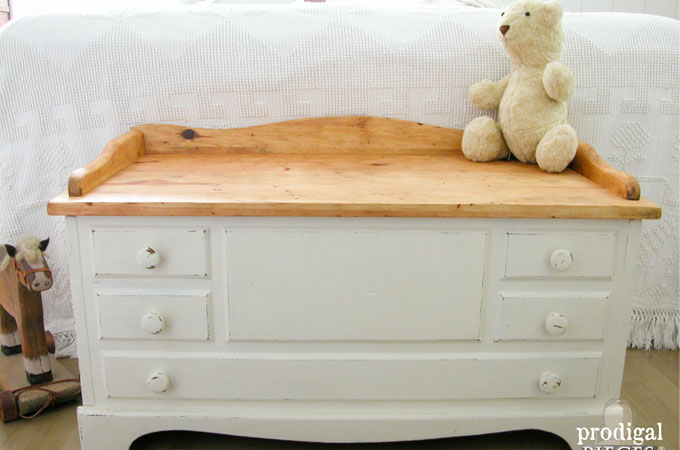
Last, here's the after...whatcha think?
 Additionally, the top is rustic anew and the faux drawer pulls make more sense to me.

 My favorite part is the ticking lining hiding that quirky text inside. God knew I would need it to make it this piece perfect.

 In addition, like most of my projects, this child's wooden chest is available in my online shop. What a sweet gift this will made.
[metaslider id=30251]
With that in mind, my purpose is to share my ideas as well as inspire, so won't you help me encourage others by pinning and sharing my DIY wooden chest makeover? Finally, you asked and I delivered. Up next, I am sharing one of my family's favorite recipes. In the same fashion, I'm making use of some garden goodness that is kid-pleasing and so good for your body. Head here!


Also, more of my projects for you like my DIY wooden chest:

