Earlier this week I showed you this vintage chest of drawers and promised you a makeover. To begin with, I thought it would be fun to use this piece to show you how to easily distress paint to create texture and a feel of days gone by. By the way, this chest was featured in
Woman's Day magazine - yay!

Initially, this chest of drawers had me drawn in when I first spied the legs, the height, and also the rose carved border along the bottom. However, it doesn't originally have casters, but I also grab a few from my stash and stuck them on - already the chest improved. Also, the drawers have damage and the previous owner had made some repairs that I was impressed with. Thankfully, the top was in great shape as well but didn't quite match the stain of the rest because it is a veneer with a different grain.

DIY TIME
You know me and my love for a wood and paint combination like I just recently did with
the other chest, so I decided to give the wood a fresh look. Firt, out comes my sander and away we go!

There's nothing like seeing that grain come alive to make my heart happy. While I typically go with a darker stain, this time I wanted a warm feel to the wood. Then, I use a Honey Maple stain by Minwax that I've used in years past.

NEXT STEPS
Next, the drawers and cabinet that got a light sanding too. I seriously was like a kid in the candy store to get started on this piece because of the vision I had for it with this color.

I've used it on this
Rustic Chic set...

and also, on this
Mid Century Modern credenza. Isn't it great how it suits all styles? Sadly, if you want to know the color, I can't tell you because it's a seconds paint.

TIPS
What is more, I am aiming for a rustic, very worn look. In order to achieve that, I whip out my petroleum jelly. Yup. Just like I used to distress paint on
my radio turned sewing cabinet.

When I was about 18 years old (you can guess how long ago that was - ahem), I watched a lady on PBS use it to distress furniture. Obviously, I am not the first to use it but thought you may have not heard of it before.
Furthermore, it can work with any paint, as this I'm using today is a high gloss paint - yes, even a gloss can look rustic. Initially, I start by smearing small amounts in places that would get normal wear. Subsequently, I dry brush one layer on the drawers and cabinet. Last, once the paint is dry (after about 2 hours), I take an old rag and rub the paint where I applied petroleum jelly.

The jelly resists the paint and allows for super-easy removal. In addition, it's less mess and easier on the hands too.
LAST STEPS
Finally, all that is left is the drawer pulls and I use a flat white paint by Rustoleum to give them a light coat. After that, I distress those with a bit of sandpaper.

Are you ready to see my method to distress paint in action?


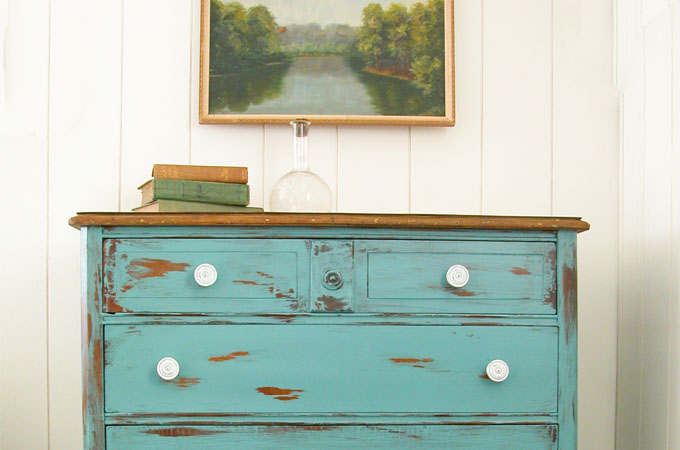
COLOR PASSION
I am ever falling in love with this color that just showcases life. Not only am I able to pair it with my new favorite painting found at a garage sale for $1, but also have a bit more to sahre. The story behind the artist was that he was an electrical engineer who injured his hands so could no longer work. He took up painting to provide income. I would say he is one gifted man, wouldn't you? I'm saving it for when we are done with our
kitchen remodel and move onto our living room.

But even so, how about them legs and carvings...swoon.


Now, I have to ask...Are you going to give this method to distress paint a try? Likewise, for those of you that are not really into painting or just love this chest, you can find it in
my online store.

SHARE
Additionally, pin and share so others can learn a new trick too. Thank you for the love! ♥

In sum, if that has whetted your appetite for paint, I think you're going to love this thrift store chest that gets a new look.
See the after HERE.

Before you go, be sure to
sign up for my newsletter. Until next time!

 PINTEREST | EMAIL
Also, more of my work for you to enjoy like how to distress paint:


 Initially, this chest of drawers had me drawn in when I first spied the legs, the height, and also the rose carved border along the bottom. However, it doesn't originally have casters, but I also grab a few from my stash and stuck them on - already the chest improved. Also, the drawers have damage and the previous owner had made some repairs that I was impressed with. Thankfully, the top was in great shape as well but didn't quite match the stain of the rest because it is a veneer with a different grain.

 There's nothing like seeing that grain come alive to make my heart happy. While I typically go with a darker stain, this time I wanted a warm feel to the wood. Then, I use a Honey Maple stain by Minwax that I've used in years past.

 I've used it on this Rustic Chic set...

 When I was about 18 years old (you can guess how long ago that was - ahem), I watched a lady on PBS use it to distress furniture. Obviously, I am not the first to use it but thought you may have not heard of it before.
Furthermore, it can work with any paint, as this I'm using today is a high gloss paint - yes, even a gloss can look rustic. Initially, I start by smearing small amounts in places that would get normal wear. Subsequently, I dry brush one layer on the drawers and cabinet. Last, once the paint is dry (after about 2 hours), I take an old rag and rub the paint where I applied petroleum jelly.
When I was about 18 years old (you can guess how long ago that was - ahem), I watched a lady on PBS use it to distress furniture. Obviously, I am not the first to use it but thought you may have not heard of it before.
Furthermore, it can work with any paint, as this I'm using today is a high gloss paint - yes, even a gloss can look rustic. Initially, I start by smearing small amounts in places that would get normal wear. Subsequently, I dry brush one layer on the drawers and cabinet. Last, once the paint is dry (after about 2 hours), I take an old rag and rub the paint where I applied petroleum jelly.
 The jelly resists the paint and allows for super-easy removal. In addition, it's less mess and easier on the hands too.
 Are you ready to see my method to distress paint in action?


 But even so, how about them legs and carvings...swoon.

 Now, I have to ask...Are you going to give this method to distress paint a try? Likewise, for those of you that are not really into painting or just love this chest, you can find it in my online store.
 In sum, if that has whetted your appetite for paint, I think you're going to love this thrift store chest that gets a new look. See the after HERE.
 Before you go, be sure to sign up for my newsletter. Until next time!


