 To say I'm excited for the young couple I got the chest from is an understatement. They purchased a downtown building in my city that has seen many days and ugly updates. However, they are renovating it back to the original glory it once was. We're talking uncovering the pressed tin ceiling hiding behind a drop ceiling, old wood floorboards revealed under carpet, and so much more. I wanted to do a happy dance! It makes my heart happy when others see past the obvious to the beauty beyond. Count me first in line to see it in the after.
STORY TIME
I came home with many treasures from this place and will show them all to you in time. Today, I'm focusing on this waterfall hope chest. It had wear to the top with missing veneer, water rings, dents, scratches, etc. Nothing too hard to handle. The interior was immaculate and has a beautiful cedar lining. I just love the smell of cedar, and wood in general. Do you ever pick up raw wood just to smell it. Stop and try it sometime - bliss, I tell ya.
 The lock was missing part of its components, but that's fine with me because I have to remove it for resell anyway due to recalls, etc. To get this makeover started, I first grabbed some veneer remnants from my stash that I salvaged off of past projects. It's hard to find good veneer nowadays so I keep all I can. My stash scrap was adhered to other layers of veneer, so I soaked it in water and separated the layers.
REPAIRS
While doing that, I chiseled out the damaged section on the chest top to make it square to receive a repair patch. After many attempts, I finally got an exact piece to fit and it looks good as new. Next up, I removed the lock set and filled it with a piece of dowel using wood glue. I cut it to length, used wood filler to fill in any gaps.
 Then, I used my orbital sander and my Corner Cat to knock down the worn finish on the top and on the sides to prepare it for the next steps.
 Before starting any finish work, I decided to add a few decorative strips to the front to add dimension. I simply cut them to length, and attach with wood glue and few brads using my brad nailer. I love that thing! No compressor needed, easy to use, and so fast. BAM!

FIRST STAIN
Once prepped, the top got a deep new color that I've loved to use in the past with an Espresso Stain. It gives the wood such richness and I like it better than the orangey feel the wood had prior. I applied the stain, let rest for 5 minutes and then wiped off with a lint-free cloth. I let the stain cure for about 30 minutes, and then applied two coats poly topcoat, making sure to let the coats cure for 2 hours in between.
For the base of the waterfall hope chest, I chose these two complimentary colors: beige and soft white. Again, using my Palm Pro, I give the cabinet two coats letting cure 2 hours in between.
I applied the stain, let rest for 5 minutes and then wiped off with a lint-free cloth. I let the stain cure for about 30 minutes, and then applied two coats poly topcoat, making sure to let the coats cure for 2 hours in between.
For the base of the waterfall hope chest, I chose these two complimentary colors: beige and soft white. Again, using my Palm Pro, I give the cabinet two coats letting cure 2 hours in between. Now comes the fun part...adding dimension. Woot! I wanted to create a point of interest on the front of this piece, so I purchased this wooden medallion applique. Isn't it lovely?
 I'll show you what it looks like in a bit, but first I added some touches of wax and gilding.
First, I apply a coat of wax using a brush or lint-free cloth. I chose to use Clear Wax, but you can use any of the other waxes (white, black, gray, or brown).
I'll show you what it looks like in a bit, but first I added some touches of wax and gilding.
First, I apply a coat of wax using a brush or lint-free cloth. I chose to use Clear Wax, but you can use any of the other waxes (white, black, gray, or brown).

MORE TEXTURE
For the center panel that I painted in a different color, I also use waxes to make an oval where that wooden applique I showed you earlier is going to go. I daresay that this is easier to use than glazing and gives such a fun effect.
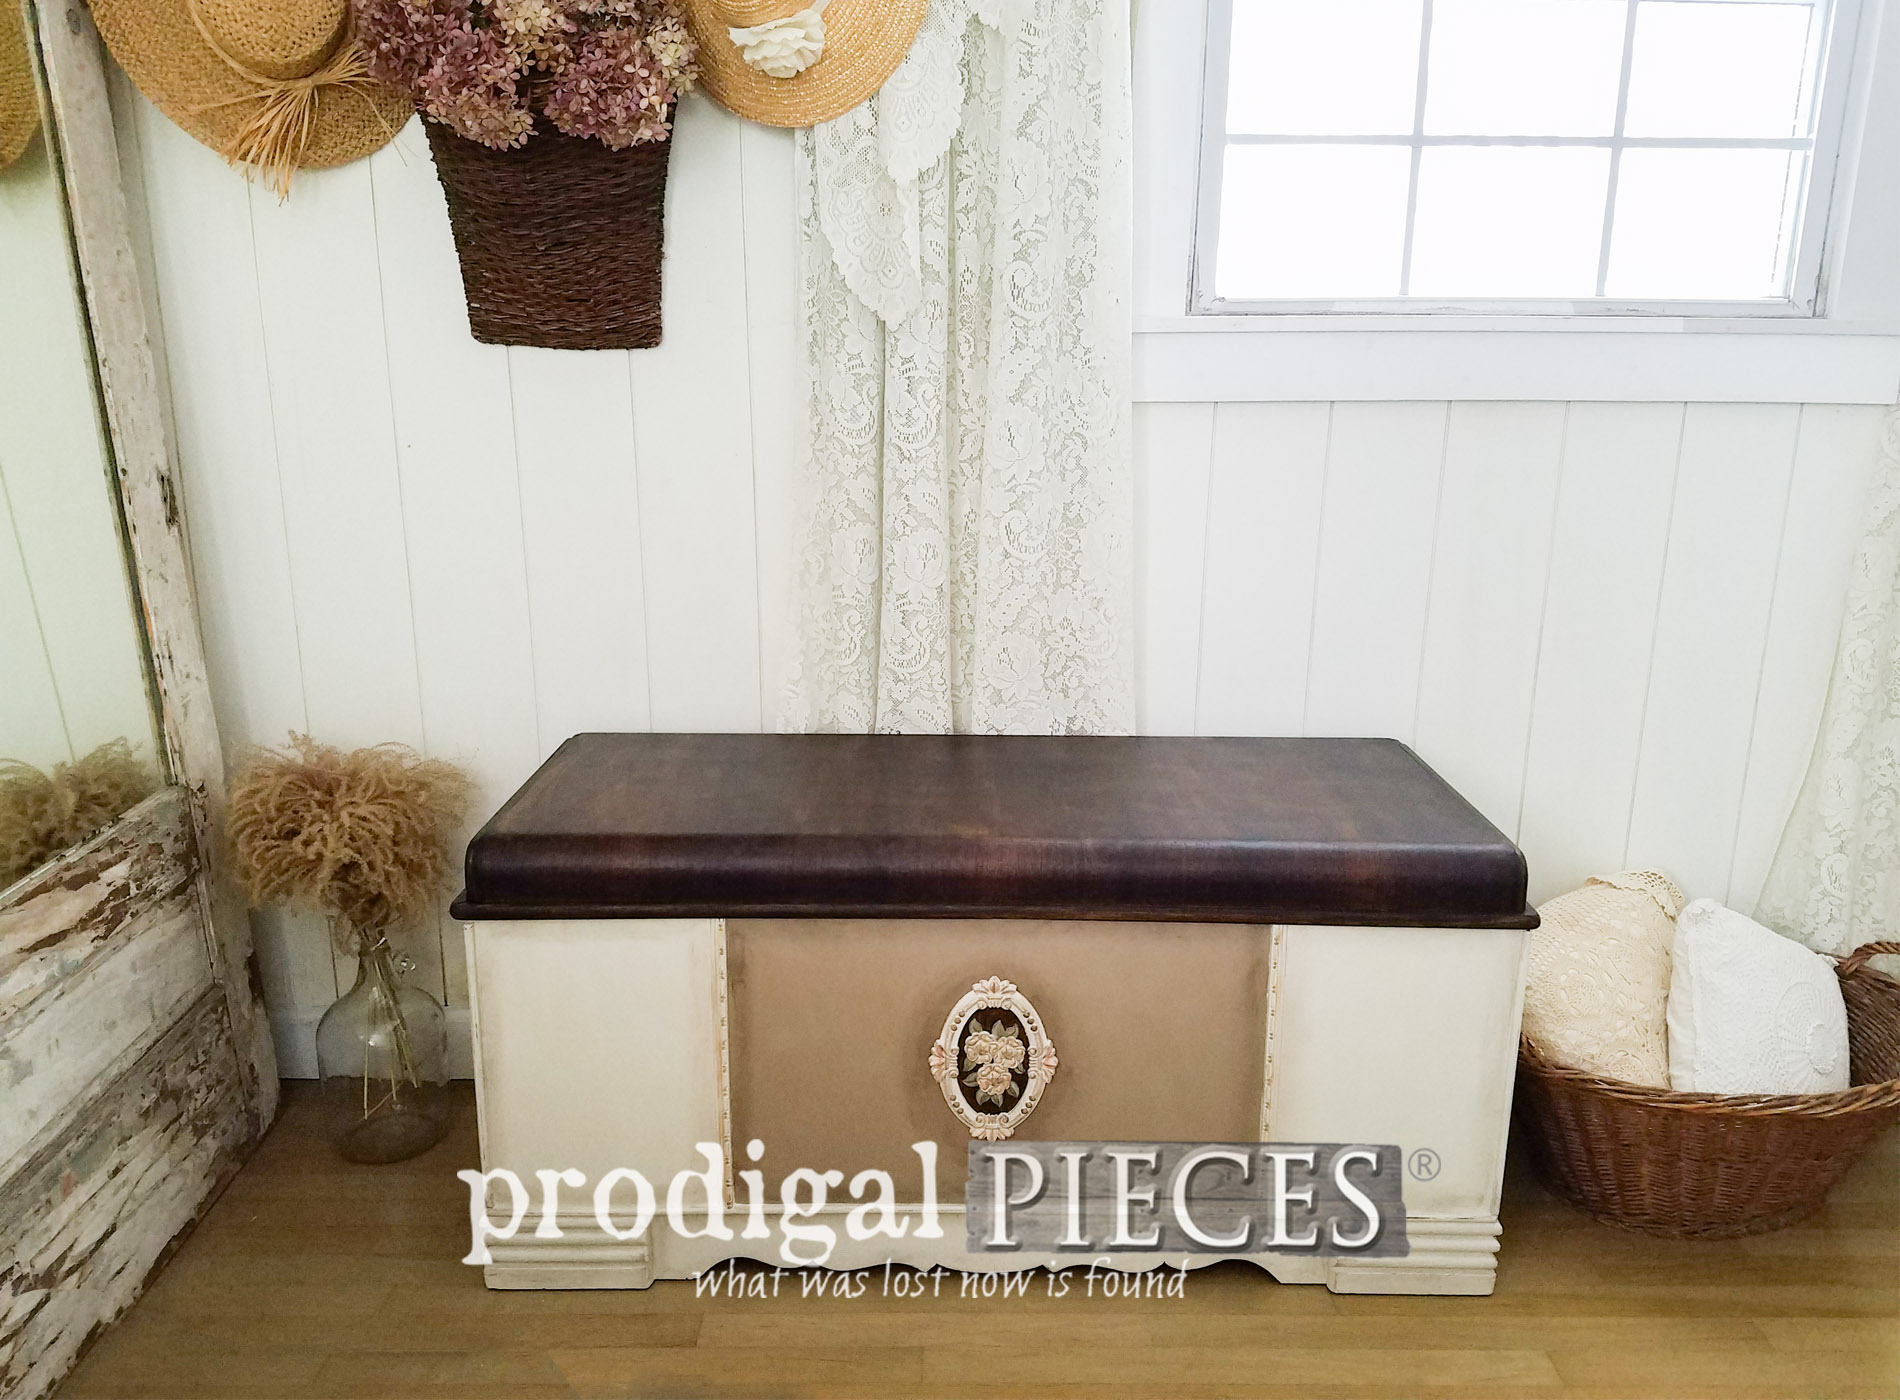
THE REVEAL
Now the base of the waterfall hope chest is ready for my last step to add my wooden applique. With wood glue and my nailer, I just pop it on and I'm done! Hooray!
 Here's an upclose peek of that applique with the painted details and gilded waxes highlighted.
 The new look has the aged feel I love. mmm...My favorite part is the outcome of the top. You can hardly even see the repair piece I patched with. High five for having a veneer stash, right?

 The interior cedar lining didn't need anything, so I left it in its raw beauty. Those built-in trays are super handy for holding your treasures. I still have my hope chest that my parents gifted to me on my high school graduation day that also happened to be my 18th birthday. It is crammed full of my treasures - I love it.


LESSONS
What a fun project this was and I hope you learned a few tricks too. For me, it's all about making your home your own. There is no need to buy high end furniture from box stores. There are so many quality vintage and antique pieces that just need a little love.
 Normally about now I would be telling you this chest is available in my online store, but it sold before I could even list it. I'm so excited that it's on its way out west to a very special young lady as a gift from her wonderful mama. Such a blessing to be a part of it all.
 Do pin and share this waterfall hope chest makeover to inspire other to give DIY a try. You never know who needs that spark of inspiration to get them on their own journey.
 Up next, my little stash of wooden thrifted items gets a new life. Any guesses? Take a peek at their new life HERE in the reveal post.

Before you go, be sure to sign up for my newsletter. Until next time!

Also, more projects like this waterfall hope chest:

