Time flies when you're having fun, right? When the second Tuesday of the month rolls around, I'm excited to announce it's Trash to Treasure Tuesday time. yeehaw! My blogger friends and I share our latest DIY inspiration for you. You'll see their work in a bit, however, until then, check out this stand of vintage TV trays that caught my eye. Vintage TV Trays Before Makeover by Larissa of Prodigal Pieces | prodigalpieces.com prodigalpieces While I'm not sure what era you grew up in, I'm sure you do know what a TV tray is. Thankfully, I grew up in a home without much emphasis on parking it on sofa for hours on end, I do know these tables are quite handy for sick days, game time, and just all-around fill-in-the-spot fun. When taking a closer look at this set, it can be deceiving. The fold out great, but... Vintag TV Tray Standing | prodigalpieces.com prodigalpieces ...they look like me in the morning...saggy and tired. tsk.

Bowed Vintage TV Tray Top | prodigalpieces.com

DIY TIME

I'd say it's high time for a facelift to this fun set, don't you? First, I take the legs and hardware off. Then, I need to remove those sagging center panels. Thankfully, I could knock apart the frame and slide it out. Disassembled Vintage TV Tray for Makeover | prodigalpieces.com prodigalpieces 
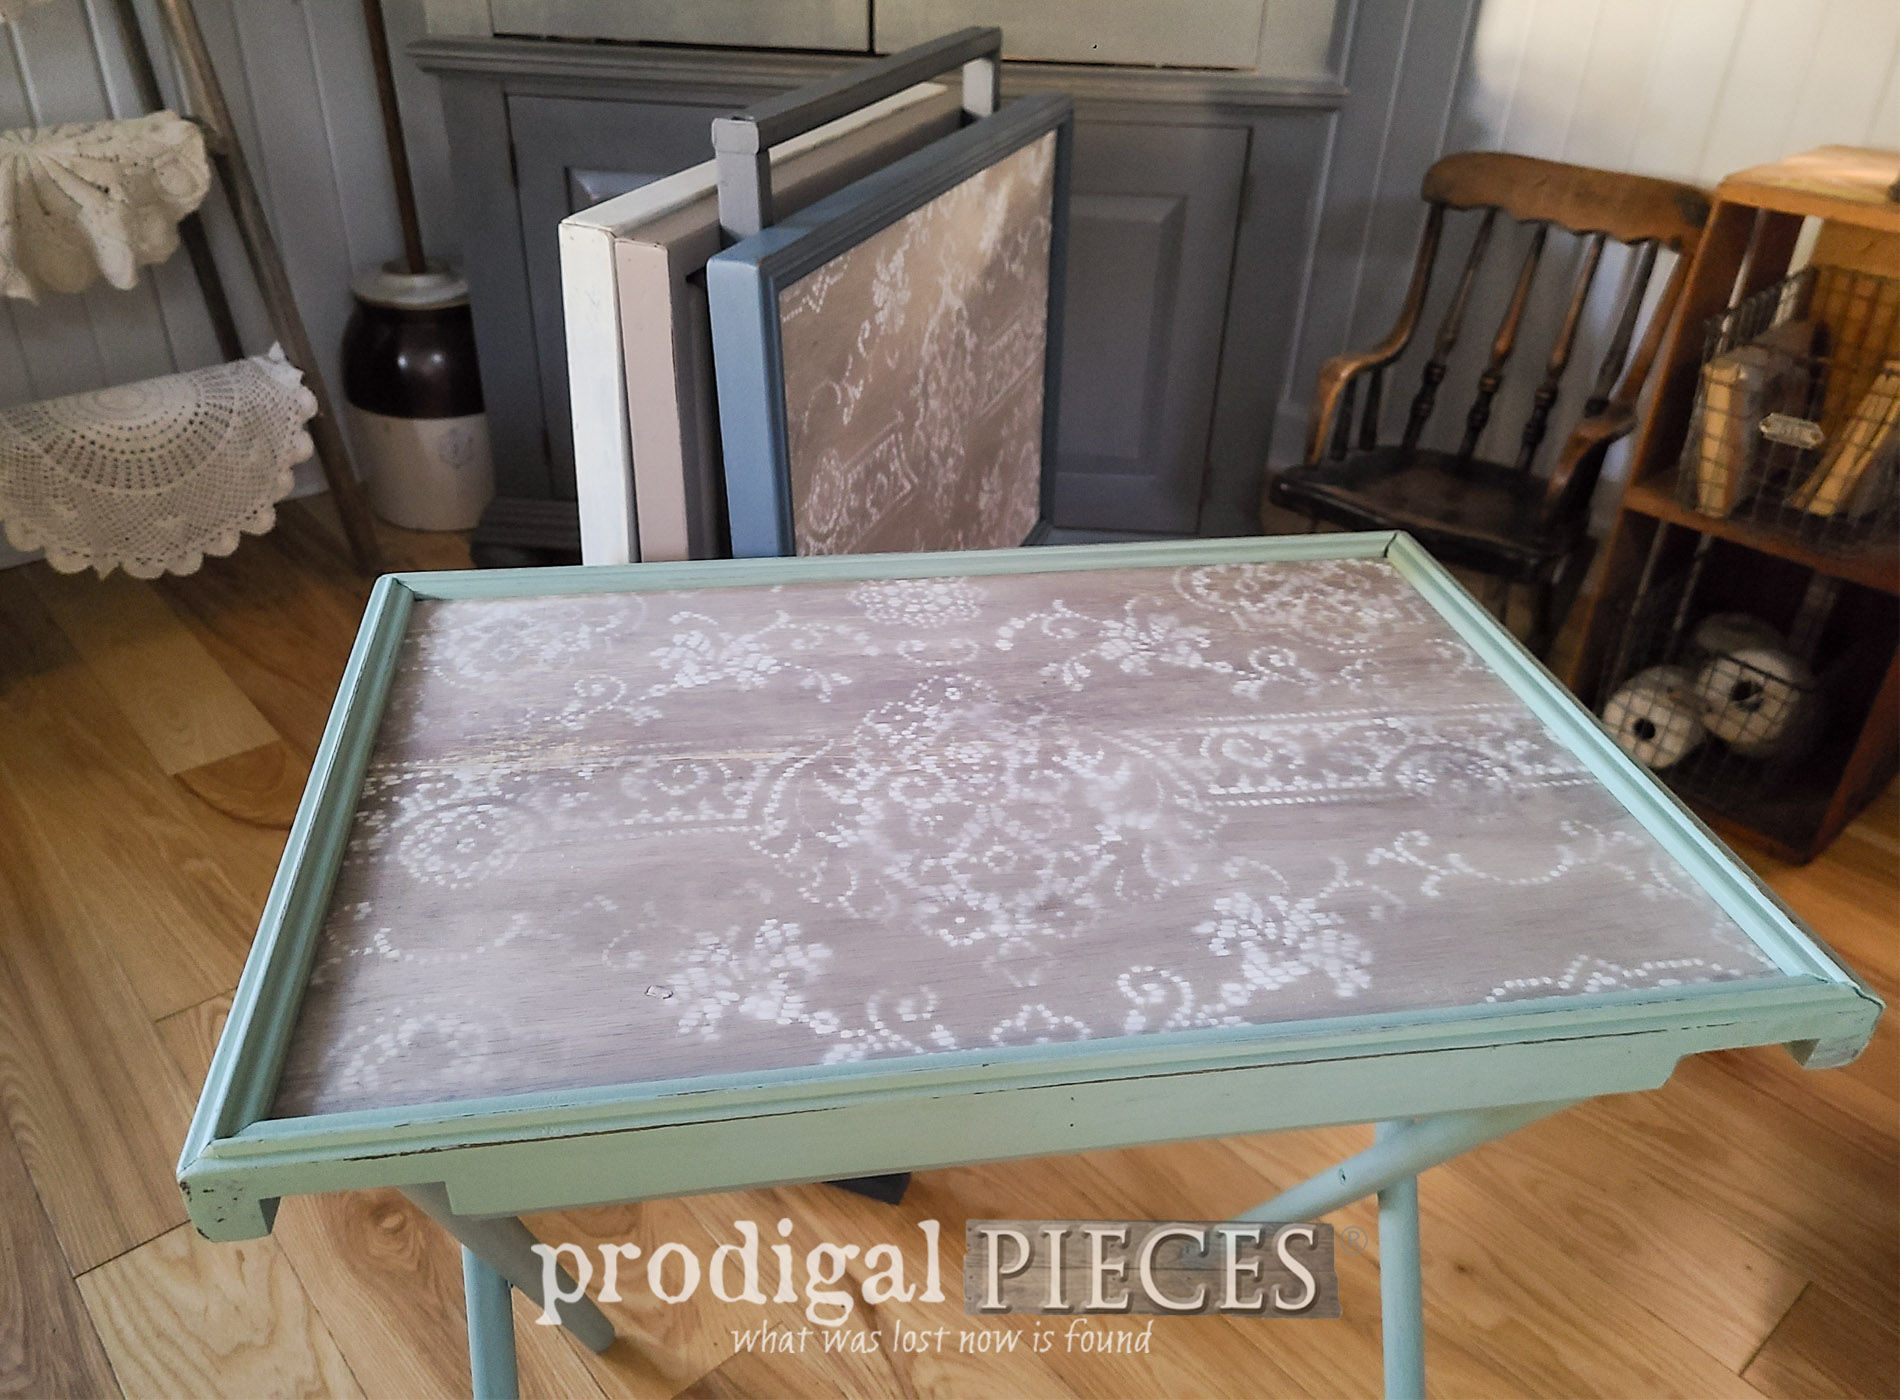
While I'm at it, I paint the tables in soft muted tones like this soft aqua. Can I just say it took me HOURS to work on them, but so worth it. I'm curious...when you have projects that provide oodles of thinking time, what do you do? Because most of my creations end up in another part of the world, I like to pray for the recipient. Or I like to just talk to my heavenly Father.  Walking down memory lane is always an adventure as well. Painting TV Tray Frame in Muted Colors | prodigalpieces.com prodigalpieces Next, while my paint is curing, I need to cut new panels for the table tops. I have to use a 1/8" thickness that fits the original. Using my circular saw, it's as easy as cutting butter. *note: I love to support local and purchased this at a family business. They had me checked out and loaded in less than 10 minutes with a smile and respect. I definitely don't receive that kind of customer service at a big box store. For every dollar you spend locally puts $3 back into the community. Cutting Luan Wood Panel for Vintage TV Tray Tops | prodigalpieces.com Then, once the panel is cut into four pieces, I need to sand the edges just a bit because this luan is a mite thicker than the routed TV tray slots. After that, I use a tannin reactive stain which ages the wood right before your eyes. In the past, I show how I use all the variations of this stain for many fun DIYs. Reactive Stain Application on TV Tray Tops | prodigalpieces.com

NEXT STEPS

Additionally, I want to add a touch of flair to the tray tops. One of my favorite ways to decorate is to use an old tablecloth or piece of lace to make a layered look. You can see how dressed up a dumpster chest of drawers or this vintage tea cart. I simply lay it on and spray through it. Spray Painting Lace for Design on Vintage TV Trays | prodigalpieces.com One thing, however, I noticed that the paint isn't as strong a contrast as I thought it would be. The paint was being absorbed into the wood. Luan is a very open grain (porous) manufactured wood. In any event, I'm still happy with the outcome. Last, but not least, I assemble with my nailer and apply a few topcoats with my DIY furniture lazy susan. Wagner Spray Shelter with DIY Furniture Lazy Susan | prodigalpieces.com Spraying TV Tray Stand with Poly Topcoat | prodigalpieces.com

THE REVEAL

Finally, after several hours of my DIY fun, the vintage TV trays are ready for many more years. Set of Vintage TV Trays with Stand Refreshed by Larissa of Prodigal Pieces | prodigalpieces.com prodigalpieces furniture diy home vintage Stacked on Stand Vintage TV Trays by Larissa of Prodigal Pieces | prodigalpieces.com prodigalpieces vintage furniture tv farmhouse Buh-bye boring and blah. Hello fun color! I worked hard on these and hope it shows, but it was so worth every bit. In my house, these tables would be fought over with my six kids based on color alone. However, they are perfect for any room and any use you can think of. Vintage Folding TV Tray with Stenciled Top by Larissa of Prodigal Pieces | prodigalpieces.com prodigalpieces diy farmhouse furniture Closeup of Vintage TV Tray with Lace Stenciling Design by Larissa of Prodigal Pieces | prodigalpieces.com prodigalpieces tv tray home Do you love the colors I chose? I wanted a muted vibe, but a little fun too. Stenciled Vintage TV Tray Top by Larissa of Prodigal Pieces | prodigalpieces.com prodigalpieces tray vintage stencil furniture Boho Style Folding Vintage TV Trays with Stand by Larissa of Prodigal Pieces | prodigalpieces.com prodigalpieces boho farmhouse diy furniture If you'd like to make these a part of your home, you can find them and much more available in my online store.

Shop Prodigal Pieces | shop.prodigalpieces.com prodigalpieces

Additionally, I'd love to hear what you would do with this set, so leave a comment below. And pin and share to inspire others to give DIY a try too.

A thrifted pair of vintage TV trays with stand are prime for a rebuid and makeover. Come see at Prodigal Pieces | prodigalpieces.com prodigalpieces vintage furniture diy

NEXT UP

Up next, I found two pairs of wooden shutters, and they are ready for a new lease on life. See their new look and life HERE! Pair of Wooden Shutters Before Upcycle | prodigalpieces.com prodigalpieces To get these DIY tips & tricks in your inbox, be sure to sign up for my newsletter. It's time to see what my Trash to Treasure friends have for you! {SCROLL DOWN}

blog signaturePINTEREST | EMAIL

Trash to Treasure Tuesday | prodigalpieces.com Trash to Treasure November 2021 | prodigalpieces.com
  1. Confessions of a Serial DIYer
  2. Salvaged Inspirations
  3. Girl in the Garage
  4. Artsy Chicks Rule

Also, more trashure makeovers like these vintage TV trays:

From damaged to Boho beauty, this vintage Ikat Mid Century Modern Dresser Makeover is one you need to see. Full step-by-step video tutorial by Larissa of Prodigal Pieces | prodigalpieces.come prodigalpieces diy furniture home homedecor homedecorideas bedroom boho midcenturymodern vintageA food grade drum can become a functional and decorative asset to your garden as a DIY rain barrel by Prodigal Pieces | prodigalpieces.com prodigalpieces diy garden selfsufficient home  


Denise - Salvaged Inspirations

Shared publicly - 2021-11-09 06:03:33

I love the soft muted colors you picked for this set. And the stencil detail makes it so fun! Pinned XOXO

Larissa

Shared publicly - 2021-11-09 06:12:11

I wanted them to blend in to decor rather than scream, "Look at me!" haha. Thanks so much, Denise.

Holly Hicks

Shared publicly - 2021-11-09 06:53:07

Hello, I actually have a set sanded and ready for the next step. They stepped right into my shed unfortunately. I bought some stencils to use on the top, of course since then I’ve seen other stencils I’d rather use. I was just wondering about the hardware. I know it would definitely look better taken off before painting, but I was a little intimidated by them and afraid I wouldn’t be able to put them back on properly. The set I have is fine otherwise, it doesn’t have a frame to have to mess with either. Thanks for inspiring me to finish my project up, yours turned out lovely!

Larissa

Shared publicly - 2021-11-09 07:02:21

Sweet! I did remove the hardware and legs and made sure to keep the sets together (ie...tops with same bottoms removed). It was a matter of removing a few screws for my set. Pretty simple and made my project much easier to tackle. Have fun with it!

Niki

Shared publicly - 2021-11-09 10:10:04

I think they turned out very cute Larissa. The colors work fabulously and are a fun-almost beachy shabby chic vibe. Thank you for sharing about your faith and that you pray for whomever may end up with these wonderful little trays. My husband is not a fan of stencils at all, and probably not transfers either so if it where me I would most likely leave the tops plane or just a hint of something around the edges. Also I’m finally getting rid of all the blue in my house- there is some in every room. I’m trying to go more neutral and earthy and am really interested in army green lately. So if I had a set of these to redo that is the direction I would go. Have a blessed rest of your week, I look forward to seeing what you do with those shutter!

Larissa

Shared publicly - 2021-11-09 10:18:42

Thank you for the sweet words, Niki. I truly have fun sharing and creating and know that hearing from those I write for make it all worth the while. I, too, love green and have been doing many green pieces lately, so I went with earth tones of blue...the sky is beautiful inspiration. :) I'm wrapping up my shutter project as I type. woot!

Jen @ Girl in the Garage

Shared publicly - 2021-11-09 10:55:21

These are beauties, Larissa- great save!!

Larissa

Shared publicly - 2021-11-09 11:41:07

Thanks! A bit more work than I bargained for, but totally worth it.

Christy James

Shared publicly - 2021-11-09 11:54:07

These turned out fabulously, Larissa! You can tell you put a lot of love into bringing them back to life! You didn't mention if you planned to list them, so maybe their keepers eh? XOXO

Nancy @ Artsy Chicks Rule

Shared publicly - 2021-11-09 12:40:47

Wow, those turned out beautifully!! xo

Larissa

Shared publicly - 2021-11-09 12:50:13

Thanks girl! It was like doing four different projects at one and kept me hopping. :D They are in shop...thanks!

Larissa

Shared publicly - 2021-11-09 12:51:05

aww...thanks, Nancy. That tacky brown had to go. tee hee!

Carroll Xavier

Shared publicly - 2021-11-09 14:05:42

Gorgeous! Love the lace detail on the tabletops, especially the soft effect. It's all in the details! Love the colors, too, and that you didn't paint them all the same. I was given two sets of Adirondack chairs, and how you did this project would be perfect for finishing them.

Larissa

Shared publicly - 2021-11-09 16:14:41

Ooh...I love that idea, Carroll!! :D I know these tables can be kinda an odd item to add to a space, so I wanted to dress them up to make them more fun. Have a blast with your chairs!

Marie - Interior Frugalista

Shared publicly - 2021-11-10 11:27:22

Nice save, Larissa, and I love the lace detail on the tops.

Larissa

Shared publicly - 2021-11-11 05:01:50

Thank you, Marie. They were relatively easy to fix, but took so much time. I kinda did a head-smack with the time I allotted myself - I'm sure you can relate! :D

Cheryl Atkinson

Shared publicly - 2022-11-29 19:16:27

Hi Larissa! I love the way these turned out. Definitely not boring now

Larissa

Shared publicly - 2022-11-30 05:21:19

Thank you, Cheryl. ;)

Sign Up To Comment