It's that time again! Time for my friends and I to share our makeovers for
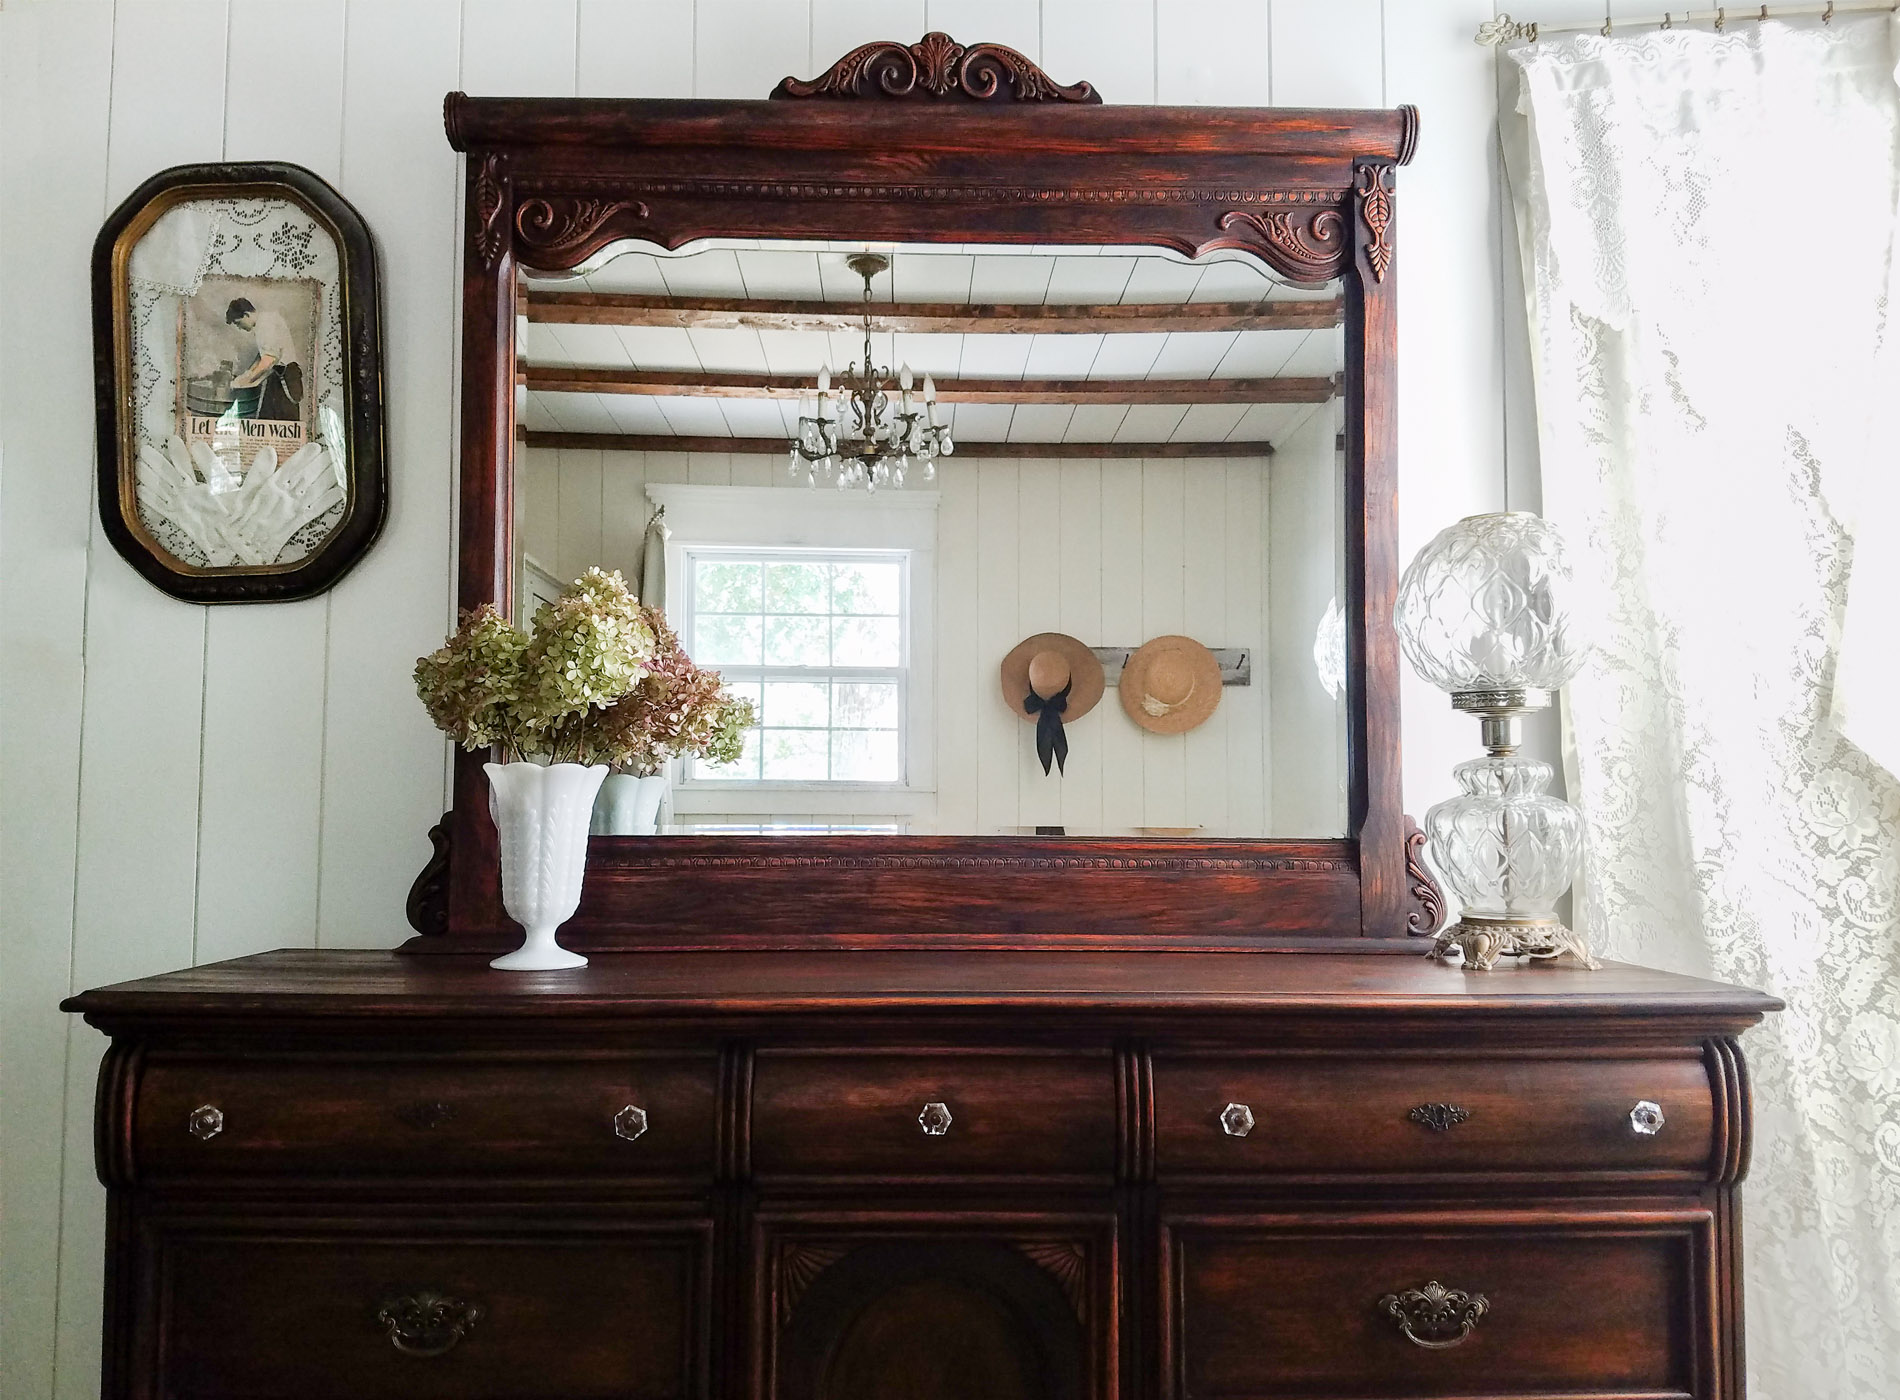
Furniture Fixer Uppers Day. This is always a blast for me because I love to share a new makeover and show you what my friends are up to as well. You'll see theirs features in a bit. Today, this beautiful Lexington dresser is going to help me show you updated furniture can be super easy.

I will be perfectly honest that I really did NOT want to do anything to this piece since it's beautiful as is. However, the fact that it had scratches and I had no interest in refinishing it since it is made of veneers and the stain color is so...orange, I had to do something.
In addition, I actually got an entertainment armóire with it as well that has its own issues. In a later post, I will show you what that becomes, see it
OVER HERE.

Not only is this set is huge, heavy, but it is also full of potential. Many of you ask me time and time again about pieces that you own and love, but aren't happy with the current style it is. You are looking for a way to update without having to paint or refinish yourself. So, here is my goal: to take a perfectly fine piece in current condition that will not only create updated furniture, but make both those who love a new look and those who love wood happy. However, there's no sanding involved, no removal of hardware or glass, all you need is the right tools. Stay with me here.
DIY TIME
Yes, this is paint and I intend to you use it. tsk. But, how I'm going to use it is key. With only one coat I will show you how to retain the wood presence but update it to a new look.
First, I begin by wiping everything down to get a clean surface to start on, then the fun begins! I tackle the mirror and all its ornate details. Why? This brush allows me to cut-in the mirror easy-peasy with no tape and fill in all those nooks and crannies.

Then, working in small batches, I brush on a light coat and wipe off excess with a soft cloth. This leaves behind the black to highlight the wood. Kinda like a glazing as I've shown
in these posts, but with more of a presence.

UP NEXT
Next, you are going to continue this process over the entire piece.

Looking like a hot mess, right? Stay with me... You don't want to coat the entire surface, but just get enough paint on that you can work it around. Again, work in small batches. Wipe in direction of the grain and blend until it all flows together.
Now for the drawers. This set has a mix of acrylic and brass pulls and I leave them right where they are. Likewise, I tackle the drawer fronts. It allows me to catch the trim and fill in nicely around each pull. I work one drawer at a time, brushing paint on and then using the cloth to remove excess.

This all goes very quickly and I'm done in no-time. You could stop right there. However, if you prefer a topcoat like I did, you can use a black wax to seal it all in. Use either a soft cotton cloth to apply and remove excess with buffing. Finally, let cure and you're done!
THE REVEAL
Finally, this piece now has a whole new vibe to it, doesn't it? Besides, I didn't have to do much to it at all.


No sanding, no removing hardware, and no prep work. Could it be any easier? I think not. In addition, and equally important is that you could do this with any color of paint for a washed effect. Needless to say, the options are limitless.


Consequently, JC even asked if we could keep it since he loves it that much. Well...that says enough in itself. As much as we'd like to, we don't need this piece, so it's yours for the taking in
my online store.


SHARE
Additionally, pin and share this technique for those that want to learn how to easily get updated furniture.

Up next, this plant stand deserves to get a fresh new look. See the
after HERE in this post.

Stay tuned to see by
signing up for my newsletter. Time to head below to see what my gal friends have for you!

 PINTEREST | EMAIL

- The Interior Frugalista
- Petticoat Junktion
- Girl in the Garage
- Confessions of a Serial DIYer
- Just the Woods
Also, more DIY projects like my updated furniture tips:


 I will be perfectly honest that I really did NOT want to do anything to this piece since it's beautiful as is. However, the fact that it had scratches and I had no interest in refinishing it since it is made of veneers and the stain color is so...orange, I had to do something.
In addition, I actually got an entertainment armóire with it as well that has its own issues. In a later post, I will show you what that becomes, see it OVER HERE.
I will be perfectly honest that I really did NOT want to do anything to this piece since it's beautiful as is. However, the fact that it had scratches and I had no interest in refinishing it since it is made of veneers and the stain color is so...orange, I had to do something.
In addition, I actually got an entertainment armóire with it as well that has its own issues. In a later post, I will show you what that becomes, see it OVER HERE.
 Not only is this set is huge, heavy, but it is also full of potential. Many of you ask me time and time again about pieces that you own and love, but aren't happy with the current style it is. You are looking for a way to update without having to paint or refinish yourself. So, here is my goal: to take a perfectly fine piece in current condition that will not only create updated furniture, but make both those who love a new look and those who love wood happy. However, there's no sanding involved, no removal of hardware or glass, all you need is the right tools. Stay with me here.
 Then, working in small batches, I brush on a light coat and wipe off excess with a soft cloth. This leaves behind the black to highlight the wood. Kinda like a glazing as I've shown in these posts, but with more of a presence.

 Looking like a hot mess, right? Stay with me... You don't want to coat the entire surface, but just get enough paint on that you can work it around. Again, work in small batches. Wipe in direction of the grain and blend until it all flows together.
Now for the drawers. This set has a mix of acrylic and brass pulls and I leave them right where they are. Likewise, I tackle the drawer fronts. It allows me to catch the trim and fill in nicely around each pull. I work one drawer at a time, brushing paint on and then using the cloth to remove excess.
Looking like a hot mess, right? Stay with me... You don't want to coat the entire surface, but just get enough paint on that you can work it around. Again, work in small batches. Wipe in direction of the grain and blend until it all flows together.
Now for the drawers. This set has a mix of acrylic and brass pulls and I leave them right where they are. Likewise, I tackle the drawer fronts. It allows me to catch the trim and fill in nicely around each pull. I work one drawer at a time, brushing paint on and then using the cloth to remove excess.
 This all goes very quickly and I'm done in no-time. You could stop right there. However, if you prefer a topcoat like I did, you can use a black wax to seal it all in. Use either a soft cotton cloth to apply and remove excess with buffing. Finally, let cure and you're done!


 No sanding, no removing hardware, and no prep work. Could it be any easier? I think not. In addition, and equally important is that you could do this with any color of paint for a washed effect. Needless to say, the options are limitless.

 Consequently, JC even asked if we could keep it since he loves it that much. Well...that says enough in itself. As much as we'd like to, we don't need this piece, so it's yours for the taking in my online store.

 Up next, this plant stand deserves to get a fresh new look. See the after HERE in this post.
 Stay tuned to see by signing up for my newsletter. Time to head below to see what my gal friends have for you!


