 So, the challenge is before me. However, I did not choose this challenge. Y'all, I am continually having to inform my husband how to not bring home a nightmare for me. Yes, YEARS of discussions and assumed understanding still gets me a hot mess of a gun cabinet. How?? How in the world does this happen over and over again. I believe there is some sort of translator that gets turned on whenever I talk...really.

THE BACKSTORY
I sent him to (1) only buy this if it was made of solid wood (remember this project from 2017?), (2) not smoky smelling, and (3) worth an easy makeover. Not only did it not hit on any of those points, but he even said, "I think it may have a smoke odor". I stare in silence as those words came out of his mouth as if in a time lapse waiting for laser beams to flash out from my eyes. And...I hadn't even looked at it yet. Does this ever happen to you? Well, per my usual, I see it as a challenge and am such a sucker for a beaten up, stinky, broken thing. However, due to my physical setbacks I have put this off because I knew it would be a doozy. Here's the breakdown of it. Screws poking in and out, holes everywhere because they seemed to have attached it to something else. That would be because the door had ¼" thick glass in it that made it heavier than the unit itself. That means that when you open it, it falls on you. Guess how I figured that out?? {{head smack}}MORE MESS
Then, there's the busted door on the bottom and all sorts of mish-mashed hardware trying to keep this thing together. Missing trim and jerry-rigged parts. A literal HOT MESS! What's a gal to do? Pull on her her big girl work gloves and beat this thing apart!! hahaha!
DIY TIME
Just for the record, I am out in 21° weather with four layers on and bundled like the Michelin man. What's keeping me warm is my thoughts of what I'd like to do to my husband. ha! Just kidding... First, the hole in the top needed remedied, so I grab a board out of my stash and fill in the gaps. I cut with my miter saw, trim with my jigsaw, and attach with my nailer. Next, I build a base out of more lumber so that it would give this cabinet a base. I gave myself a pat on the back for figuring it out fairly quickly. It's been months since my brain has dealt with miters and measurements. It felt good.
MORE DIY
In addition, to the base, I also created crown molding for the top. I had to attach a piece of ply for it to attach to, but that was the easiest part of the whole deal. Not only did the outside need love, but also the interior. I punched out those strips on the bottom shelf to make it easy to clean. After that, I cut shelves from wood my brother gave me. Last, but not least, I decided to put this tongue and groove paneling I bought off the clearance rack at the home improvement store. (always stop and check there...really!) Plus, I salvaged trim off the broken bottom door to replace the missing trim on the side. Here is my improved and upcycled gun cabinet in the works. Oh, and I haven't even started the door yet...sigh. The door had hardware all over, hung incorrectly and basically needed rebuilt.

NEXT STEPS
At this point I haven't installed the shelves yet because it will be easier to paint the cabinet with them separate. Before I paint though, it's time to apply a stain to the paneling and shelves. It's the same Summer Oak I used on the vintage sewing desk I upcycled in this post. For this, my Stubby Brush handles the stain beautifully. I'm done in a few minutes and call it a day. I spent from 8:30 am to 6 pm out in that cold, so I had enough.
The next day, I head back at it sanding down all the wood filler I had filled in the day before. My sander and I had fun giving this ol' thing a fresh slate. As soon as I felt it was ready for the finish work, I drag it inside for both of us to warm up.
For this, my Stubby Brush handles the stain beautifully. I'm done in a few minutes and call it a day. I spent from 8:30 am to 6 pm out in that cold, so I had enough.
The next day, I head back at it sanding down all the wood filler I had filled in the day before. My sander and I had fun giving this ol' thing a fresh slate. As soon as I felt it was ready for the finish work, I drag it inside for both of us to warm up.
PAINT TIME
Finally, it's time to paint!! I'm so excited to be at this part of the makeover. It's where I can see my vision coming to fruition - like the light at the end of a freezing tunnel. haha. I couldn't decide on a color scheme because there are many ways I could have made this suit any style. In the end, since I went with the light stain, I wanted to stick to that vibe. I'm using the same paint I have on my trim, bookshelves, and kitchen cupboards in my home. It's called Slate Green with the most gorgeous color to match what I'm after with this project. Once the paint cures, I add a bit of wax for dimension and depth to all the features.
THE REVEAL
Huge sigh of relief because my upcycled gun cabinet is now complete. Check out my farmhouse cupboard reveal. {{applause}}
 I'm super stoked it came out as I'd hoped, though I did have my moments of freakout-ness. Like...burn this baby!! eep.

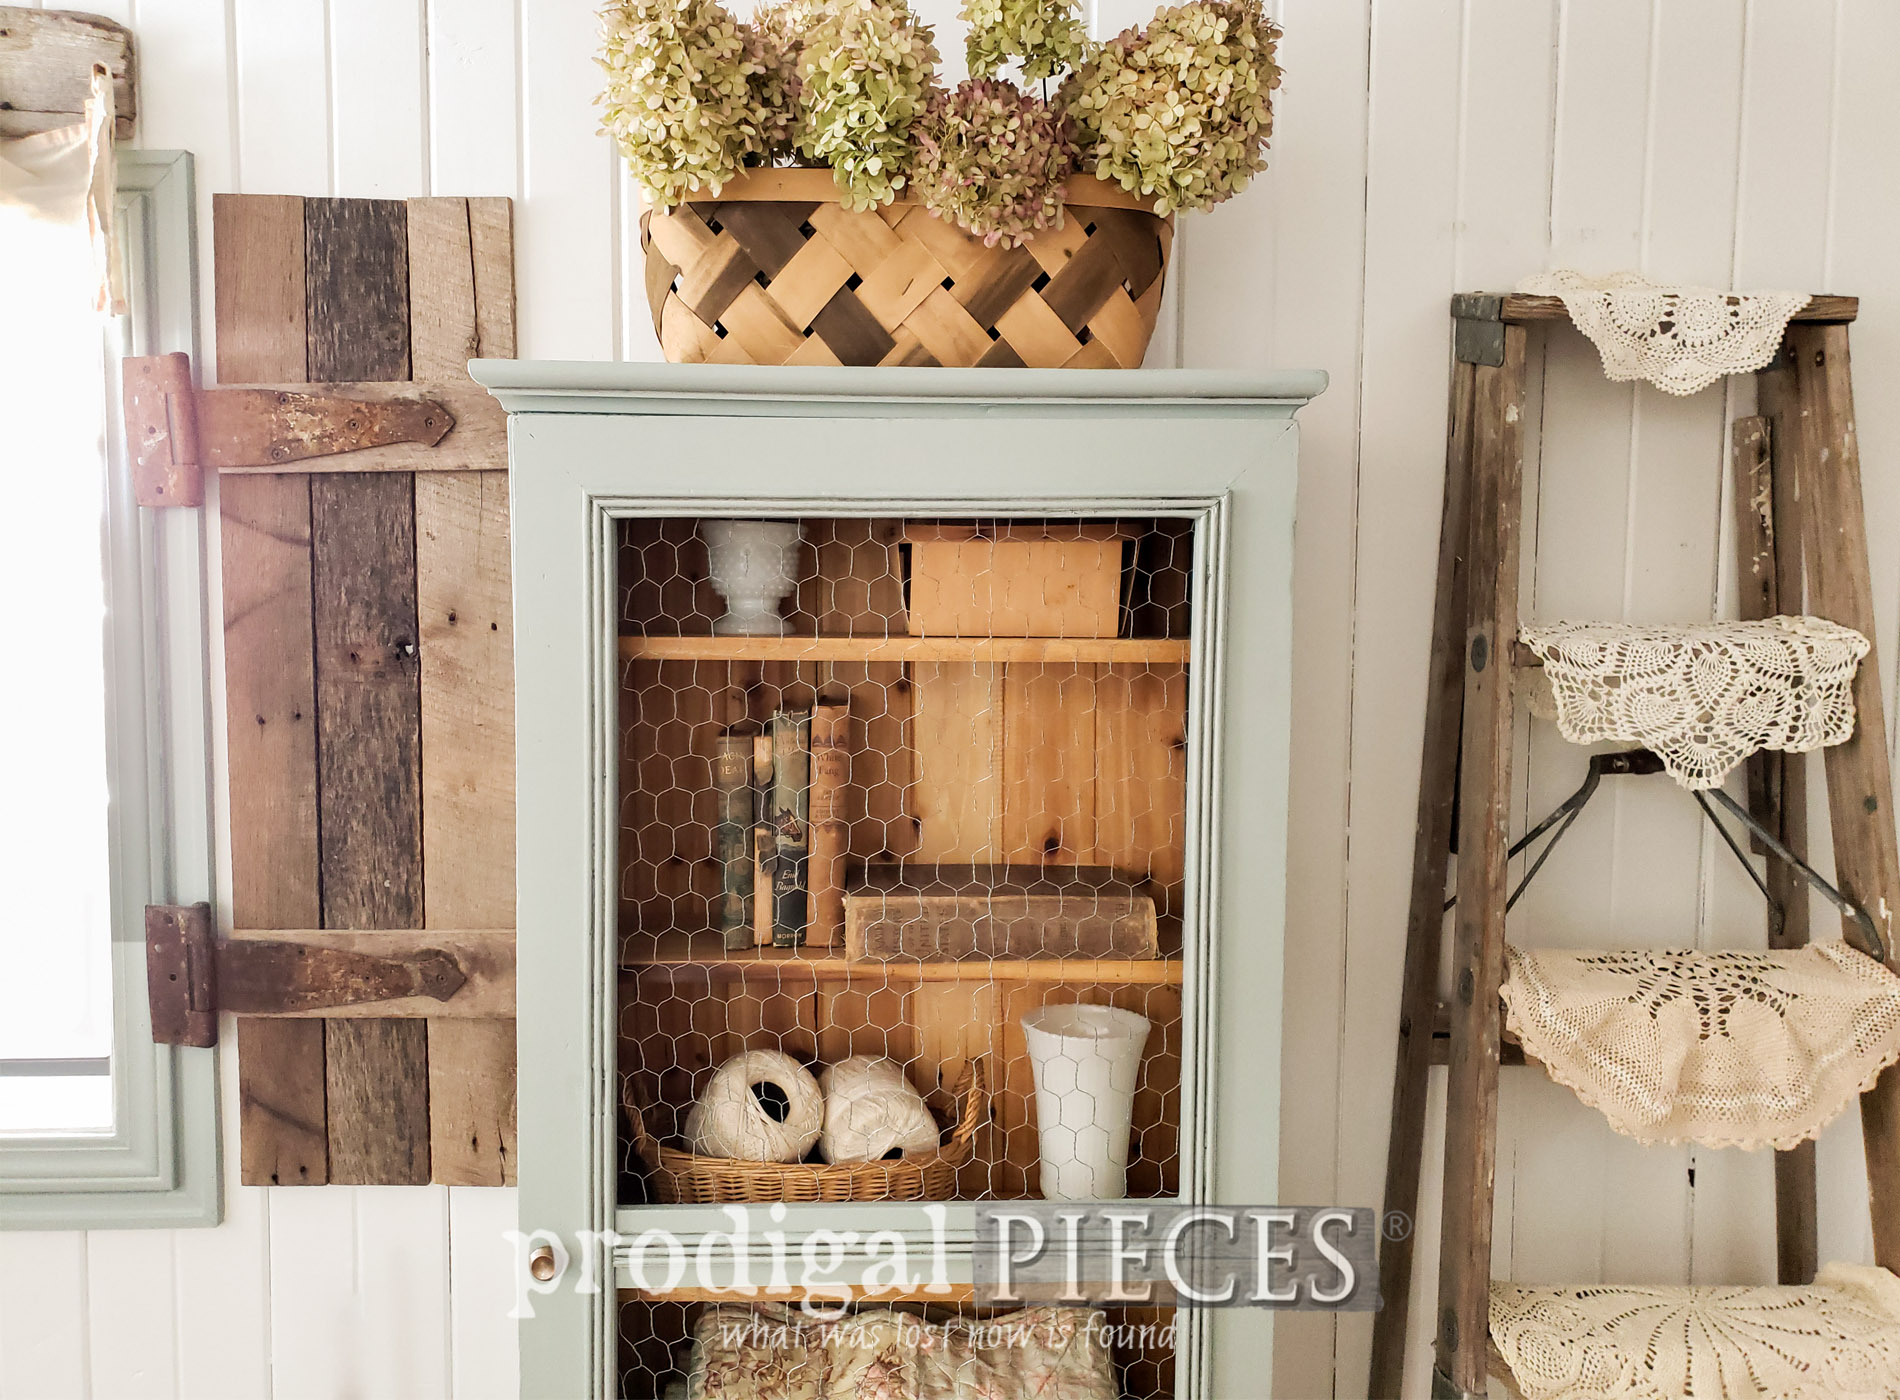
 The interior now showcases the shelving I made, while the door is much more suited for this size of cupboard. Although that glass was beautiful and so thick, it was also super heavy. Chicken wire for the win! You can see how I've used it in past projects HERE.
 Aside from the color, my fave is the wood elements that are getting to shine.

 My goal each time I tackle a project like this is to inspire you. Maybe you have a project piece that is waiting for you to roll up your DIY sleeves and have at it?
If you'd like to make this farmhouse cupboard your own, you can find it and more in my online shop. (SOLD)
My goal each time I tackle a project like this is to inspire you. Maybe you have a project piece that is waiting for you to roll up your DIY sleeves and have at it?
If you'd like to make this farmhouse cupboard your own, you can find it and more in my online shop. (SOLD)
[metaslider id=30251]

SHARE
Also, do pin and share this upcycled gun cabinet. I have no doubt there are more like this who need a new lease on life. Right?? Up next, I'll be giving this pile of "stuff" a new lease on life. HEAD HERE.
 To get these DIY tips & tricks in your inbox, be sure to sign up for my newsletter. PLUS, you will get your FREE Furniture Buying Checklist and special discount to my shop. Until next time!

More projects like this upcycled gun cabinet:

