 You may be wondering what I see in this thing, but really, it's all about function. Also, I adore pieces that can go in most any room. In spite of the wear, this one is made solid enough, but just needs some TLC.

*post sponsored by HomeRight(see full disclosure)
Not only was the back was flimsy, but it also had a large hole drilled into it (probably for a cord to fit through). In addition, the paint job was seriously lacking. Plus, there were drips and runs all over.
DIY TIME
No worries, right? My first order of business in this upcycled bookcase makeover is to remove the back with my handy-dandy hammer. That was stress reliever! haha! After that, I used a substantial amount of wood filler to fill all the scratches, dents, and nail holes. Once cured, my sander came out to play and help me finish it all up. Since I removed the backing the stability of the bookcase was faltering. However, that is easily fixed by adding some back braces that would serve a dual purpose. I cut a couple of 1"x 4" boards with my miter saw, and then added some pocket hole joints on each end with my Kreg Jig. My sweet helper decided she could attach them for me with my drill. Love it! For the front, I cut a few small strips to build it up for what I'm going to add next. In addition, my nailer made this a super easy job to do.

NEXT STEPS
Here is the start of my upcycled bookcase with the back braces and front pieces added.
 Now the bookcase is sturdy and just needs a bit more wood filler and sanding and it's ready for paint. Woot!
So... I surveyed your guys' thoughts on social media what I should name this color and without a doubt the top picked named was Avocado. I don't think I'm going to name it that (although I eat avocado almost daily), but it sure was a hoot to hear all your responses. Thanks for the input!
Now the bookcase is sturdy and just needs a bit more wood filler and sanding and it's ready for paint. Woot!
So... I surveyed your guys' thoughts on social media what I should name this color and without a doubt the top picked named was Avocado. I don't think I'm going to name it that (although I eat avocado almost daily), but it sure was a hoot to hear all your responses. Thanks for the input!

PAINT TIME
Isn't this a pretty color? It's an alkyd enamel in a gloss finish that I knew would be prefect for my project. Because this kind of paint can be a horror to apply with a brush, I chose to use my paint sprayer. You can see how I've used the sprayer in previous posts HERE, and my demos of the spray shelter in these posts. PLUS, I have the build plans to make your own furniture Lazy Susan over HERE. It makes painting a piece go faster and no fuss in your finish.
For this upcycled bookcase, I'm using my black nozzle and blue tip. (the sprayer comes with two nozzles and three different tips so you can change it up easy-peasy).
You can see how I've used the sprayer in previous posts HERE, and my demos of the spray shelter in these posts. PLUS, I have the build plans to make your own furniture Lazy Susan over HERE. It makes painting a piece go faster and no fuss in your finish.
For this upcycled bookcase, I'm using my black nozzle and blue tip. (the sprayer comes with two nozzles and three different tips so you can change it up easy-peasy).

 When using your sprayer, feel free to practice on a piece of scrap or cardboard. To get a gorgeous, finish, be sure to use your shoulder, not your wrist, to move the sprayer evenly. Also, begin spraying before you hit your project with spray and continue off. This will help prevent and runs and drips and give you even coats.
MORE DIY
Next, let your coat cure. I let my first coat cure for about 6 hours. *this is an enamel and takes much longer than latex, milk, or chalk paint, but oh so durable. Once it was cured, I add another coat and let cure again. Here it is after two coats of paint. Looking good! While my layers were curing, I set about to work on the rest of my exciting idea. You see, I wanted to create a miniature farmer's market for a pretend play set. Making kid toys and dolls is easily one of my favorite things to do. Just so happens I have 6 kids in my gaggle that love to receive said gifts. Happy mama + happy kids = FUN!
BUILD IT
Here is their farmer's market I made for them ages ago with cardboard and still going strong. You can see my post about it and what goodies lie behind that fun setup in this post HERE. Since they already have this one, I am making this one just for the sheer fun of it. I dug into my wood stash and created this stack of mini crates. Aren't they cute?
 All they needed were some rope handles added. Likewise, that was made simple with my drill and this drawer pull jig.
 In addition to woodworking, my other favorite pastime is sewing. My other stash afforded me these fun gingham fabrics. I'm not kidding...it pays to have a stash! Some of this would become an awning, tablecloth, and...
 ...an adorable apron perfect for a little farmer's market munchkin.

THE REVEAL
Finally, after working on all these fun parts of my bookcase evolution, it's finally time to show you. Ta da!

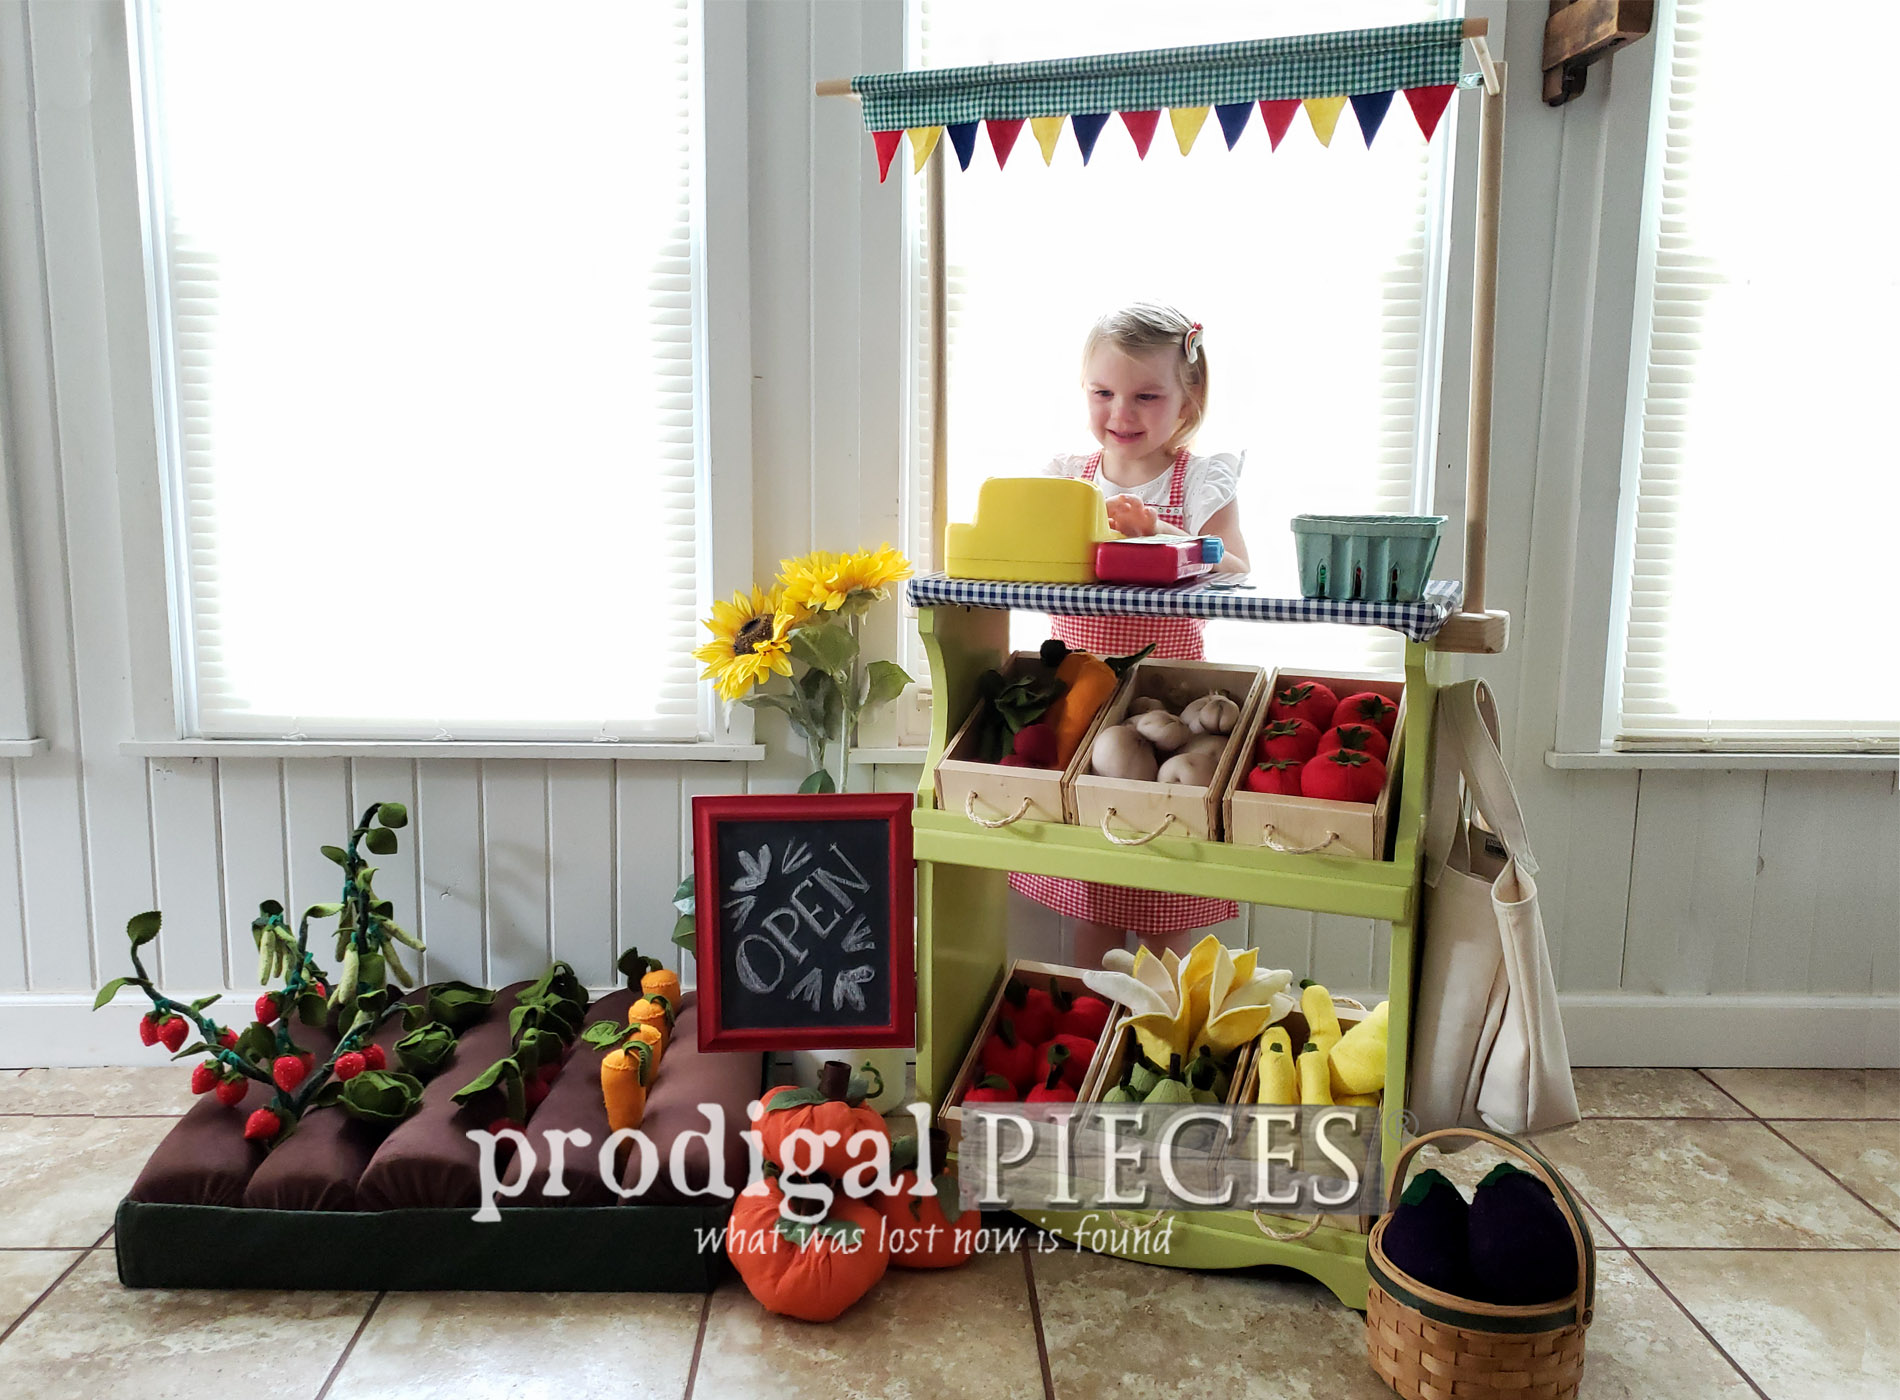
 Can you tell I had a blast?! My little market features six crates, a removable tablecloth, embroidered market bags, and even a fold-away shop sign. Additionally, the awning is removable and sets up easily too. My colorful little bunting is from felt wool scraps I have from all my past creations. Last, every part of this stand is made from something I have in my stash. I was SO STOKED!

SO CUTE
And, I have to mention this cutie pie in the red gingham apron. She helped and her sibs encouraged me the whole way and were even game to help me stage it. They are my biggest fans! Often I remind her she's not allowed to get bigger. In spite of my efforts, I don't think she's listening. sniff...
 I wasn't kidding when I say I LOVE to do this! Pretend play is an amazing thing to do as a child and encourages such awesome life skills. And, you know I have fun playing too. tsk.


FOODIE
With that in mind, in case you think I'm completely nuts, I didn't make all these food items just for this project. haha! These are the food items that I made for my kids years ago for their market and helped me through a difficult time. Stitch therapy is wonderful. However, if you'd like to find some of these food items for your own kids, there are so many crafty folks with handmade goodies here in these shops.

 Since my kids already have a larger market of their own, this fun farmer's market is available for purchase in my store. Someone is going to be getting a sweet combo of market bags, market, and apron. Purchase food items HERE.


 I had a blast (literally) sharing this with you today. Not only is my goal to inspire you, but also to see beyond the obvious and have some fun while you're at it. Thanks for joining me in my DIY adventure!
SHARE
In addition, pin and share this upcycled bookcase farmer's market to inspire others too. Up next, these seriously sad set of canisters is up for reprieve. Can we maybe say Pinterest fail? See their after HERE.
 Before you go, be sure to sign up for my newsletter. Until next time!

Also, more DIY projects like this upcycled bookcase:

