
DIY TIME
So, the other day I was as giddy as a kid in a candy store because I got to yank out some of my upper kitchen cabinets for our remodel. (You can read about our remodel HERE) We are finishing up the flooring and will be moving on to counters, sink, and bar soon. I'm excited!! Once I was done giving myself a workout, here is what was left...
 Since my house looks like a complete tornado hit it right now with my appliances in my living room and furniture coming out the wazoo, I wasn't about to stuff this mess into a corner. Oh no, it was going to find a purpose and quick. (plus I don't throw anything away if I can help it)
The first subject for my repurposed kitchen cabinets idea as this wooden scalloped valance that went above our sink.
Since my house looks like a complete tornado hit it right now with my appliances in my living room and furniture coming out the wazoo, I wasn't about to stuff this mess into a corner. Oh no, it was going to find a purpose and quick. (plus I don't throw anything away if I can help it)
The first subject for my repurposed kitchen cabinets idea as this wooden scalloped valance that went above our sink.
 Though our house was built in the 50's I think this was pretty much original to the kitchen and hated to remove it, but it didn't suit our new look. I took it out to my my new compound miter saw and gave a few buzzes.
 Can I just say this saw has made my life so much easier! And...notice the chaos everywhere after I just got a garage makeover? tsk. Never fails.
FIRST REVEAL
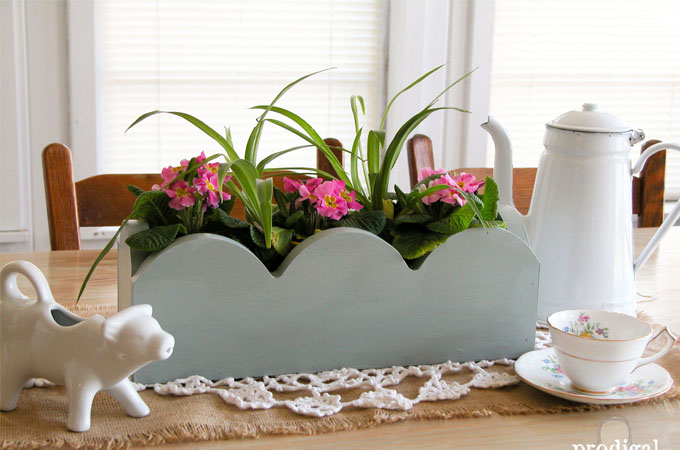
After a little bit of assembly, here is what I came up with for that valance... ...a sweet centerpiece for my newly refinished table! I love its spring-like feel and the scalloped design.
 I just cut the pieces to size, added a piece of plywood to the bottom, and then nailed it all together with my nail gun. Easy and effective - my kind of decor.


NEXT STEPS
My next choice of "junk" from my repurposed kitchen cabinets pile was the face of the cabinet. I had to tear it apart to remove it, but it still has life. I gave it a good sanding with
my orbital sander, and then filled the holes with wood filler.
I gave it a good sanding with
my orbital sander, and then filled the holes with wood filler.
 Once prepped and ready to go, I used my other life-saving tools, my Kreg Jig and drill to create a few pocket screw holes.

SECOND REVEAL
It wasn't long after that I decided to turn it into this... ...a message center fit for a family. I added a piece of chipboard on the one side painted with flat black paint and on the other a piece of cork board to create a place to tack up a memo or reminder.
 For the bottom, I added a piece of board to create a shelf with a tiny canning jar I found while fleatiquing. My favorite part is the hand-carved wooden buttons I nabbed from my stash and I adhered to push pins.
 Aren't they cute? They jar is glued down as well with some E6000®, so it isn't going anywhere and makes a great place to store chalk, pens, pencils... whatever.
 By the way, did you know you can sharpen regular ol' chalk with a pencil sharpener? Makes for nice clean lines with your chalkboard art and much like chalk markers. I love hacks like that!
If you would like to own these sweet pieces, you can find them in my online shop available for purchase.
By the way, did you know you can sharpen regular ol' chalk with a pencil sharpener? Makes for nice clean lines with your chalkboard art and much like chalk markers. I love hacks like that!
If you would like to own these sweet pieces, you can find them in my online shop available for purchase.
[metaslider id=30251]
In the meantime, I hope you've enjoyed seeing how my nutty brain works. Oh, and yes, I do have more plans for the remainder of that pile. hee hee hee. You can see what I did with that shelf HERE. Do pin and share so that others can be inspired to see the goodness that lies in their junk. ♥
MORE FUN
Later on this week is our Themed Furniture Makeover time and it's all about CHOCOLATE. My subject is my very own sideboard. eep! It's coming out of my kitchen remodel and the question is....will I keep it? Come on over to find out. Before you go, be sure to sign up for my newsletter. Until next time!
 Now, take a look at what my DIY blogger friends have whipped up for you!
 Girl in the Garage Girl in the Garage |
 Bless'er House Bless'er House |
 Artsy Chicks Rule Artsy Chicks Rule |
 Confessions of a Serial DIYer
 |
While you're at it, here are more rethunk junk for you like my repurposed kitchen cabinets:

