 Over the years, it has held our homeschool materials and served us well. I would sit and daydream..."One day I will finally give you the makeover you deserve".

DIY TIME
Today's the day! I have decided to part with my gem. (gasp!) When we pulled it out from our dining area, I loved the extra light. We have always planned a built-in for that space anyway, so out she goes. Though it's missing some pulls, damage to the legs and doors, and just needing some TLC. The top was in great shape with some very large scratches, but those would come out easily.
 I grabbed my orbital sander and got to work taking it down to raw wood.

STAIN
Now down to the good stuff and no intent to paint, I used my favorite stain used in our master bedroom and bathroom, called Early American. Once the top has a poly topcoat, it is time for the cabinet. I decided to use DecoArt Chalky Finish Paint in Lace, since it's very much like my favorite antique white and easy to use. By the way, yes, I realize the theme is chocolate, but I'm getting there. Hang on! tee hee.
GLAZING
Once the cabinet was painted and cured, it was time to add my chocolate glazing. (see I told ya!) This is the same method I used on our garage door (recipe here) and on the piano face turned transom in our bedroom remodel. Easy-peasy. Whenever I'm glazing, I have the Karate Kid guy, Mr. Miyagi, in my head saying, "Wipe on, wipe off". Bet that takes you back...and if you have no idea what I'm talking about then you're missing out. tsk.
 Next, it was time for the pulls. I used Rust-Oleum Heirloom White to spray the pulls and then glazed them as well.
 Question: Is it just me or do those pull pieces in the background look like white nipples to you? Ahahahaha...I couldn't help but point out what I saw! Sorry. hee hee.
Back to sideboard...ahem.
Question: Is it just me or do those pull pieces in the background look like white nipples to you? Ahahahaha...I couldn't help but point out what I saw! Sorry. hee hee.
Back to sideboard...ahem.
REPAIR
Well, the hardware on the doors have been a booger ever since I owned it. So, I whipped out my Dremel and ground them down to fit. Wouldn't you know I fix it when I'm not going to keep it. That's how it always works, right? I distress and then add the topcoat to the cabinet to give it extra protection.
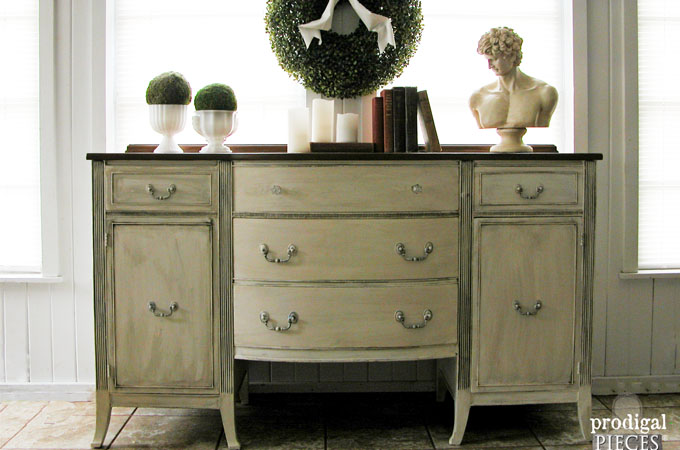
 I love the classic lines of this piece. However, if it was in better shape, would have been pretty refinished to all wood. Check out that top...
 ...sigh. So pretty, isn't it? I think everyone should have vintage sideboard.
 The glazing adds depth to the paint and brings all all the gorgeous detail.

 I choose to replace the missing pulls with two glass knobs since I like to keep original pulls with a piece as much as possible. I think the contrast adds character.
Well, I said I wasn't keeping this gem, so if you're interested in making this vintage sideboard your own, you can find it in my online shop.
I choose to replace the missing pulls with two glass knobs since I like to keep original pulls with a piece as much as possible. I think the contrast adds character.
Well, I said I wasn't keeping this gem, so if you're interested in making this vintage sideboard your own, you can find it in my online shop.
[metaslider id=30251]
SHARE
Sometimes furniture is worn and dated, and a little bit of DIY attitude goes a long way. Do pin and share to inspire others! ♥ Up next, I'll be sharing with you how to take these flea market finds and turn them into farmhouse decor. Head here to see!
 To get these DIY tips & tricks in your inbox, be sure to sign up for my newsletter. PLUS, you will get your FREE Furniture Buying Checklist and special discount to my shop. Until next time!
 Before you head off, be sure to check out all the CHOCOLATE themed furniture makeover goodness!
More furniture makeovers like this vintage sideboard:

