My heart always races at this time of the month because it's
Trash to Treasure time! Bonus is that Christmas is just around the corner and celebrating our Savior's birth can't be beat. My choice for today's
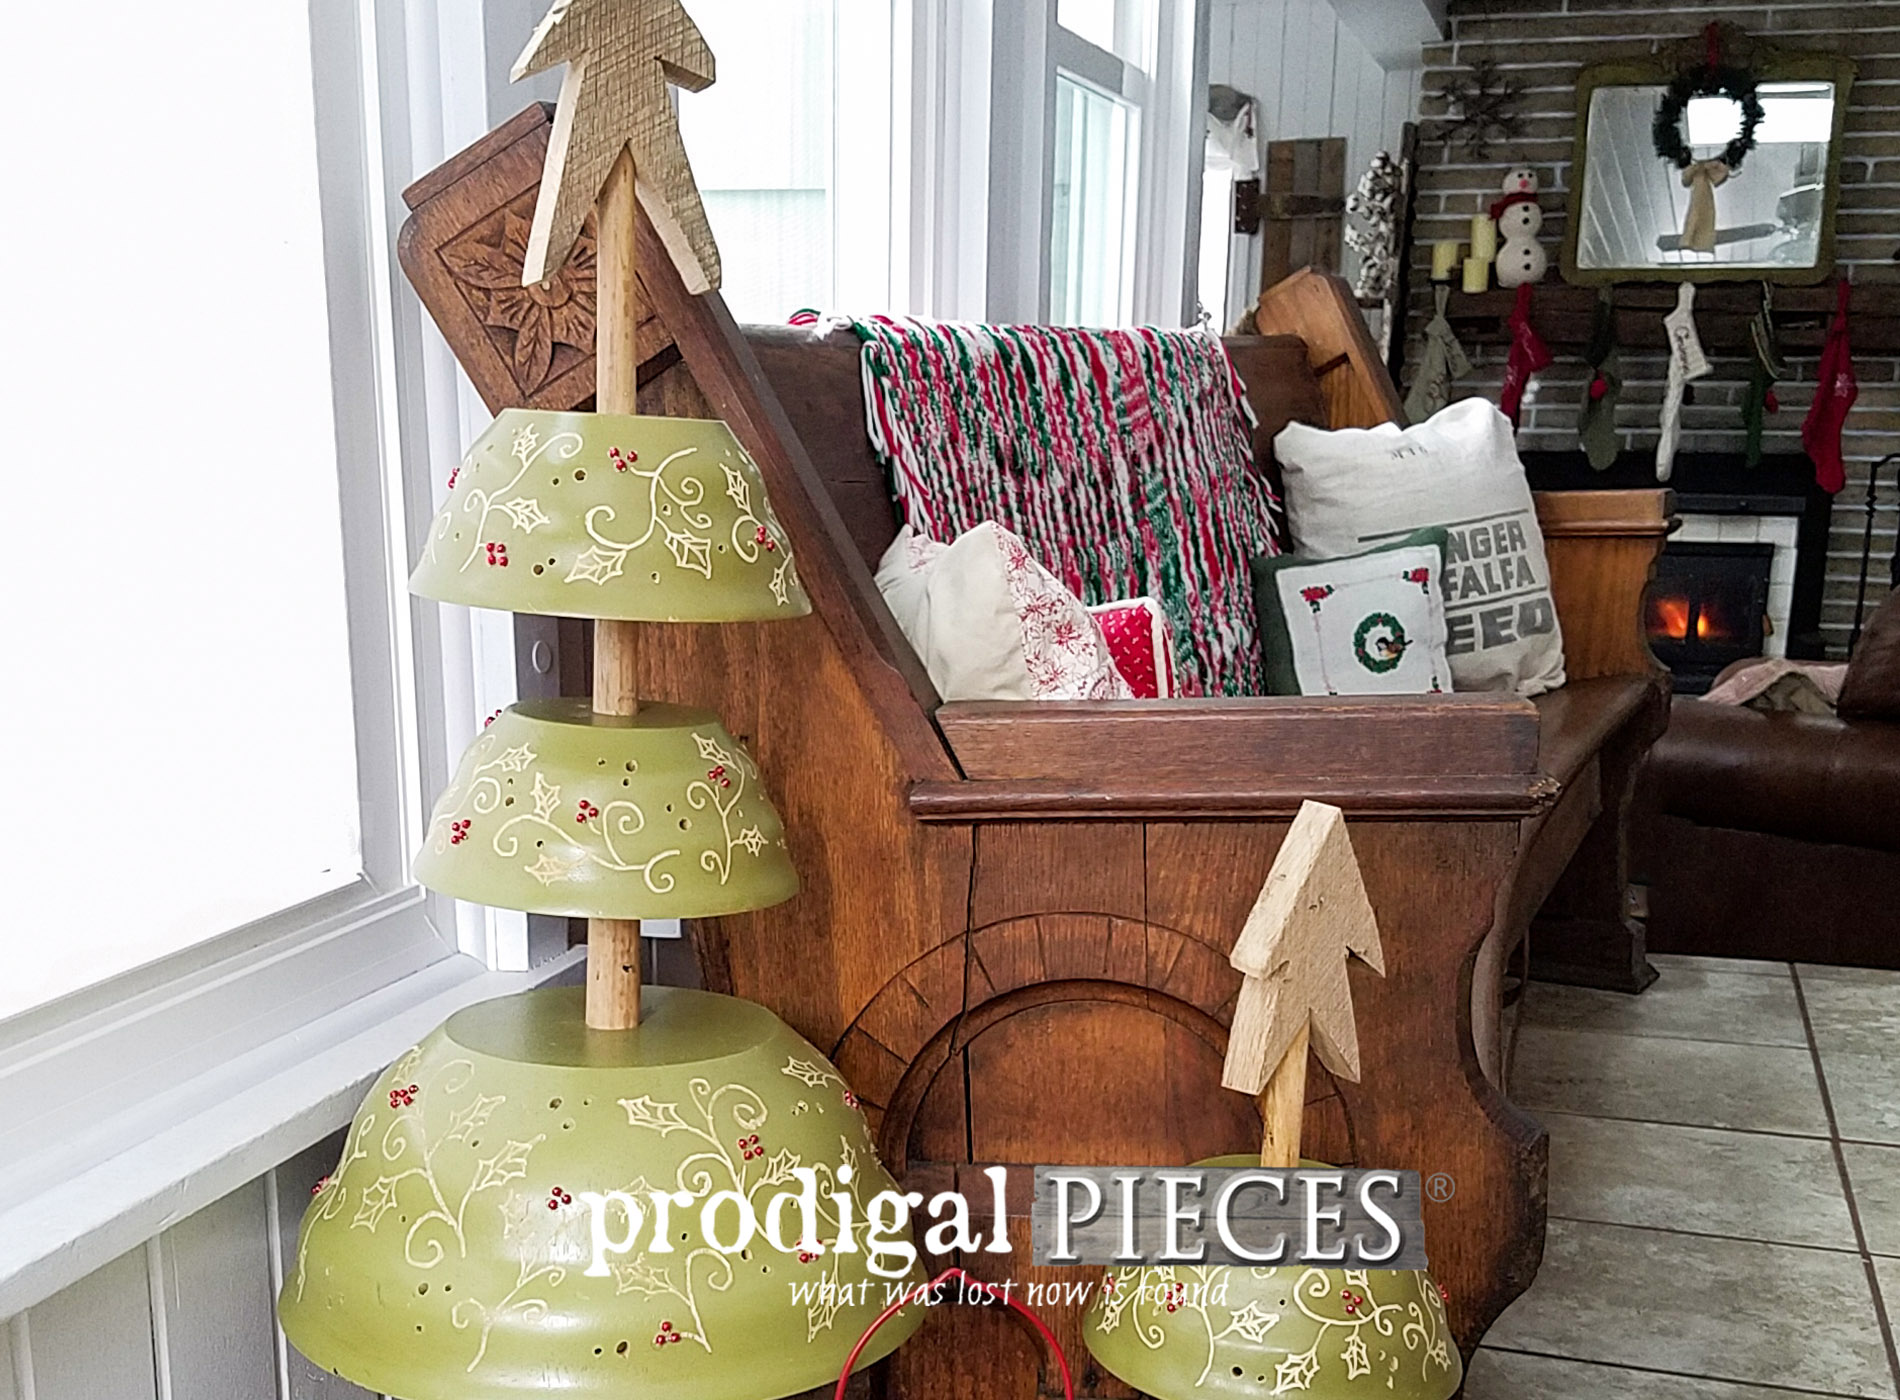
trashure makeover has a crazy story. Follow along as I show you how I took a set of thrifted salad bowls and made repurposed Christmas trees. So fun!

So, the story goes I spied this set in the thrift store - big surprise, I know. Pretty much anything wooden always makes me go oooh... I picked them up to see if there was any damage and mulled them over. I already had plenty of project pieces at home and didn't have an ah-ha moment when I first saw them, so I put them back reluctantly as I have had thrift store remorse before. Anyone else every experience that - where you put something back and never got back for it only to kick yourself later?
Wouldn't you know as soon as I pulled down the street it hit me what to do with them. I didn't dare turn around as I had a truck full of my 6 hungry kids and so we headed home. Now I have a bee in my bonnet and my scheming brain starts to churn.
JC and I talk for a bit at lunch every day and I told him my plight and asked if he would stop by to pick them up on the way home. I was nervous as I had hoped they would still be there for my sake and for his. I even told him, "They're on the very back bottom shelf...etc.". Logistics in these matters are key as husbands need all the help they can get, right? hahaha...he such a awesome hubby.
DIY TIME
At this point you might be thinking I'm loony to think I can see trees in old salad bowls but stay with me. First of all, I know my wood stash has some goodies for me and I do find what I'm looking for...a couple of oak pencil stick table legs from this awesome haul mentioned
HERE, and scrap reclaimed hickory from our kitchen countertops soon to be revealed.

It was pretty easy to use my drill and spade bit (shown on the right) to connect them together. You can use a forstner bit (show on the left) as well the difference is it will make your hole have a flat bottom. I simply made a hole in the hickory and stuck the table leg in. I could have glued everything together with wood glue, but I want this to be dry fit so that it can be taken apart and stored when the holiday is over.

To make holes in the bowls, I use the same bits and drill away. Now comes the fun part!! I have long-since loved my Dremel I received as a gift from my parents about 10 years ago. You know my motto toolsoverjewels. {{fist pump action}} As a treat to self, I purchased this flex shaft attachmentthat allows me to do to more detailed work. I have managed with my regular tool for all those years in my creations, but this will make my job go faster and be easier on my hands and wrists. Plus, depending on the bit you use, this works for stone, glass, metal...just about anything.

FUN TOOLS
The minute I plugged it in and turned it on, I squealed!! This thing ROCKS! I couldn't believe how much easier it was to get the detailed work done. All 7 other members of my family had a spin with it too. This is when my mind begins to reel at the doors this has opened up for me. You see, I drew my design on the bowls and used the Dremel to carve the designs. Easy enough, right? All I needed was the right bit for the job. My repurposed Christmas trees are coming alive!

I had to park myself on the floor as we are currently in hot mess state in our workshop and kitchen where our remodel is happening. All work surfaces are occupied with big projects. You'll always find me working on the floor anyway, but at this point I keep saying to myself...I need a studio. Don't you agree? hee hee hee

THE REVEAL
Once I got started, there was no stopping me. I was so excited to be able to achieve the vision I was after. With a bit more doing and creating, here is what my thrifted salad bowls turned repurposed Christmas trees look like now...


If you look close, you'll see the detail work I did. Plus, I added some red beads plugged into spots I made with my tool.


For added whimsy to the top, I took more reclaimed oak from our kitchen remodel and cut a couple of stars with my jig saw. Love me some reclaimed wood...mmm.


And for added fun I even installed a few string lights so you can see the lights shining out the holes I created with my drill. Can you tell I had fun with this? Here they are with no lights on in the house, just the Christmas tree, our fireplace, and a couple of candles lit in the background.

What a wonderful feeling it is to sit with family and enjoy being together with the lights off and talking. Just being. Sigh...

Likewise, I hope you are savoring the season and making the most of this blessed time of year. It's so easy to get caught up on the craziness. I'm all about less more, even in the doing.
If you would like to make these trees your own you can find them and more holiday goodies, as well as many other items available in
my online store.

Additionally, pin and share my repurposed Christmas trees from salad bowls. You never know when inspiration will strike someone to get their DIY groove on too!

UP NEXT
Likewise, up next, Mr. O (my youngest son) and I are going to do a mama-son project with this thrifted chair we found.
Head here to see it anew.

Before you go, be sure to
sign up for my newsletter. Be sure to head below to see what my blogger friends have created for you too!

 PINTEREST | EMAIL
In addition, check out the fabulous makeover by my awesome Trash to Treasure friends:


- Bless'er House
- Confessions of a Serial DIYer
- Girl in the Garage
- Artsy Chicks Rule
While you're at it, here are more projects like my repurposed Christmas trees:


 In addition, check out the fabulous makeover by my awesome Trash to Treasure friends: