 That beauty and this room has come a long way from where it started 15 years ago. To catch those of you either just joining our fun or maybe missed our past details on our family room remodel, here are some links to check out:
- How to Add a Floating Barn Beam Mantel
- How I updated the grout and stained the barn beam mantel
- DIY Coffered Ceiling Tutorial
DIY HISTORY
After ripping up the archaic carpeting, we had to build a floating subfloor that needed to come up about 6 inches in order to achieve level status in this room. Yeah...it was that bad. More to come on how we did that. We are about ready to install our hardwoods, build our built-ins, and call this puppy done. Since we are up to our eyeballs in finishing this off, I couldn't let the fireplace insert go without a much-needed update. I typically repaint it every couple of years as it's our main source of heat and works like a beast for us. I've created a video tutorial for those of you that prefer to see it in action. You can view that down below.

HEAT
While we clean the chimney and insert every year before burning season, it's been more than a few years since I've painted the insert. However, this time around I'd doing it proper-like and changing it up. Big surprise, eh?

*post sponsored by HomeRight (see full disclosure)
As you can see, the paint has faded and flaked. Also, there's a bit of rust showing up too. By giving this painted fireplace a refresh, it will not only update its visual appeal, but also keep it running top notch.STEP 1
First, I can't say enough how cleaning your surfaces is key to a good finish. Any job is all about the prep work. Having the right tools to make it easier is a bonus. After I use my shop vacuum to suck up the debris, it's time to really clean. For a job like this, I pull out my handy steam machine. It has all the tools on board for easy access, comes with a tool caddy, and gives me a chemical-free clean like none other. You can see how I've used it to clean my kitchen appliances HERE, my car cleaning in these posts, and also my bathroom and floors in this post. Simply fill it with distilled water using the funnel and cup provided. Then, plug it in and wait for it to build up steam. At first, both lights will be lit, but when it's ready the orange light will turn off.
STEP 2
Attach the appropriate brush or tip to the nozzle. For my project, I used the large black nylon brush. It will help me removed caked-on soot and not scratch my surfaces. Time to blast away the bluck!
 Cleaning with this is as easy as squeezing the trigger and scrubbing with the brush. You can see it in action in the video below. That soot was no match for my SteamMachine! {{laughs wickedly}}
 After steaming and scrubbing, use the cloth provided to wipe away the soot. I finish the exterior using the same method
 See the difference? Love it!
 Best part is that it's all done in a matter of minutes. Easy!
To clean up, let the machine cool before emptying. Also, wash up accessories with mild soap and water and return to storage compartment.
Best part is that it's all done in a matter of minutes. Easy!
To clean up, let the machine cool before emptying. Also, wash up accessories with mild soap and water and return to storage compartment.
STEP 3
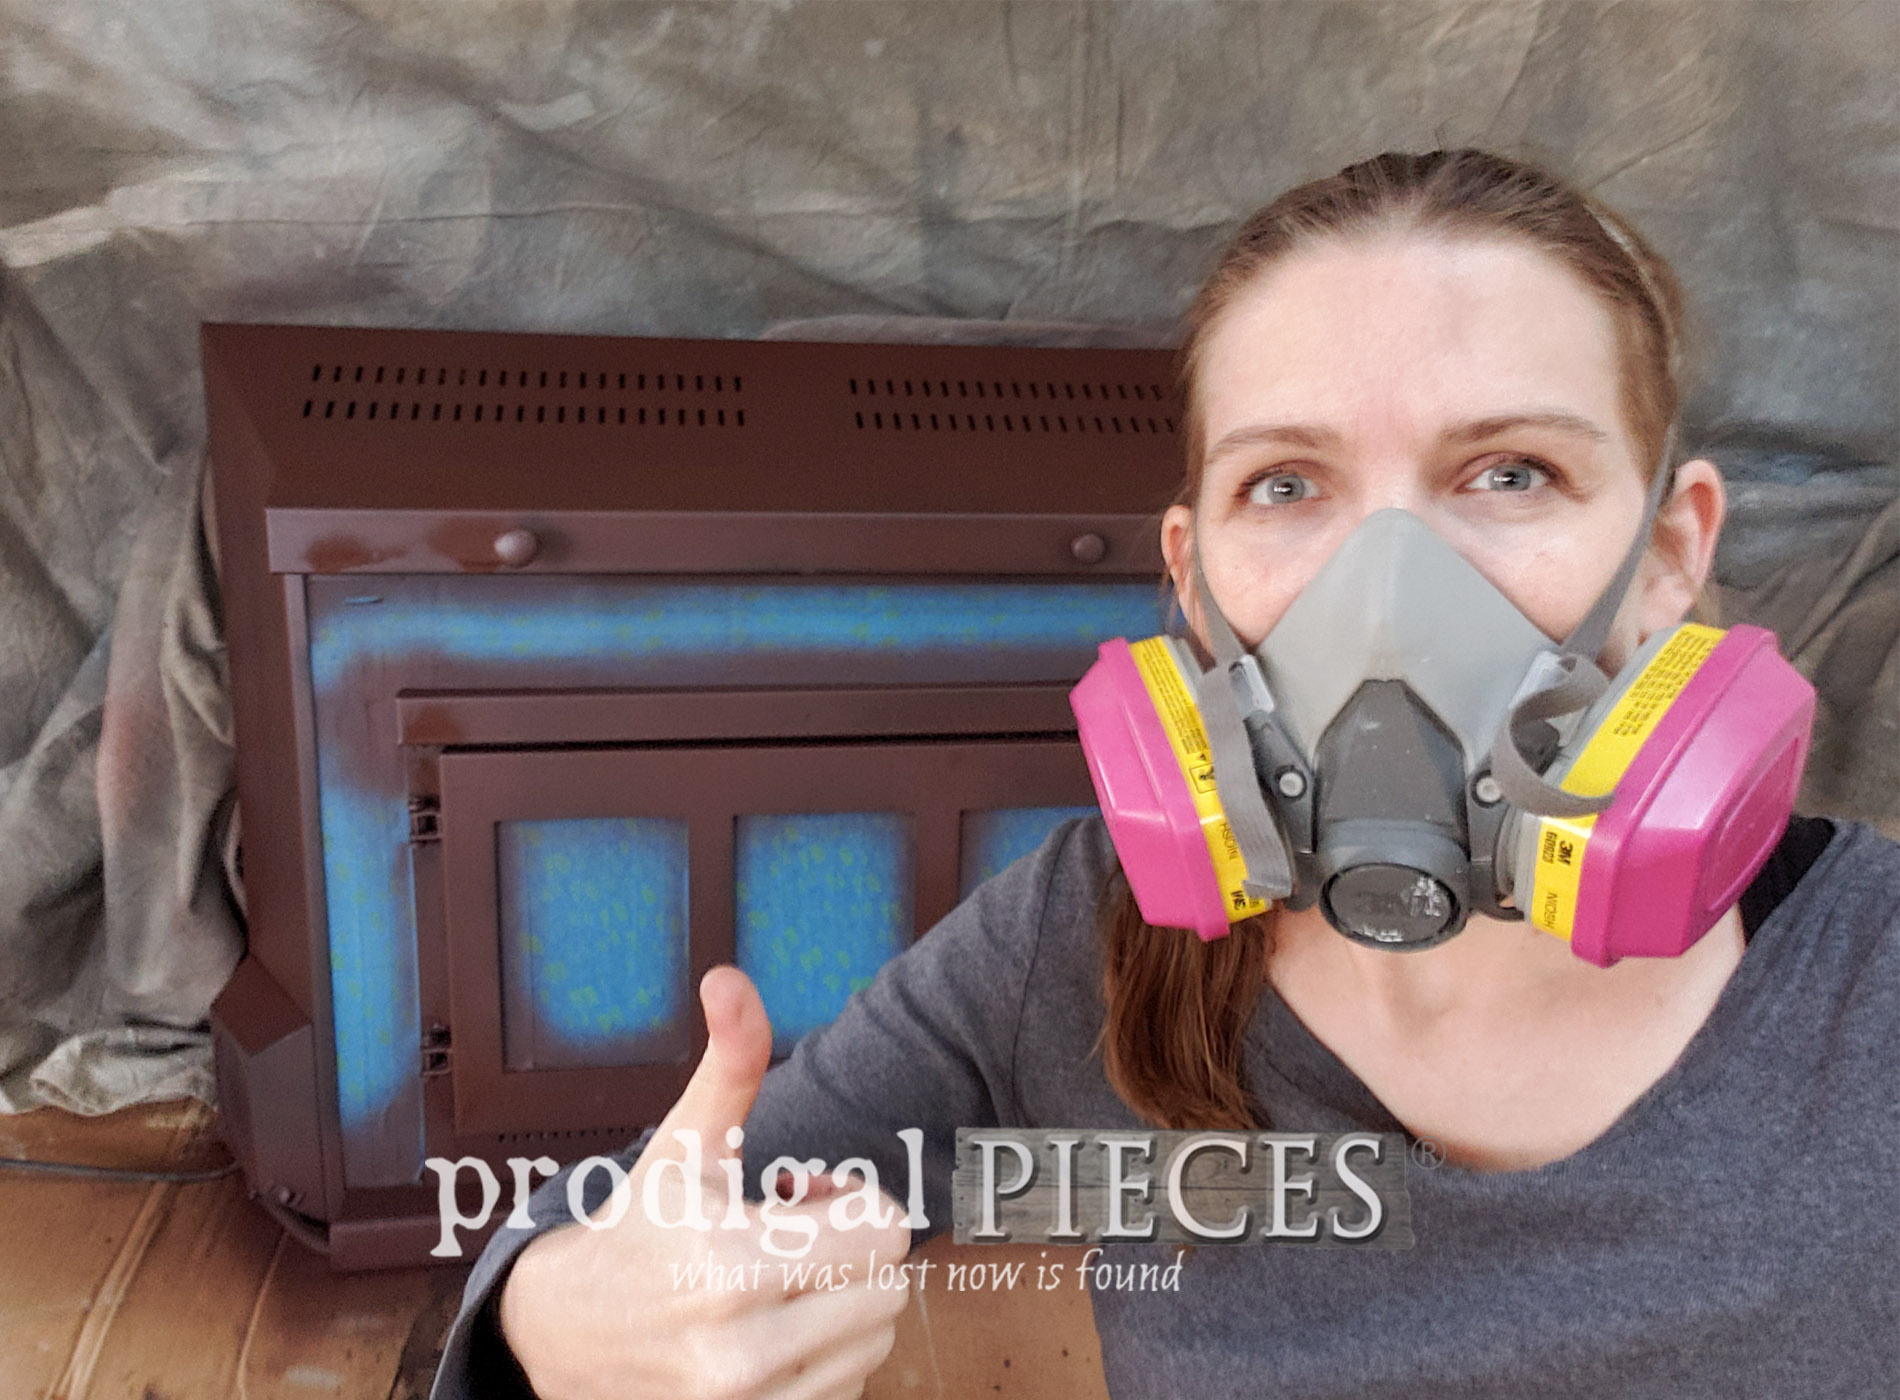
Next, it's time to paint. Normally, I would have used my paint sprayer to knock out the painting in a jiffy. You can see how I've used it for my past projects here. However, the color I wanted for my painted fireplace insert in a special stove paint was only available in a spray can. I chose to use Bark Brown. I've had black for over 15 years and wanted to change. I almost went with a pretty blue. tee hee. To prep the area, I used a piece of cardboard underneath, hung a tarp to block off the rest of the fireplace, and use painter's tape to cover the places I didn't want painted (glass and tile). Also, since the paint is nasty stuff, I opened all the doors and windows, and hung plastic to keep this space separate from the rest of the house. I don't want the fumes getting pulled into my furnace return ducts and possible causing a BAD hazard. Taking the insert outside would be optimal, but not happening for me at this point. In addition, you must wear a respirator to protect yourself. I use this one for my DIY projects. Once you're ready, follow the manufacturer's instructions and have at it. I mention how the brand I chose said to apply the layers in the video. In all I did 3 coats to my painted fireplace. The paint only needed to cure for 2 hours before I could get a fire lit again. Yay!

THE REVEAL
Fireplace is done and I'm one happy mama. Not only did I get my fireplace clean without chemicals, but now it is refreshed and ready to go. SCORE!!

 I'm diggin' that brown as a great way to keep my neutral, cozy vibe I'm after. However, I haven't decided yet whether or not to do a hand-painted design to the tile. Also, what to do with that concrete hearth. Hmmm... I think I'm going to wait until we finish a few things to decide what to do next. Thoughts??

 I will be sharing all details as we go and hope to show a final reveal soon. I'm so ready to get cozy in this space. Do you blame me?
Likewise, pin and share this painted fireplace insert tutorial.
I will be sharing all details as we go and hope to show a final reveal soon. I'm so ready to get cozy in this space. Do you blame me?
Likewise, pin and share this painted fireplace insert tutorial.
 Up next, this motley crew is going to get some farmhouse fun. See their new looks HERE in this post.
 UPDATE!!
Finally, you can see my final family room remodel reveal in all its glory with our floating floor OVER HERE. Before you go, be sure to sign up for my newsletter. Until next time!
UPDATE!!
Finally, you can see my final family room remodel reveal in all its glory with our floating floor OVER HERE. Before you go, be sure to sign up for my newsletter. Until next time!

While you're at it, here are more remodeling projects like this painted fireplace tutorial:

