There is rarely a time that I don't go with my gut when I spy something in the thrift store that piques my interest. However, there are occasions where I ponder, debate, and end up walking away only to go back and get whatever it is I left behind. Such is the case with this time, except it's not just one medicine cabinet, it's two. ahem.

I guess you may be wondering two things: (1) why did I leave them (2) why did I go back and get them? Well, since I used to ship most of our shop items, I have promised myself that I would stop buying small pieces with glass or mirrors in them because packaging them is horrid. haha. I have no problem with large items on pallets, just nerve wracking with the smaller ones that need boxed.
REAL FUN
Needless to say, I went back and got them to torture myself. Actually, I had a revelation as I was pulling away from the store (of course, not while in store). So, they next morning I went back to see if they were still there. Not only were they still there, but I found a few more goodies to use my 35% off coupon on. SCORE!
They're not in bad shape, but do have wear, missing parts, and some staining going on. They also aren't identical, but very similar. Here's medicine cabinet 1 on the inside.

And here's a peek at the interior of medicine cabinet 2...

DIY TIME
First order of business was to remove the doors and then remove the mirrors. No worries as the mirrors will find a forever home too - not the landfill. Once the doors were off, it was time to give this twin set a good cleaning. In order to prep them, I gave them a thorough cleaning.

Look at my bucket of water after I wiped them both down. Blucky! It always amazes me how dirty something can be even though to our eye it's not that bad.

Before I started to refinish them, I did some hole filling with wood filler and made minor repairs here and there. It amazed me that the previous owners had these hung on the wall using screws through the micro thin backing and not proper hardware. These things are not light! I will remedy that soon to make them safe.
Since their original finish isn't the greatest, there were stains and mixed woods to boot, paint is my best friend. No primer needed, just putting it on with my paint brush.

After the first coat cures for about 2 hours, I apply a second coat. During the time the first coat is curing on the first cabinet, I spray paint the hardware and begin the first coat on the other cabinet. I decided to redo them in two different ways just for fun's sake. I'm anxious to see which one you like best.
UP NEXT
Once I completed the two coats on each medicine cabinet, I chose to showcase their interior with a pop with the soft blue. This time, I give each interior two coats, letting cure between.

While those coats are curing, it's time to tackle the doors. Since, I removed the mirrors, I decide to open them up and add chicken wire for fun and texture, plus change the entire use of them. Now they are not bound to a bathroom but can be used as a wall hutch anywhere in your home. Yay!

However, does anyone else have a love/hate relationship with chicken wire? I mean it looks so cool, but hurts so much! Yes, I wear gloves and take all precautions, but when you are using the tightly rolled end of the roll, it's doggone hard not to let it bite ya. Just sayin'.
And for those who are wanting to add chicken wire to doors, windows, etc., it's quite simple. Cut to size with wire cutters leaving a bit of excess, fold over exposed ends, and staple in with a stapler/staples like this one here. Easy... just owie. You are now warned. tee hee.
THE REVEAL
Okay, so doors are done, and I added a bit of interest to each cabinet using paper on the insides. Are you ready to see this motley pair made new? I am!
Here is medicine cabinet 1.


The rich black really took this to a new level, don't you think? The medicine cabinet looks like a completely different piece and has new function. And I'm loving the little bling the glass cabinet pulls gave to it as well.

Then the part going on inside makes it a fun peek to see through that chicken wire.


With a little distressing for a time-worn wear effect, it adds to the story of this piece made new.

Now for fun, I staged medicine cabinet 2 in the exact same way but see what a difference there is in style when I change the main color as well as the paper backing.


The white paint is so refreshing and really changes up the feel of this cabinet. To mix it up with this one, I used the same rustic wood wallpaper I applied to
my hutch desk makeover. It's such a beautiful paper and the bonus is that it's removable, repositionable, and super easy to use. That way if you want to swap it out at a later point, just peel it off to have aqua or put new paper up. Yay!


For this cabinet, I used the same knobs to give a bit of bling and did the same distressing to add the time-worn effect.


ALL DONE
So...I have to ask...which one is your favorite? The black cabinet 1 or the white cabinet 2? In case you were wondering, I remedied the hanging hardware problem by installing keyhole hardware for a flush mount that's safe.
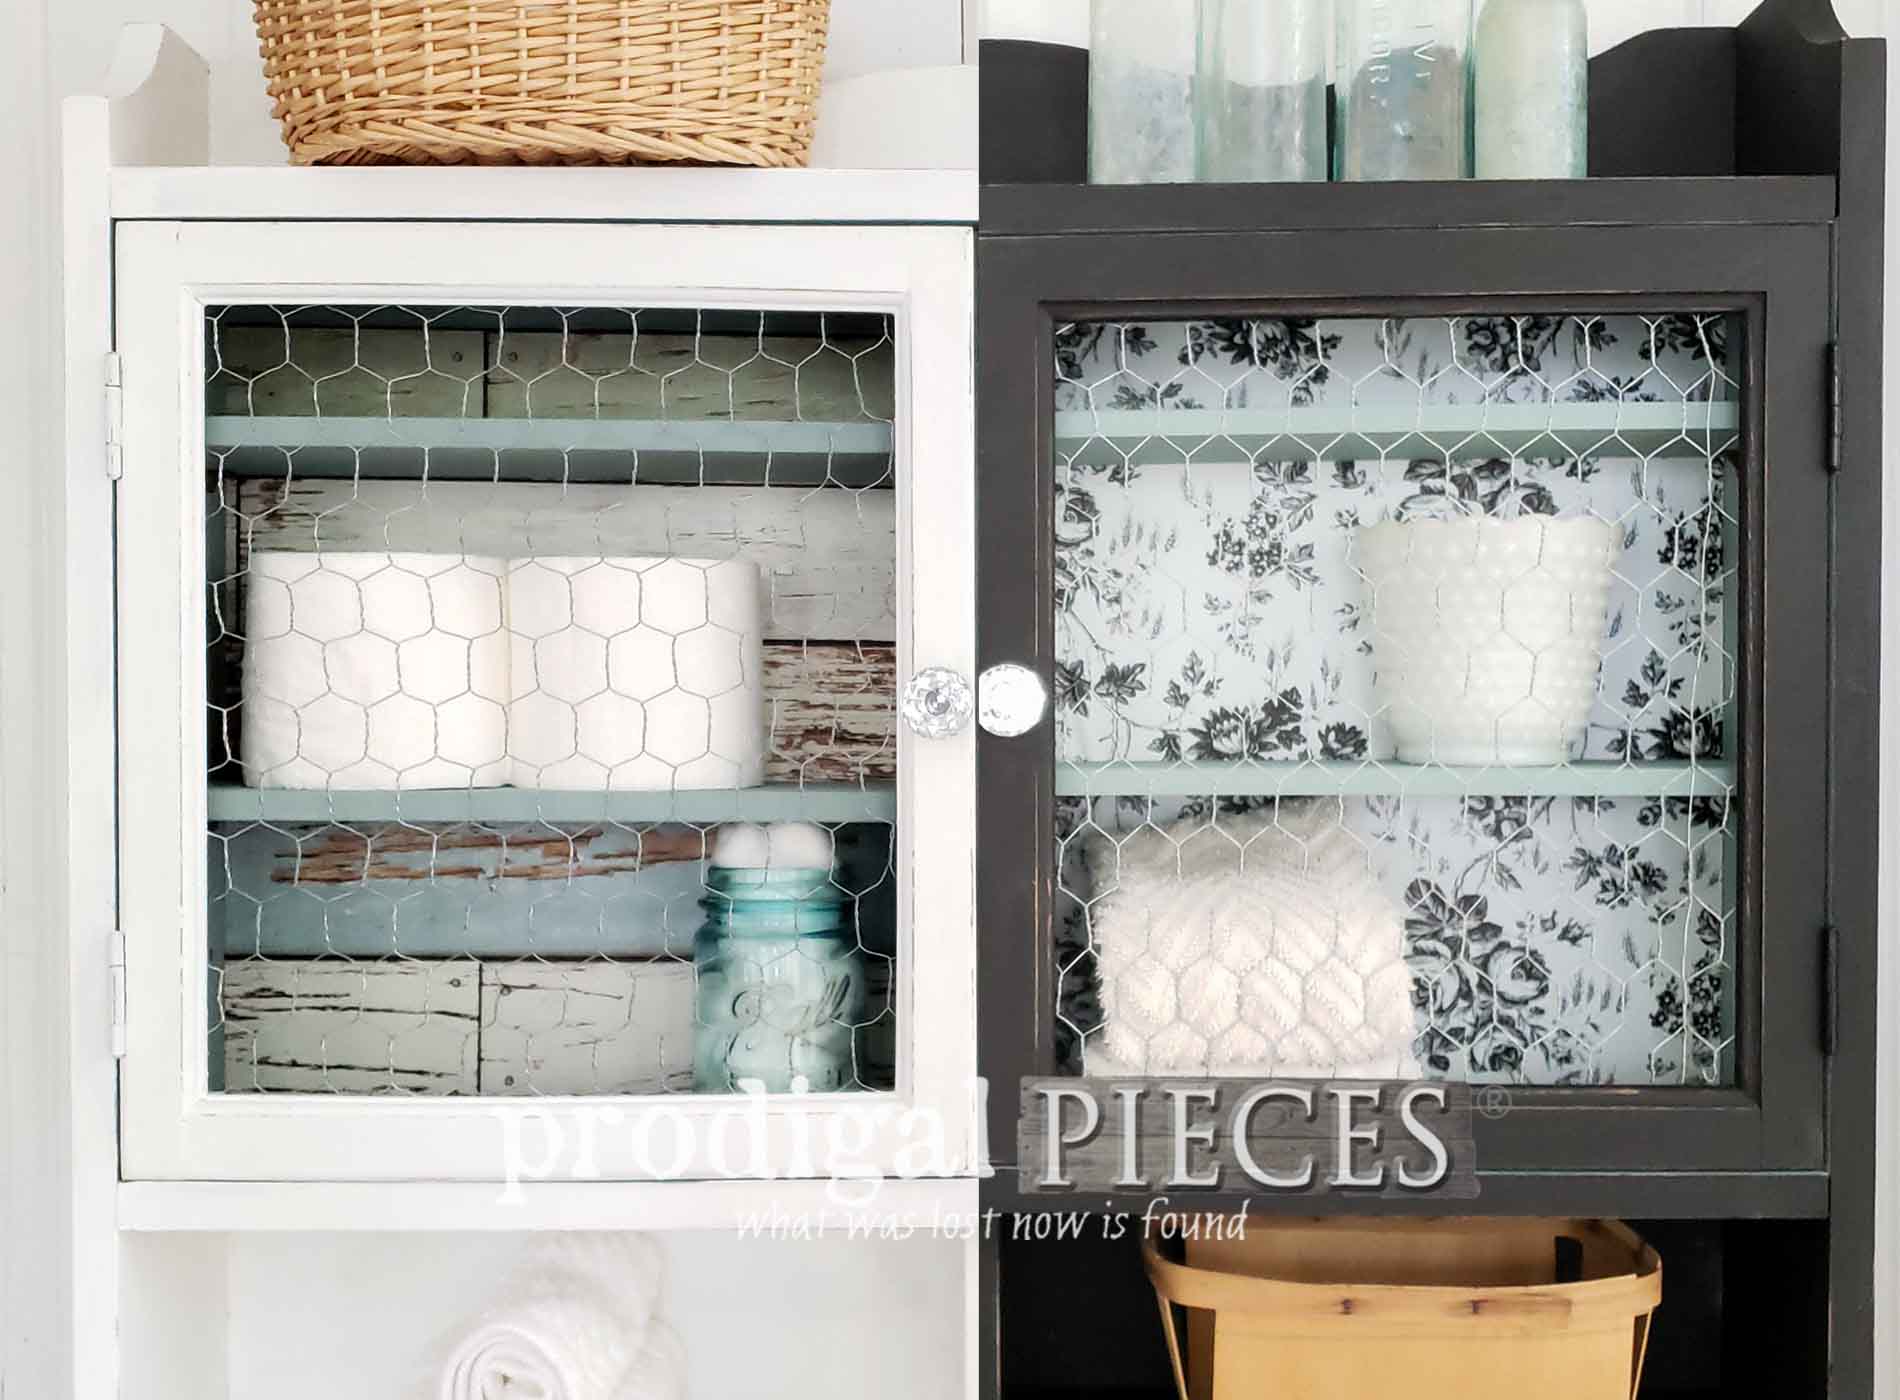
Here's a fun look at the cabinets side-by-side:

Both cabinets are available in
my online store so you can have your pick. woot!

Do pin and share this dynamic duo makeover of a medicine cabinet. You never know who may be looking to recreate their home DIY style.

Before you go, be sure to
sign up for my newsletter. Until next time!

 PINTEREST | EMAIL
While you're at it, here are more DIY projects like this medicine cabinet makeover: