 Many of you have been around long enough to know that I reworked my garden shed two summers ago with intent to finish it up last summer. However, that didn't happen because of our neighbor fiasco. So...here we are finally at the time where we can do what is necessary to fix our little shed shack.
There were definitely bumps in the road that kept us from finishing on our desired timeline (like 6 weeks of repairing our family vehicle). But, we are finally able to call it complete. I've created a video tour of our journey below, and also share our story here.
Many of you have been around long enough to know that I reworked my garden shed two summers ago with intent to finish it up last summer. However, that didn't happen because of our neighbor fiasco. So...here we are finally at the time where we can do what is necessary to fix our little shed shack.
There were definitely bumps in the road that kept us from finishing on our desired timeline (like 6 weeks of repairing our family vehicle). But, we are finally able to call it complete. I've created a video tour of our journey below, and also share our story here.
THE BEGINNING
When we purchased our home 16 years ago, we learned the story of the shed being one of the coolest places to hang out in the neighborhood. Apparently it was not only used for garden tools, but also a playhouse. It has lights, outlets for garden tools, and even TV hookup. I'd say that's pretty cool, wouldn't you? Over the years, we've used it as the same (without TV though), and enjoy the whimsy it adds to our backyard environment. Though, once it started to fall into disrepair, my kids saw fit to make the situation worse by creating messes that sent me into tears. I even bought a lock to keep them out. Yes, really! This "before" picture is from two years ago and is nowhere near how bad it was before we started.
 Add into the mix 7 bicycles, wheelbarrow, more tools, and more rotting holes in the floor to the already existing ones. Plus, our soffit and facia had rotted out in the back due to a roof leak. The fact that we couldn't get to it before winter last year just made the situation worse.
 In the fall our daughter broke one of the windows, and both windows needed replaced. Also, the back wall was in need of repair as well.


REPAIR TIME
First, we began by repairing the roof. We originally wanted to take the entire thing off and create a gabled line, but that wasn't logical. Financially, it would take the cost of repairs to the point of making sense to just buy new. So, we added new to the existing and are good to go. Then, we rip out the floor, which we found is a floating floor. Our backyard is located over oodles of natural springs so we are always walking in a swamping situation in the spring. Plus, it didn't help that our neighbor put in a swail that directs water onto our property as well.
 Just as soon as we ripped out our shed floor, my truck brakes went out with break lines busted causing us to put this project on a 6 week hold. We only can work on projects like this on weekends, so it takes oodles of time. Finally, we were able to put down a moisture barrier and rebuild the floor.
 Plus, we also had to jack up the walls as the roof was sagging causing the water to not run off properly. Who knew our floor jack would get so much use, eh? So not funny.
 Now the floors are in and we are able to replace the rotted windows. Yay!

*post sponsored by HomeRight (see full disclosure).
Plus, I filled an entire shop vacuum with hundreds of nuts and poo I cleaned out of the ceiling from chipmunks. It took me over an hour!NEXT STEPS
Next, we were able to get the supplies to give our shed the much-needed storage adjustments and repairs to the rotted soffit and facia. Lemme just say that shopping after a full day's work while also doing extensive math is not my favorite thing. So thankful that we didn't run into any snags along the way. whew!TOOLS & SUPPLIES:
- HomeRight Super Finish Max Extra
- stapler
- multi-purpose tool
- cordless drill
- jig saw
- circular saw
- Thomspon's WaterSeal
- cedar shake siding
- thin recessed lights
 Meanwhile, JC and kids helped install the floating shelves. We have the best helpers around here.


 I'm thankful JC was able to take a few days off work to help me get the framework done. I even worked about 12 hours on my birthday so we could get this thing DONE.
Bonus is I'm reusing anything I can to make this a great use of resources. My little man is helping me bust up these shelves to build into floating shelves.
I'm thankful JC was able to take a few days off work to help me get the framework done. I even worked about 12 hours on my birthday so we could get this thing DONE.
Bonus is I'm reusing anything I can to make this a great use of resources. My little man is helping me bust up these shelves to build into floating shelves.

READY FOR PAINT
Here is our garden shed remodel in the rough layout ready for the next step...paint. Notice I also built boxes to house the recessed lighting. We are replacing the fluorescent lights that were broken. This will make things soooo much better.
 As you can imagine, I didn't want to spend another week painting this thing by hand, so my HomeRight Super Finish Max Extra came to the rescue. Seriously, folks, this thing rocks! You can see how I used it many time on furniture, but also to stain our new privacy fence, our backyard furniture, and even our DIY garden arbor (free plans HERE).
I filled it with a white paint that would brighten up this once gloomy place. You can see it in action in my video below.
As you can imagine, I didn't want to spend another week painting this thing by hand, so my HomeRight Super Finish Max Extra came to the rescue. Seriously, folks, this thing rocks! You can see how I used it many time on furniture, but also to stain our new privacy fence, our backyard furniture, and even our DIY garden arbor (free plans HERE).
I filled it with a white paint that would brighten up this once gloomy place. You can see it in action in my video below.

 The first coat is on! Now, I head to the exterior to wait until the coat cures and apply a second coat as well as paint the floor.


THE EXTERIOR
It's now time for the exterior to get much needed love. You can see the colors our home has been. First, red. Then, green. Then, blue/gray. And currently green again. This time around, however, I'm getting the cedar shake garden shed remodel I've always wanted. tee hee!
 Siding with cedar shakes is simple, just time consuming and labor intensive to go around windows and doors. I'm totally game for it though as it will tighten up our garden shed as well as add value.
Then, once the shakes (and new vinyl soffit are up), I add a protective coat with my sprayer. This coat will add longevity to the wood, but won't prevent that gorgeous patina I look forward to with cedar.
Siding with cedar shakes is simple, just time consuming and labor intensive to go around windows and doors. I'm totally game for it though as it will tighten up our garden shed as well as add value.
Then, once the shakes (and new vinyl soffit are up), I add a protective coat with my sprayer. This coat will add longevity to the wood, but won't prevent that gorgeous patina I look forward to with cedar.
 Then, I also wanted to change the door color to suit the cedar. This beautiful blue called Superstition was perfect for now until we side our house. (that is is we don't sell first and get out of the city)

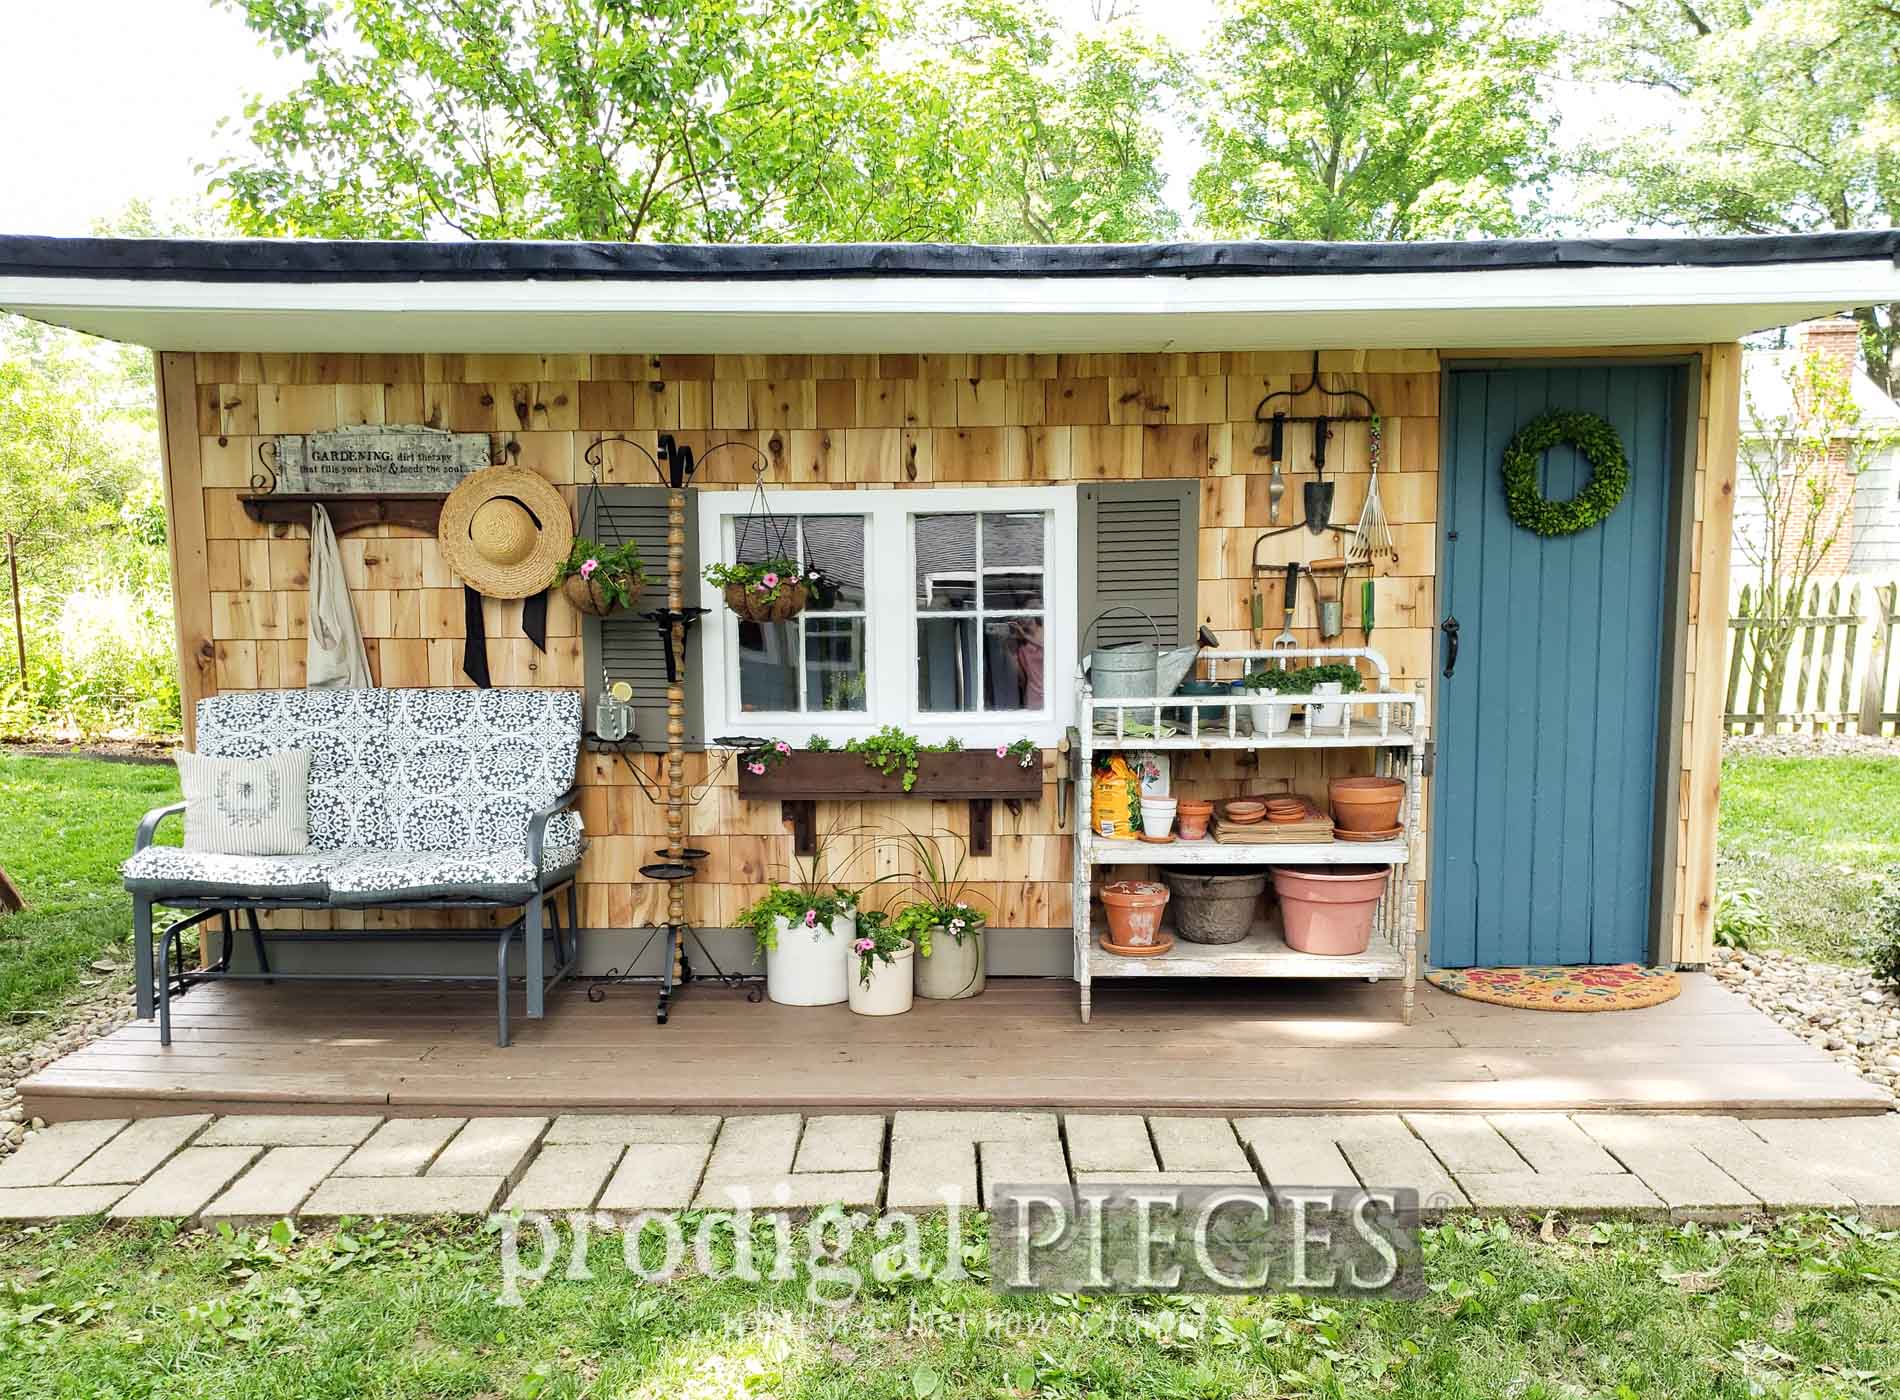
THE REVEAL
After much work and DIY spirit, we can now say that our garden shed remodel is complete. DONE, DONE, DONE.
 Dare I say I did a happy dance? You know it!


 I still have my changing table potting bench and my reclaimed coat rack to enjoy. Plus, my cheap glider swing got a new coat of paint and cushions. I was able to purchase those with coupons and discounts to get them for free. Also, see what I did with the potting rack HERE.


THE INSIDE
Are you ready to see the inside? Take a peek!

 We are so delighted with the space and use of storage. It makes my sanity restored and ready to tackle the jobs in my yard.
 Plus, I even having my lighting and outlets back. eep!


WRAP-UP
As you can imagine, we are relived to have this project behind us. The eyesore is gone and function is back. We hope we've inspired you to take the initiative to work on your own home projects. Time for me to take a sip of lemonade, give huge hugs to my awesome family for helping us get it all done. In my daughter's words...this is like a tiny cottage!


 Also, do pin and share our garden shed remodel to inspire others. There is hope behind the worn out and broken.
 To get these DIY tips & tricks in your inbox, be sure to sign up for my newsletter. PLUS, you will get your FREE Furniture Buying Checklist and special discount to my shop. Until next time!

More DIY projects like our garden shed:

