There are few things in life that I really get excited about. One of them is a true
trashure hunt. Every so often I head to the flea market, not looking for the obvious, but the stuff that everyone overlooks. Ya know, the junk. Today, you are in for a treat! It's
Trash to Treasure Tuesday and I'm going to show you what I do with this pile o' "junk" by turning into flea market decor. Not only will I create for you, but you'll also see what my gal friends are up to at the bottom.

First, I started with this mesh screen. When I find old screens or mesh anything I snatch them up for one purpose...stitching. My apologies for the fuzzy pic...I was in a rush!

STITCHIN'
Also, if you've followed me for long, you know that I truly enjoy embroidery and the therapy it provides. For the mesh screen, it was the same as the last time I created a
woolly sheep on a sifter screen. Time to get my stitch fix!

Finally, after a bit of fun, I have a new woolly creation that makes me smile. I hope it does for you too!


In the first place, can you blame me for being a little bit hooked on these woolly creatures? In the past I've even made some from spindles and sweaters seen
in this post. Additionally, for the burlap, I used these wonderful, laminated burlap sheets you can stick in your printer. In addition, I used to make my own by ironing burlap onto freezer paper, but these are handy too.

PROJECT 2
Next, let's focus on found object 2. Do you know what it is? Let me tell ya. Once upon a time things were done by hand and when dried corn needed sifted, this was the way to do it.

This, folks, is a corn sifter, and as you can imagine has seen many hard days on the farm. Cool, huh? Meanwhile, let me show you what I turned it in to. mwahahahaha...

This here is a bonafide trashure message center. Next, I take the found bread pan from the stash pictured above, and attach it to the sifter, then added a bin pull. Likewise, my horseshoe was from my stash of goodies, and the antique buttons are now magnets to use for this and that.

Additionally, you can even tuck some goodies inside the back of it as well. I had fun creating this one and making it have a whole new story. Imagine the stories it could tell or the stories it heard while being put to use. So cool.

PROJECT 3
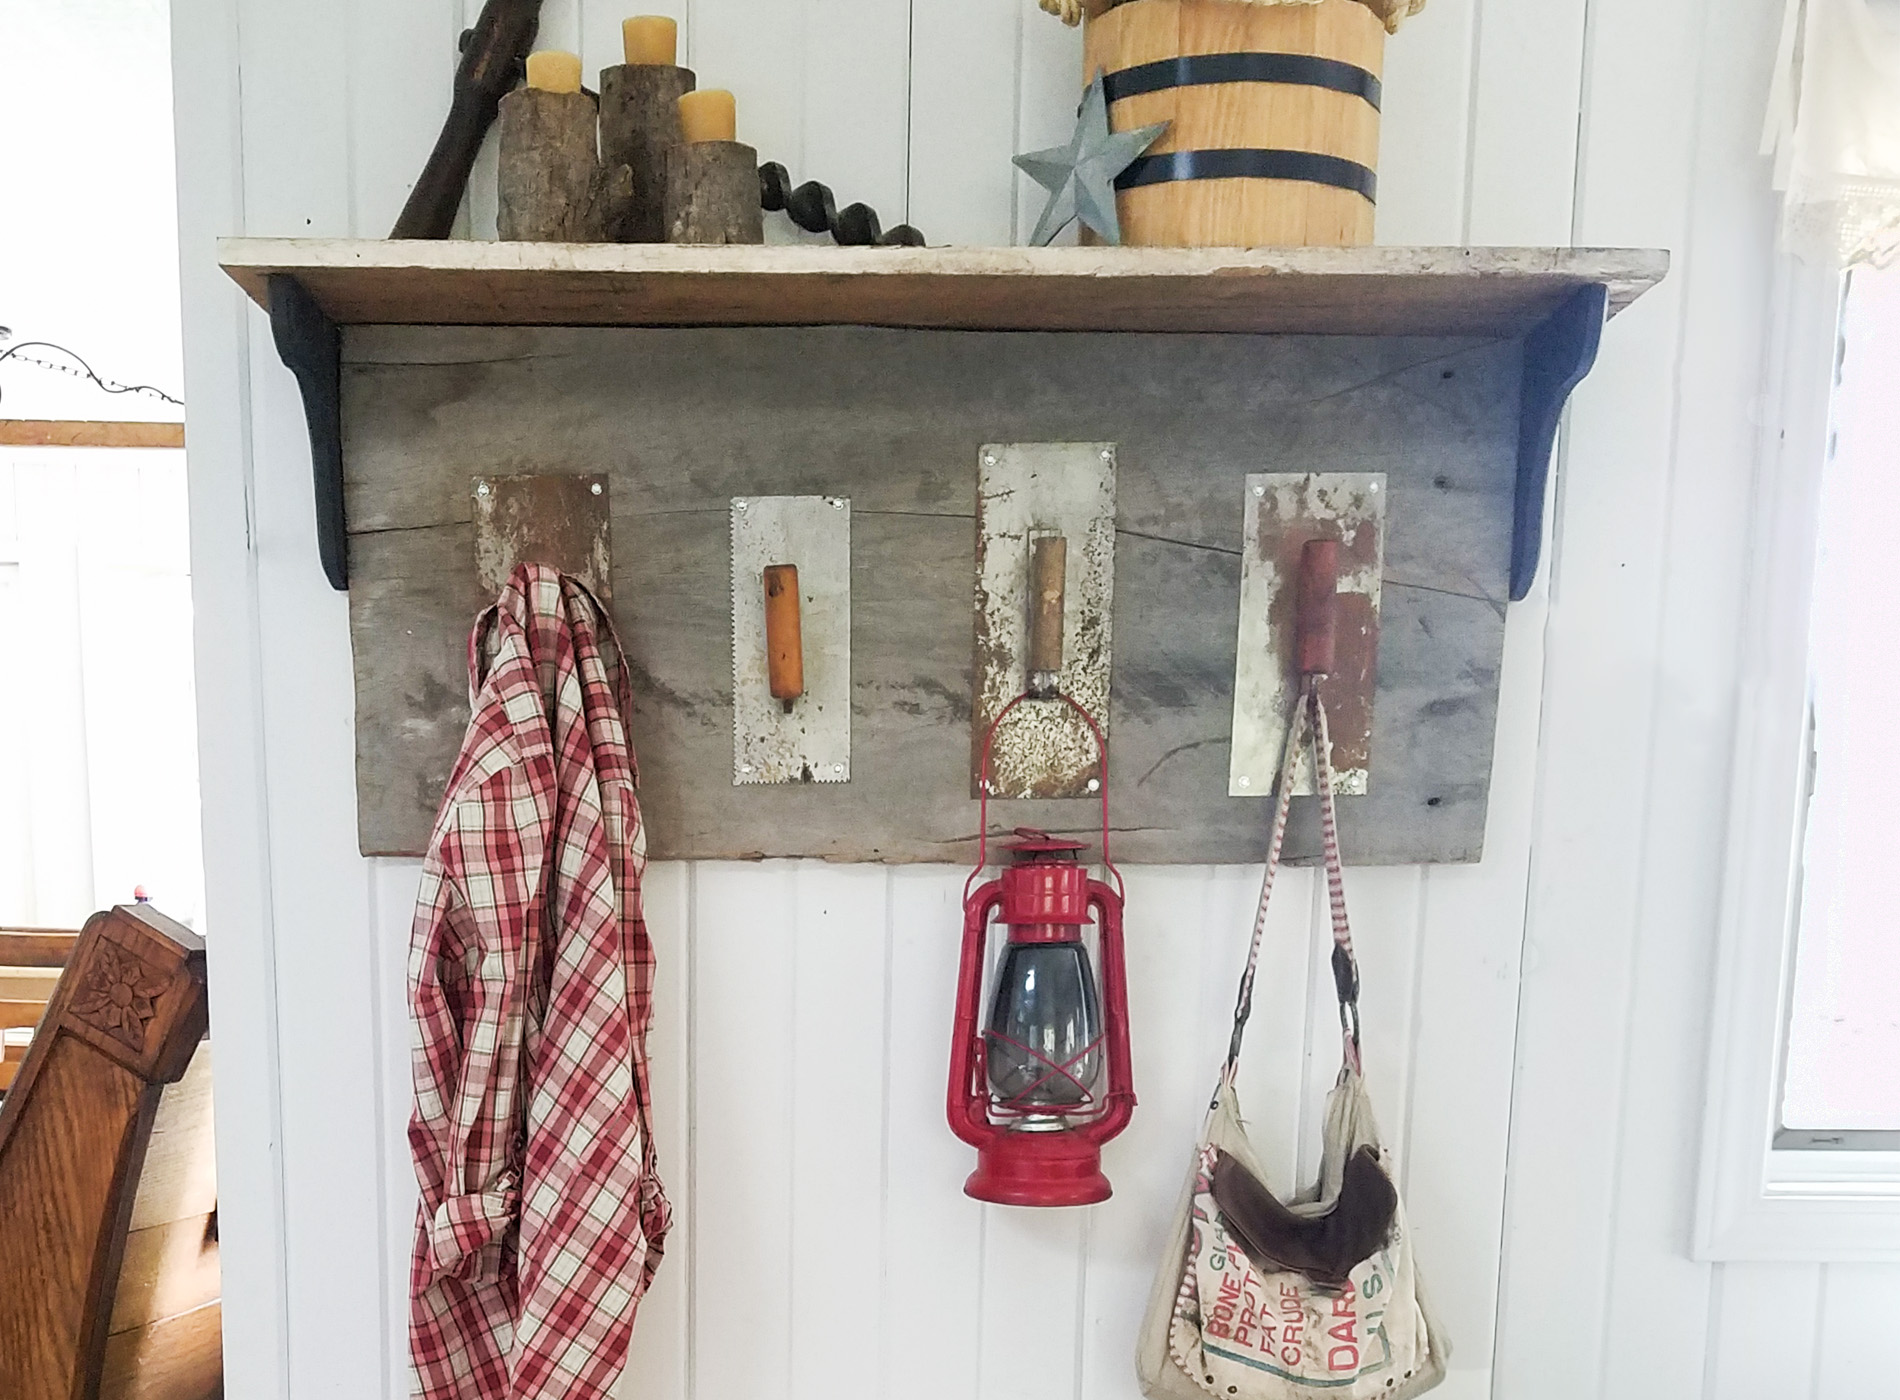
Last, but not least are those trowels. The moment I spotted them I grabbed them up. Funny thing is, the vendor looked me queerly...little did he know, right?

A good cleaning was in order and just like I did to that cake pan above, I gave them a clear coat. This helps slow down the rust action and prevent it from coming off. You can also leave it as-is too.

Last, once they're ready to go, I use my drill to attach them to a gorgeous piece of reclaimed barn wood from
my repurposed sewing machine table.

With this in mind, I then add a piece of reclaimed oak for the top and a pair of corbels to the ends. You can see how to build a coat rack like this in
my step-by-step tutorial HERE in this post. Now I have a funkified trowel coat rack to add to my flea market decor. Woot!
THE REVEAL


Not only does the rusty patina paired grab my heart, but also the time-worn reclaimed wood makes my heart pitter-pat. Are you smitten with patina too? As is the case with most of my creations, all three of these items are
available in my store, along with many other furniture, vintage finds, and handmade goods.


In addition, pin and share my flea market decor to inspire others to make their house their home. It really can be done on a budget.

By the way, this vintage Broyhill hutch desk is going to get a new lease on life. See the after
HERE.

Likewise, stay tuned to see and be sure to
sign up for my newsletter. Finally, it's time to see what the other blogger ladies have for you below!

 PINTEREST | EMAIL


- Artsy Chicks Rule
- Bless'er House
- Confessions of a Serial DIYer
- Girl in the Garage
Also, more DIY projects like my flea market decor:


 First, I started with this mesh screen. When I find old screens or mesh anything I snatch them up for one purpose...stitching. My apologies for the fuzzy pic...I was in a rush!

 Finally, after a bit of fun, I have a new woolly creation that makes me smile. I hope it does for you too!

 In the first place, can you blame me for being a little bit hooked on these woolly creatures? In the past I've even made some from spindles and sweaters seen in this post. Additionally, for the burlap, I used these wonderful, laminated burlap sheets you can stick in your printer. In addition, I used to make my own by ironing burlap onto freezer paper, but these are handy too.

 This, folks, is a corn sifter, and as you can imagine has seen many hard days on the farm. Cool, huh? Meanwhile, let me show you what I turned it in to. mwahahahaha...

 A good cleaning was in order and just like I did to that cake pan above, I gave them a clear coat. This helps slow down the rust action and prevent it from coming off. You can also leave it as-is too.
 Last, once they're ready to go, I use my drill to attach them to a gorgeous piece of reclaimed barn wood from my repurposed sewing machine table.
 With this in mind, I then add a piece of reclaimed oak for the top and a pair of corbels to the ends. You can see how to build a coat rack like this in my step-by-step tutorial HERE in this post. Now I have a funkified trowel coat rack to add to my flea market decor. Woot!

 Not only does the rusty patina paired grab my heart, but also the time-worn reclaimed wood makes my heart pitter-pat. Are you smitten with patina too? As is the case with most of my creations, all three of these items are available in my store, along with many other furniture, vintage finds, and handmade goods.


 In addition, pin and share my flea market decor to inspire others to make their house their home. It really can be done on a budget.
 By the way, this vintage Broyhill hutch desk is going to get a new lease on life. See the after HERE.
 Likewise, stay tuned to see and be sure to sign up for my newsletter. Finally, it's time to see what the other blogger ladies have for you below!


