 You might be wondering why a hutch desk would be on my bucket list. Well, they are versatile, functional, and are typically kinda boring like this one. I wanted to take a sort of ugly duckling and make it shine. This one in particular caught my eye because it had nice form and was a Broyhill hutch desk, however, it was dated. Don't you just love the pressed acorns? I half expected a squirrel to scamper by as I was taking these pics. hee hee hee.

*post sponsored by HomeRight (see full disclosure)
The fact that it's made by Broyhill means it would be made well, however it's still made of fabricated and real wood materials. This is the kind of stuff that many of us have in our home and aren't sure what to do with it. So, this was my subject for my makeover. Time to give it new life!DIY TIME
First, I grab my tub of wood filler and not only fill all those acorns on the hutch and drawers, but also the pull holes. Those are going buh-bye too. While the wood filler is curing, I use my staple puller (talk about handy!) to remove the back of the hutch. I'll get back to what I'm going to do with that in a bit.

NEXT STEPS
The rest of the hutch and desk get a light sanding and now I'm ready to have a blast...literally! This is when all the fun really starts with my paint sprayer. Since this set has a whole lotta slick surfaces with the veneer, I chose to use Gripper primer. Also, that stuff will make your paint stick and last much longer than without it.
 With my surfaces prepped and ready to go, I give it a nice even coat of primer.

MORE PAINT
Next, once the primer has cured, I give the hutch desk two coats of Dove White - one of my favorite colors I've used throughout my home. Then, while the paint is curing between and after coats, I also give a chair I found at a barn sale a couple coats of primer and paint. That's what's so nice about this sprayer, I can switch from job to job and create the finish I'm after. When I'm done, I just hook it up to my Rapid Clean Kit and cleanup is done faster than you can blink. I love it. Additionally, since there's some wait-time for the paint to cure, that's the best time to take tackle the hutch backing. One of the best inventions ever in recent years is peel-n-stick removable wallpaper. We used it in our boys' bedroom a few years ago and absolutely love how easy it is to hang and reposition if need be. Yes, no paste, no water, no worries!
For this project, I chose this reclaimed wood paper to add some color and texture to the desk. The best part is that if I ever want to change it up, I just peel it off and go on my merry way. Isn't it awesome?!
Additionally, since there's some wait-time for the paint to cure, that's the best time to take tackle the hutch backing. One of the best inventions ever in recent years is peel-n-stick removable wallpaper. We used it in our boys' bedroom a few years ago and absolutely love how easy it is to hang and reposition if need be. Yes, no paste, no water, no worries!
For this project, I chose this reclaimed wood paper to add some color and texture to the desk. The best part is that if I ever want to change it up, I just peel it off and go on my merry way. Isn't it awesome?!
 Since my hutch backing is a faux wood panel, I wanted to give the paper a bit of tooth to stick to with my sander. I don't think I really had to since it sticks to walls perfectly, but old habits are hard to break. tsk. Better to be safe than sorry, right?

APPLY PAPER
To apply the paper, I just did a dry fit and cut to length. Peeled back the top edge of the paper to line up and gently pulled the backing off as I worked down. I didn't have any major issues with bubbles, and I was so pleased with how easy it was. Plus, it only took two sheets side-by-side. Then, to stick the backing back on the hutch top, I just laid it face down and stapled the backing on with my stapler. (another favorite tool and why my motto has always been toolsoverjewels) And we're done!
THE REVEAL

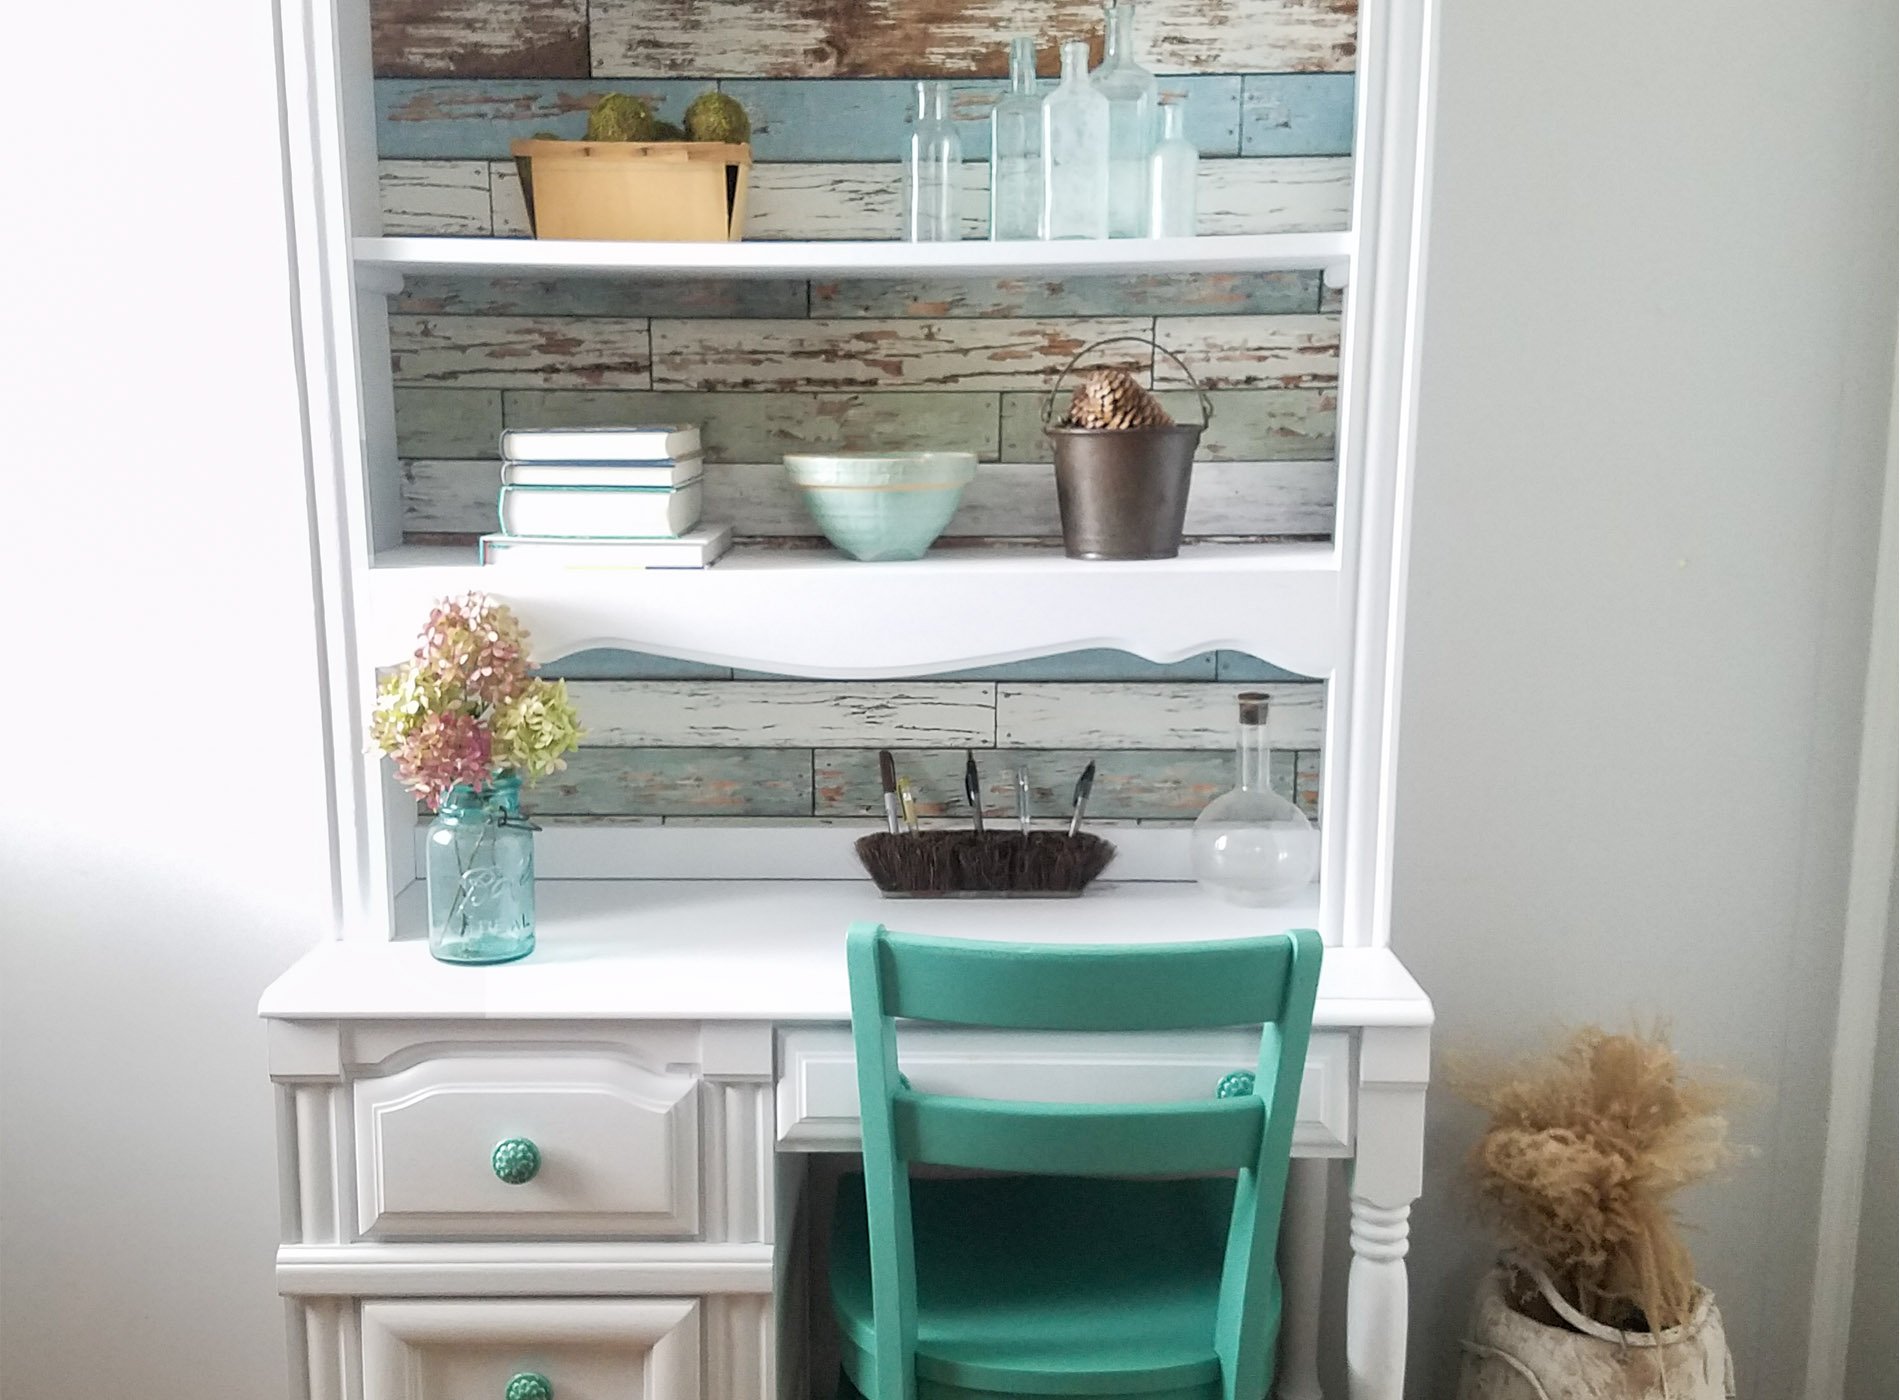
 What a huge difference the simple steps I made gave this vintage Broyhill hutch desk. First, it has such a refreshed feeling. Then, the pop of color from the new pulls and the added chair make the set complete. You can see how that green color has been used in these posts HERE. Likewise, the woodsy acorns are gone, and the desk has a whole new vibe. It was easy to do with the right tools and fun too! I couldn't be happier with the finish.

 Last, for an added touch I even gave the drawers a coat of gray like I did my farmhouse blanket chest and entertainment armoire.

THE AFTER
Many have asked about this paper, and I think it has endless uses. Furthermore, think of all the accent walls you could create. Or how about for a person who rents or has a shop or stages furniture (ME) this is PERFECT. There are other woods, bricks, prints...so many to choose from.
 What is more, you can purchase this Broyhill hutch desk and more in my online shop.


SHARE
Additionally, pin and share this Broyhill hutch desk transformation to inspire others to give DIY a try. They may have some ho-hum furniture needing some love too! Before you go, be sure to sign up for my newsletter. Until next time!

Also, more makeovers like my Broyhill hutch desk:

