Whether it's embossed glass, paper, metal, or wood, I have always been intrigued by that design element. I love to create that effect in my artwork whenever possible. So, it may not surprise you that I also emboss furniture too. It is so absolutely easy and only take a few basic materials. Let me show you what I did with this worn-out jewelry armoire.

THE BACKSTORY
The story behind this piece goes like this: I went to pick up an antique nightstand from a guy that I had just spoke with the night before. While on my way there with kids in tow, my oldest began to feel ill. I didn't want to go back home and stand the guy up, so we headed over anyway with my oldest's permission.
Turns out the guy sold the nightstand before I got there (me not happy at all), and he had a bunch of other stuff that he kept trying to sell me. He said that he and his wife "shabby chic" stuff and asked if I did the same. ummm... (wink, wink). Anyhoo, I was upset I wasted my time and didn't want to come away empty-handed for my effort, so I bought this thing. meh.

I wasn't too keen on working on it because it looked like a whole lotta work, but thought I'd give it a try, and if I didn't want it I knew one of my kids would like to have a crack at it.
DIY TIME
To me, it looked like a blank slate and since I have yet to add a piece like this to my repertoire, so I thought I'd have a try. To get started, I removed all the damaged velour, and made repairs.

Then I primed like crazy because this was a mahogany stain that would bleed through. Bleeding isn't an issue if you're using a deep dark paint, but I intend to go light on this one.
Once primed, I did two coats of my favorite Antique White by Behr using a Glidden Flat Paint. I've used this same color oodles of times, like on
my chest of drawers and
this dressing table and this
French beauty.
Once the paint was dry, I hand-painted the drawer fronts to create some whimsy.

I decided to glaze the details using a homemade glaze I talk about
HERE, so that it would add dimension. (See my diva cat, Lily, snoozing in her perpetual spot? I share about her often. tsk. Silly cat.)

NEXT STEPS
My original intent was to hand-paint a floral design to the front because to me it was like a canvas, but I really didn't want to add any color. It just needed
something, so I decided to emboss the front panel. Hint: You could also use embossed wallpaper like I did on
this nightstand for a simple effect too.
Seriously, this method is so easy and creates oodles of texture - you must give it a try! Here is what you'll need:

- Stencil (I used Martha Stewart's Birds & Berries) that I also used on this project)
- Delicate Surface Frog Tape
- spackling
- putty knife
I typically use spackling for a smooth finish, but when I went to work on my project I found my tub dried up. tsk. So, because I have been under-the-weather, I wasn't about to go anywhere and used what I had on hand instead - a specialty finish by Martha Stewart. It's a bit grainier, but I like the effect too. Also, here's a video demonstrating (
tutorial HERE) the technique with spackling or see this post too.

EMBOSSING
Grab your stencil and tape it in place. (you could certainly do this before painting, but since this was last-minute, I did it on top) Get a nice chunk of spackling on your putty knife and smear it evenly across the stencil.


Carefully remove the stencil by rolling it back towards you and this is what you should see.

The best part is that if you mess up, just scrape it off, wipe the surface clean and try again.
For added dimension, I used a toothpick to create features in my embossing.

Since you will be needing your separate layers to dry before working on another element, I found it best to use a hair dryer to quicken the dry time to about 5 minutes.
Once all is dry, you can paint it and even glaze it as I did.

THE REVEAL
Ready to see my how to emboss furniture project? woot!

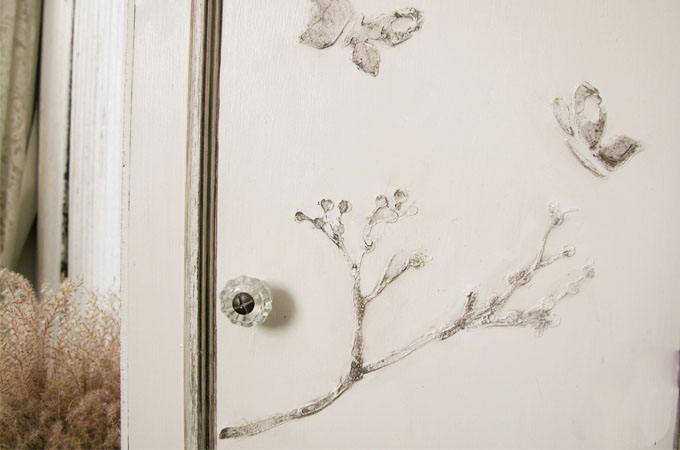
The outcome is perfect and I'm happy to say this thing is done! I even had an antique glass pull to add to it from my stash.

I replaced all the damaged velour with wallpaper, the same one I used on
this sewing cabinet, and love the spring-like feel it has.

And you have to love the numbered drawer fronts, right?

As much as this looks sweet in
my master bedroom, I am adding it to
my shop.


I know that I will be using this method again to emboss furniture, so pin and share so you can find it again. ♥ And...you can certainly do this on most anything! Give it a try - you know you want to.

To get these DIY tips & tricks in your inbox, be sure to
sign up for my newsletter. PLUS, you will get your FREE Furniture Buying Checklist and special discount to
my shop. Until next time!

Also, more projects like how to emboss furniture:


 I wasn't too keen on working on it because it looked like a whole lotta work, but thought I'd give it a try, and if I didn't want it I knew one of my kids would like to have a crack at it.
 Then I primed like crazy because this was a mahogany stain that would bleed through. Bleeding isn't an issue if you're using a deep dark paint, but I intend to go light on this one.
Once primed, I did two coats of my favorite Antique White by Behr using a Glidden Flat Paint. I've used this same color oodles of times, like on my chest of drawers and this dressing table and this French beauty.
Once the paint was dry, I hand-painted the drawer fronts to create some whimsy.
Then I primed like crazy because this was a mahogany stain that would bleed through. Bleeding isn't an issue if you're using a deep dark paint, but I intend to go light on this one.
Once primed, I did two coats of my favorite Antique White by Behr using a Glidden Flat Paint. I've used this same color oodles of times, like on my chest of drawers and this dressing table and this French beauty.
Once the paint was dry, I hand-painted the drawer fronts to create some whimsy.
 I decided to glaze the details using a homemade glaze I talk about HERE, so that it would add dimension. (See my diva cat, Lily, snoozing in her perpetual spot? I share about her often. tsk. Silly cat.)


 Carefully remove the stencil by rolling it back towards you and this is what you should see.
 The best part is that if you mess up, just scrape it off, wipe the surface clean and try again.
For added dimension, I used a toothpick to create features in my embossing.
The best part is that if you mess up, just scrape it off, wipe the surface clean and try again.
For added dimension, I used a toothpick to create features in my embossing.
 Since you will be needing your separate layers to dry before working on another element, I found it best to use a hair dryer to quicken the dry time to about 5 minutes.
Once all is dry, you can paint it and even glaze it as I did.
Since you will be needing your separate layers to dry before working on another element, I found it best to use a hair dryer to quicken the dry time to about 5 minutes.
Once all is dry, you can paint it and even glaze it as I did.

 The outcome is perfect and I'm happy to say this thing is done! I even had an antique glass pull to add to it from my stash.
 I replaced all the damaged velour with wallpaper, the same one I used on this sewing cabinet, and love the spring-like feel it has.
 And you have to love the numbered drawer fronts, right?
 As much as this looks sweet in my master bedroom, I am adding it to my shop.
 I know that I will be using this method again to emboss furniture, so pin and share so you can find it again. ♥ And...you can certainly do this on most anything! Give it a try - you know you want to.
 To get these DIY tips & tricks in your inbox, be sure to sign up for my newsletter. PLUS, you will get your FREE Furniture Buying Checklist and special discount to my shop. Until next time!


