 Isn't the detailing gorgeous? I mean, this can't be found in your box store lumber aisle for sure. So, I ration it like it's gold (pssst...because it is! tee hee!)

DIY TIME
Okay, so I mentioned create a shelf, but even better I'm sharing a fun technique using a tool some people tend to overlook. Meet my hottie friend, the Wagner Furno Heat Gun. Have you ever used one of these? When I worked on the paint crew in college, I kinda blew it off as a glorified hair dryer. However, little did I know how amazing it is to have in my tool arsenal. You can see what I mean in my video below.
*post sponsored by Wagner (see full disclosure)
 Plus, you can also see how I built a sleigh and used it to bend metal, and also how to use it to create your own wood-burned designs and logos.
 Here is the end result of my woodworking and torching adventures.
 Have you ever heard of Shou Sugi Ban? It's an ancient Japanese carbonized burnt wood finish that naturally preserves the wood. You can see it used on cedar or larch cladding. In addition, you can also use pine, hemlock, maple or oak as well. (*source) I'm going to basically show a spin on that method.
First, if you'd like to create one of these of your own, get your hands on the materials below. This is a rough guide, but you can totally tweak this to suit your space or your liking in any way you like. I use pine in this instance, but any species will work.
Have you ever heard of Shou Sugi Ban? It's an ancient Japanese carbonized burnt wood finish that naturally preserves the wood. You can see it used on cedar or larch cladding. In addition, you can also use pine, hemlock, maple or oak as well. (*source) I'm going to basically show a spin on that method.
First, if you'd like to create one of these of your own, get your hands on the materials below. This is a rough guide, but you can totally tweak this to suit your space or your liking in any way you like. I use pine in this instance, but any species will work.
TOOLS & SUPPLIES
- reclaimed or new wood
- 2 - 26" L x 7" W boards (tongue & groove is great, but isn't essential)
- 2 - 8 ¼" L x 5" W boards
- 1 - 9 ¼" L x 5" W board
- 3 - 9 ¼" L x 1 ¼" W boards
- 1 - 15" L x 5 ½" W board
- 2 - 5 ½" L x 5 ½" W triangles for corbels (cut scroll design if desired)
- 3 wire hooks or Shaker pegs
- keyhole hardware (for flush-mount hanging)
- Furno Heat Gun
- saw - miter saw, jig saw, table saw, or circular saw
- nailer with 1 ½" brads, or drill with screws
- wood glue
- tape measure
- builder's square
- safety gear - ear plugs, safety glasses, dust mask
 TERMS OF USE: If you want to create a shelf, you agree to the following: it cannot be shared or distributed for monetary gain in any way, it may not be modified in any way, and you may not claim the work as your own.
NEXT STEPS
Then, once I have all my pieces cut and ready to assemble, it's time to get building. Not only is a nailer my preferred tool for assembly, it makes this job easier as a solo DIYer. However, you can use a drill and screws as well. Just make sure you pre-drill the wood to prevent splitting. Also, to make the job easier, assemble the 1 pieces (use a pocket joint if your boards aren't tongue & groove), the 2, 3, &4 pieces into a crate (shown below), and 5 & 6 into a shelf. In addition, use wood glue to make the joints nice and tight. Don't stop yet, however, because our DIY fun is just getting started! It’s time to break out our Furno Heat Gun and give this wood some dimension. The two back boards I use a charcoal reactive stain to make it nice and dark.
 Though, for the crate and shelf, I want to contrast that with a scorched wood look. Simply rest the gun on the stand on a safe surface, turn it on, and allow it to heat up for a couple of minutes. Then, slow and steady, pass it over the wood. Eventually, you’ll see the grain pop out in a miraculous way.
 Likewise, hit the edges and corners to give it a darker effect. It’s so addictive!
 Finally, to assemble it all together. Reverse your shelf and crate placement on the backside and mark where you want your pieces attached. Then, pre-drill holes to attach from the back using screws. In like fashion, be sure to add your keyhole hardware.
 That hardware allows for a flush mount, as well as can hold heavy objects with no problem. They're a must-have in my stash.
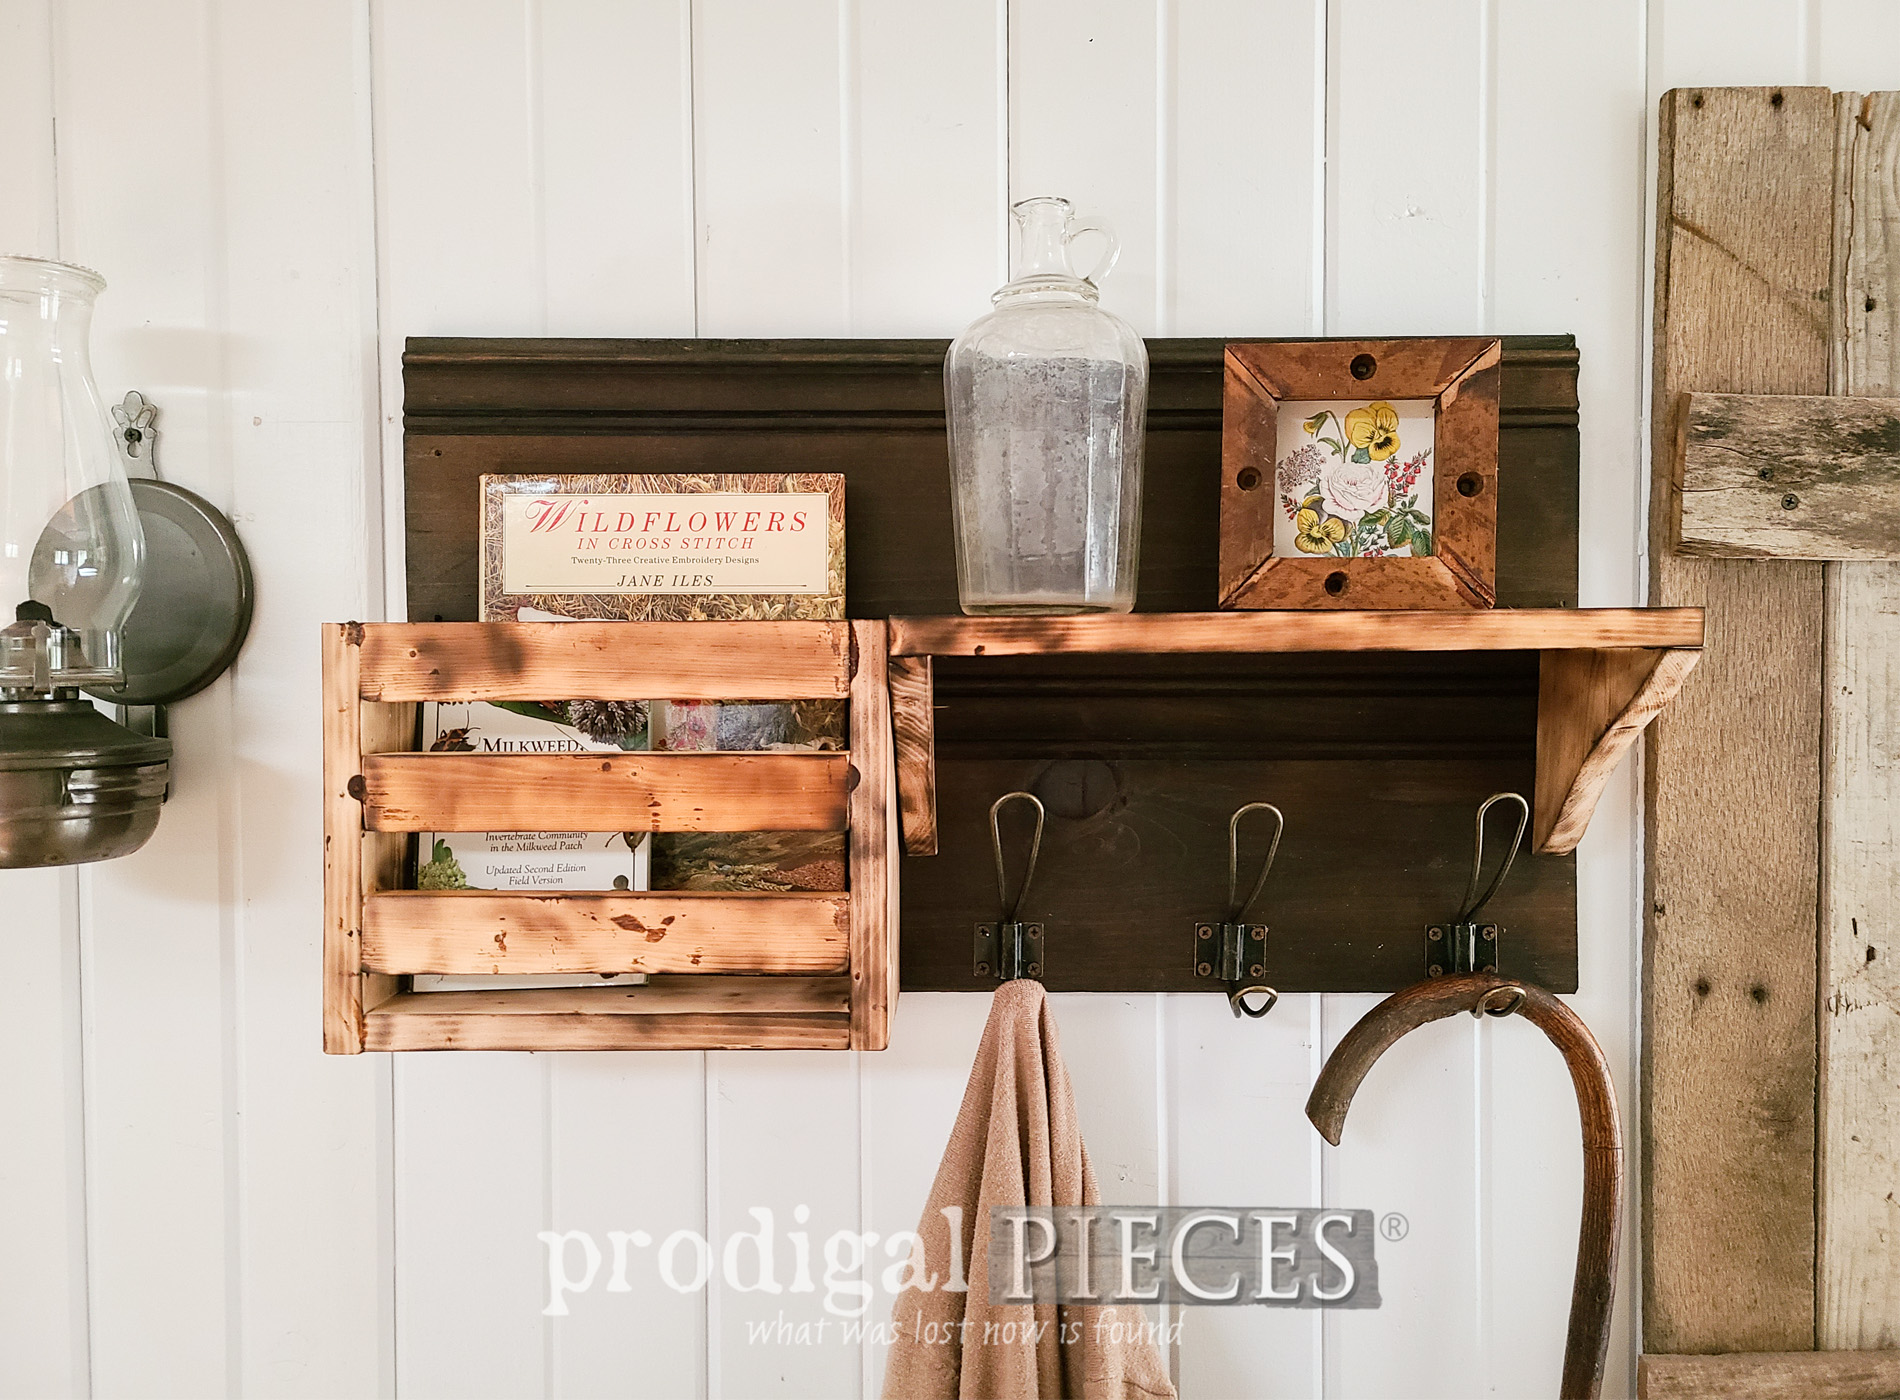
THE REVEAL
Here’s our DIY scorched wood shelf complete with hooks for coats or towels. Where would you use it?
 I've staged it as an entry shelf, but honestly, it can be useful in a bathroom, bedroom, and even a porch if protected properly. Isn't that wood technique sweet?

 Not only is the crate a sweet addition, but it's so useful for books, mail, towels...you get the idea. And, who can't use oodles of hooks too.
 Likewise, if you'd like to add this to your home story, you can find it and more available in my online shop.
[metaslider id=30251]
GIVEAWAY TIME
Wagner and I are all about empowering you to get your own DIY projects done. We are giving away a Wagner Heat Gun to one of you. Just fill out the widget below for as many entries as you like (daily even). Open to U.S. & Canada residents 18 years of age and older. Winner will be notified via email and will have 24 hours to respond. Also, check your spam! In addition, let's get the DIY spirit out there and inspire others to give this DIY scorched wood technique a try. Do pin and share! Up next, this broken stand needs some serious DIY help. Come see its new life HERE!
 To get these DIY tips & tricks in your inbox, be sure to sign up for my newsletter. PLUS, you will get your FREE Furniture Buying Checklist and special discount to my shop. Until next time!

Also, more builds like this DIY scorched wood storage shelf that you can build too:

