 Before we get started, I wanted to give you a bit of history on this fire pit. Four years ago I shared this original post detailing how blessed I was to be able to create it for JC on Father's Day without spending a dime. All the materials were sourced from the curb and I was over-the-moon excited to surprise him with it after building it in a day.

A MESS
I certainly could reset and re-stain everything, but we felt it was time for a do-over. Our back yard makeover began with my recent build of our compost bins made from pallets. I share the DIY with you and invite you to see the transformation of our MESS. That's what happens when you are as busy as we are. It was driving me nuts and I had to do something. After the compost bin I moved on to our back fence. It was a hot mess as you can see in the above picture. My gang and I yanked out everything to start over. We gave all of the perennials to a Paid in Full group since I never wanted to see another tiger lily again! Oy! I have been digging those things out for years when we moved in 14 years ago and I am tired of wrangling them in. So, buh-bye! I am so happy that many were delighted to get them.
*post sponsored by DFOHome and HomeRight (see full disclosure)
Aaahhh...just look at the clean start. Hooray! My goal was to create a bed that had much less maintenance involved. So, I dug out my Rose of Sharon bushes, boxwood bushes and rearranged them, then added a few shrubs and limelight hydrangeas to create a visual barrier. (BTW, the fence that is in disrepair is my neighbor's.) Those new additions will grow in nicely over time. Around them I used landscaping fabric and then topped with landscaping stone. A huge job, but it is done and I can relax...for a minute. ha!DIY TIME
Onto the DIY fire pit! Isn't it 1000 times better?!? Here is what you'll need to create your own: (this is based on our 14 ft. diameter, so adjust materials to the size you need) With all the materials ready to go, we easily had this done in a day. Funny that it ended up being Father's Day weekend 4 years later. haha. Best part is it was for less than $250 (that includes an $84 delivery fee for gravel, so you could even do it for less)
Materials:
- landscaping fabric
- 106 (approx.) - red brick at 75¢ each (or rock, railroad ties, or border of choice. You can source this from Craigslist and Freecycle too)
- 2 ton (approx.) - 8 limestone or pea gravel
- furniture and decor
Tools:
- square point shovel or sod cutter
- spray paint - any color
- garden stake or anything to mark center
- twine or rope
- garden rake
- Wheelbarrow
- garden/work gloves
- utility knife

Step 1
First, find center of where you want your pit to be. Second, insert in a stake into that center point. Next, tie twine around your stake the length of the radius (We decided to increase the size of our area and create a circle and wanted 14 ft. diameter = 7 ft twine). Then, use spray paint to walk around the circle while spraying an outline. Basically like using a giant compass.
Step 2
Remove the sod from inside the painted circle. Use your square point shovel or a manual sod cutter. When we did our front yard garden we rented a gas powered sod cutter that works super fast. For this though, it wasn't bad to remove it by hand. Start at the circle edge, cut through the sod and then make a wedge shape (pie slice) with your shovel. Make a shallow cut trying to keep the shovel parallel to the ground to only get sod and not dirt. Once you get started you can move quickly. Make sure to keep your center stake in while digging.
We had many helpers from our gang of 6.
Start at the circle edge, cut through the sod and then make a wedge shape (pie slice) with your shovel. Make a shallow cut trying to keep the shovel parallel to the ground to only get sod and not dirt. Once you get started you can move quickly. Make sure to keep your center stake in while digging.
We had many helpers from our gang of 6.
 Roll up the sod and set aside. Because we like to create less waste, we put our sod on Craigslist in the free section. Many will scramble to come get it from you to patch their yard or cover damage from construction.
 This huge pile was gone like a flash of lightning. woot! You can even set up with someone prior to digging to give them your sod, that way you don't have it sitting in your yard longer than you want. I just cleaned up that spot, so ain't no way it was stayin'!
Step 4
Using your garden rake and shovel, grade the area level as best as you can. You don't want standing water or trip hazards. Create your fire ring by using a second piece of twine tied to the center stake and measuring out 24" from center. Use your spray paint again and make a smaller circle. Place one layer of your red brick on that circle (approx 48 bricks for total ring). Our fire ring will be 3 bricks high, but only lay one layer down at this point to move on to the next step.Step 5
Grab your roll of landscaping fabric. Beginning at one edge of the circle, cut a length of fabric and trim it to fit the shape. Place your red brick on the fabric edge as you go making sure to overlap the fabric about 4" or more to get plenty of coverage. Tuck it under your fire ring bricks as well. We chose red brick because the previous owner of our home used it to edge different places in our yard and we want it to match. It also is very affordable at 75¢ a brick and many have them sitting around you can snag for free. The brick should be placed just a bit higher than level with the grass as it will settle over time. That will create less trip hazards and make for a nice flush finish.
Step 6
Once your fabric and brick is in place, it is time for your gravel. Again, because we already had 8 limestone in our yard in other areas, that is what we chose. It was $22 a ton with an $84 delivery fee. We also considered pea gravel for $6.25 a ton, so there are many options. I really wanted to use decomposed granite because it compacts and make for a more solid surface. However, it can't be sourced anywhere in our state. So, gravel it is. This pile is 5 ton as we are doing more improvements after the fire pit, so stay tuned! We even considered using asphalt shavings or crushed limestone to create a packed surface before adding our top layer. However, we really didn't feel the need to as we have used the landscaping fabric with much success for many years in other areas. If a stray weed pops up, we just spray with vinegar. Safe, natural, and easy.
Dump your gravel on and spread with the back side of your garden rake for even coverage. Our DIY fire pit used approximately 2 ton of limestone to fill the area 2" deep.
We even considered using asphalt shavings or crushed limestone to create a packed surface before adding our top layer. However, we really didn't feel the need to as we have used the landscaping fabric with much success for many years in other areas. If a stray weed pops up, we just spray with vinegar. Safe, natural, and easy.
Dump your gravel on and spread with the back side of your garden rake for even coverage. Our DIY fire pit used approximately 2 ton of limestone to fill the area 2" deep.

Step 7
Time for fun - Add furniture and accessories. In our patio makeover, we added privacy and charm with our outdoor curtains from DFOHome (Designed for Outdoors), and comfort with our tufted hammock. You can see it was an easy choice to head back there to get furniture to finish our space. You can imagine my delight to see this happy mail sitting on my driveway. My neighbor quickly came over to inquire. tsk. Straight from the box, the folding adirondack chairs are ready to go. The loveseats needed a bit of assembly, but nothing my gang and I couldn't handle.
 JC and I stayed out late that night to get it done. What better way to spend time with your husband, right?

FINISHING
The furniture is ready to go with a protective finish, but the furniture we built needed a topcoat. My go-to tool is my HomeRight sprayer for a job like this - ain't nobody want to hand-stain those things. But, guess what?? They have come out with a new and improved sprayer!! Meet the new Finish Max Extra. Not only can this one machine do a fine furniture finish, but also can tackle all your heavy duty jobs with the switch of a tip. This means my Finish Max works as well as my stain sprayer, and my heavy duty sprayer are now all wrapped up in this one tool. {{happy dance!!}} This set comes with two different nozzles and 3 tips, though more tips are available. For my project, I'm all about the blue tip since it gives the spray pattern I want for applying the stain to the tables and bench we built to complete our space (complete build plans coming soon!)
Check out this video to see it in action...
This set comes with two different nozzles and 3 tips, though more tips are available. For my project, I'm all about the blue tip since it gives the spray pattern I want for applying the stain to the tables and bench we built to complete our space (complete build plans coming soon!)
Check out this video to see it in action...
 Once everything was dried and cured, it was time to enjoy.


 We couldn't be happier with our space as it is not only more pleasing to look at, but fits us all, and is so much safer. It compliments our patio area in more ways than one.


THE REVEAL
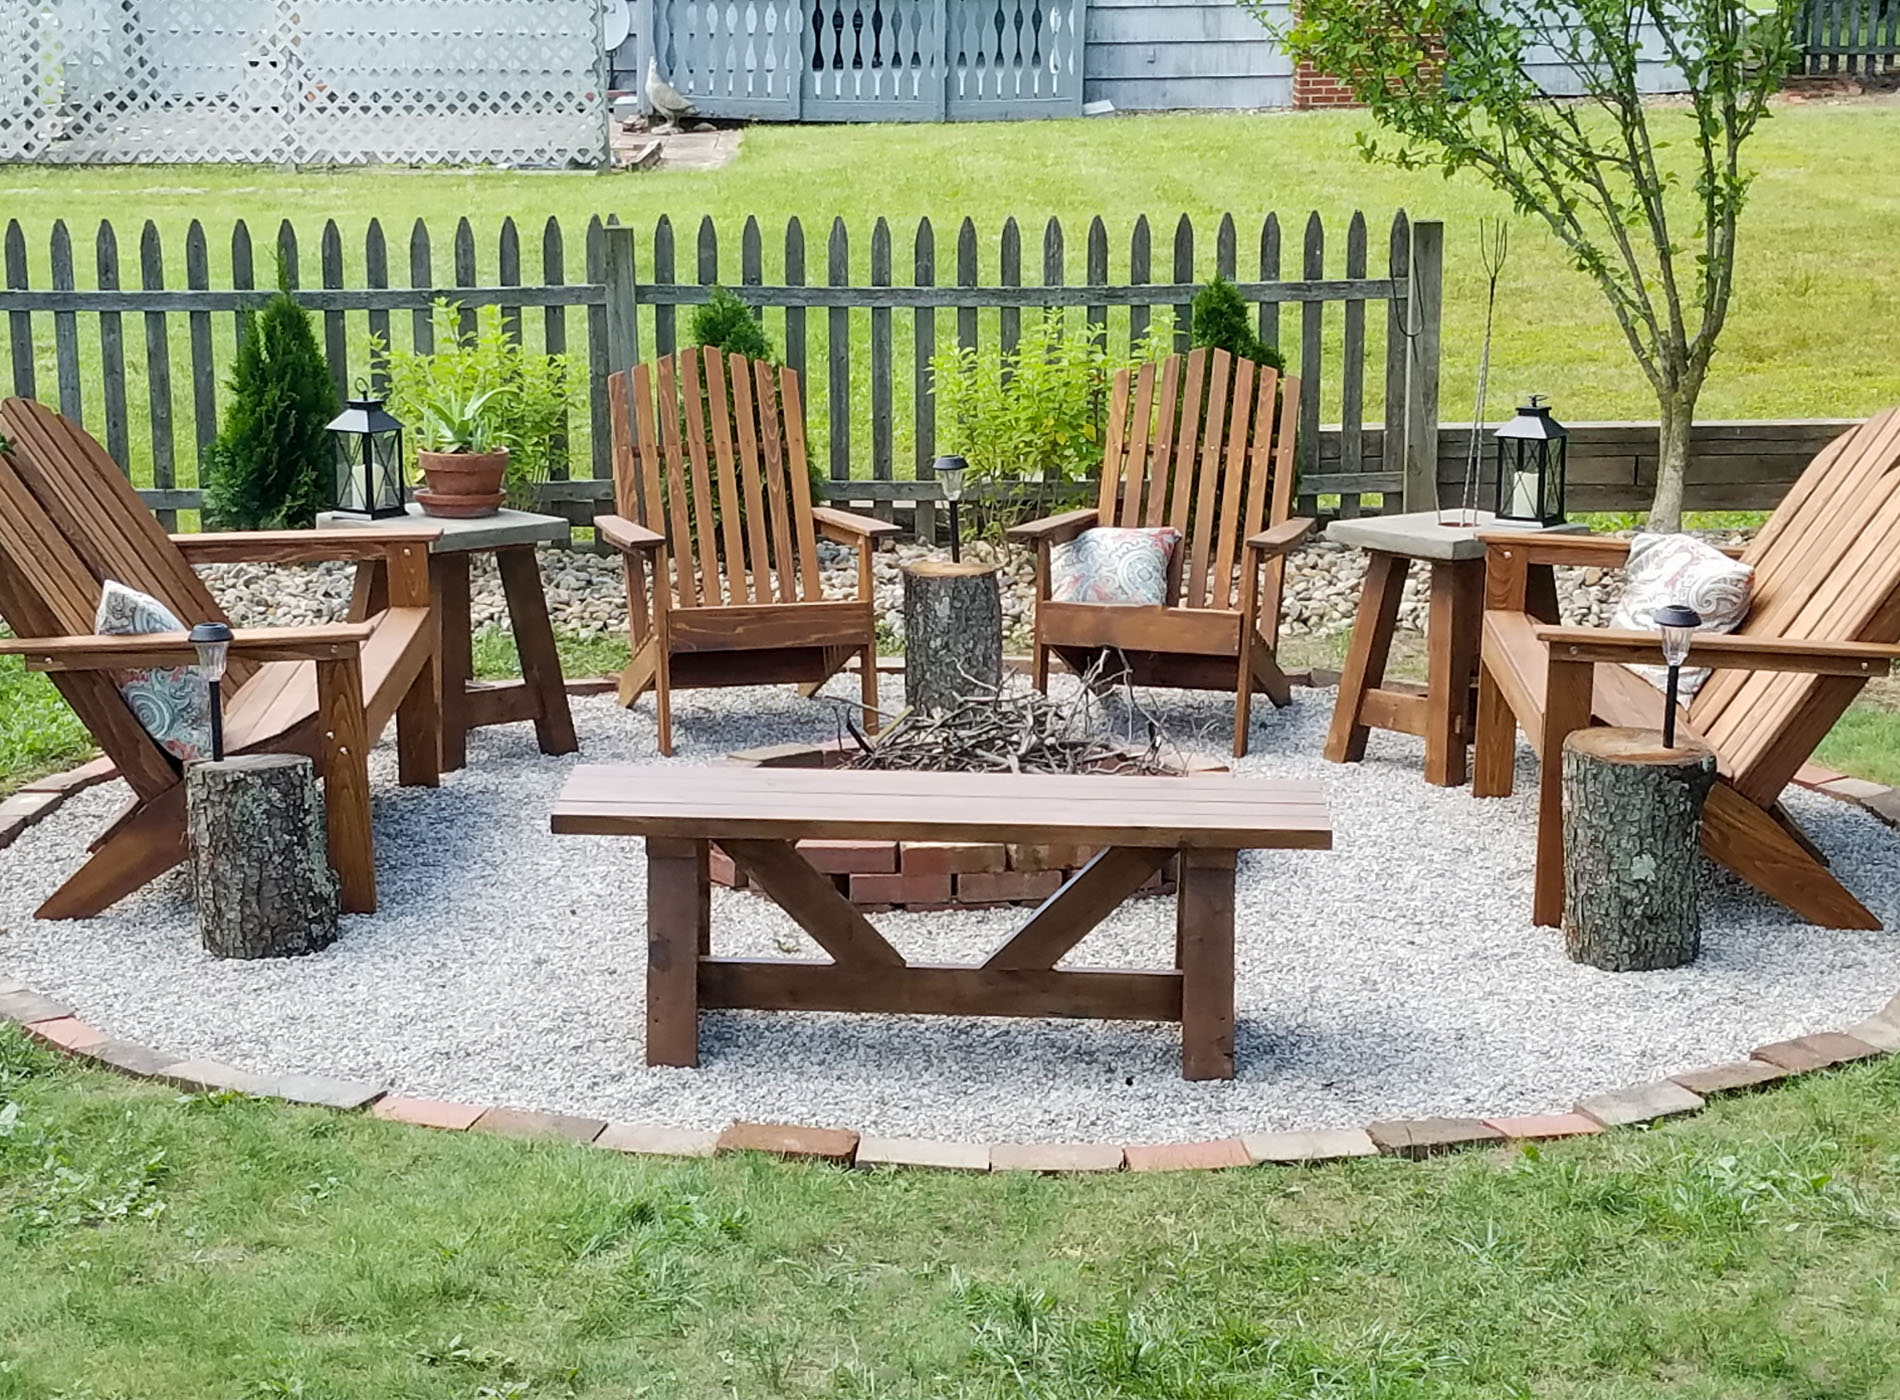
The Adirondack chairs and loveseats now allow us to all sit together. Our concrete tables fit nicely among them, as do the log accents with solar lights.

 The one concrete table even made use of our spare drain tube that was from our old fire pit. It continues to hold our roasting sticks, but now in with style. Both the tables and bench came out just as planned thanks to the HomeRight Finish Max Extra. Build plans coming soon!
 I don't know about you, but I'm getting the itch to eat and it's time to roast!
 Our littlest couldn't wait to dig in...here is where I found her. tee hee hee.
 Now, the whole gang was able to join her to celebrate our hard work on the new DIY fire pit. High-five guys!!

 Full bellies means it time for swing in the tufted hammock from DFOHome. That is my sweet spot for sure. Little do they know I'm about to snuggle in with them in a minute.
 As night begins to fall, we decide to just settle in an enjoy each other's company and also make some of our favorite Roasted Stone Fruit Dessert with homemade ice cream. It sure didn't last long!
 Enjoying the lights as the sun sets makes me sigh. We may not live in the country as my heart desires, but we are making the most of all that we are blessed with...health, happiness, and family.
NIGHTTIME

 Now to make more memories that will last a lifetime.

 Our hope is to inspire you to make your house your home. We may all not live where we want to, but we can make the most out of what we have. As I mentioned before we will be sharing the tutorials on how to create all the accents, like the solar powered lamp below. That's what we're all about - empowering YOU.

And...to get you started on your own DIY fire pit adventure, I am giving away one of the new HomeRight Finish Max Extra sprayers valued at $100 to one of you. Easy entry - just fill out the widget below. Open to U.S. & Canada residents 18 years of age and older.
We invite you to pin and share our DIY Fire Pit so that others can learn how to create their own space too. Outdoor projects for your DIY reference:
- Patio Start
- Patio Reveal
- DIY Faux Fireplace
- Concrete Fire Pit Tables
- DIY Lanterns from One Board
- Outdoor Space Inspiration
- Budget Outdoor Pillows
- DIY Faux Shipping Crate Table
- DIY Succulent Centerpiece
- Faux Succulent Planter
- More Succulent Love
 So be sure to sign up for my newsletter. PLUS, you will get your FREE Furniture Buying Checklist and special discount to my shop. Until next time!

More projects like my DIY fire pit:

