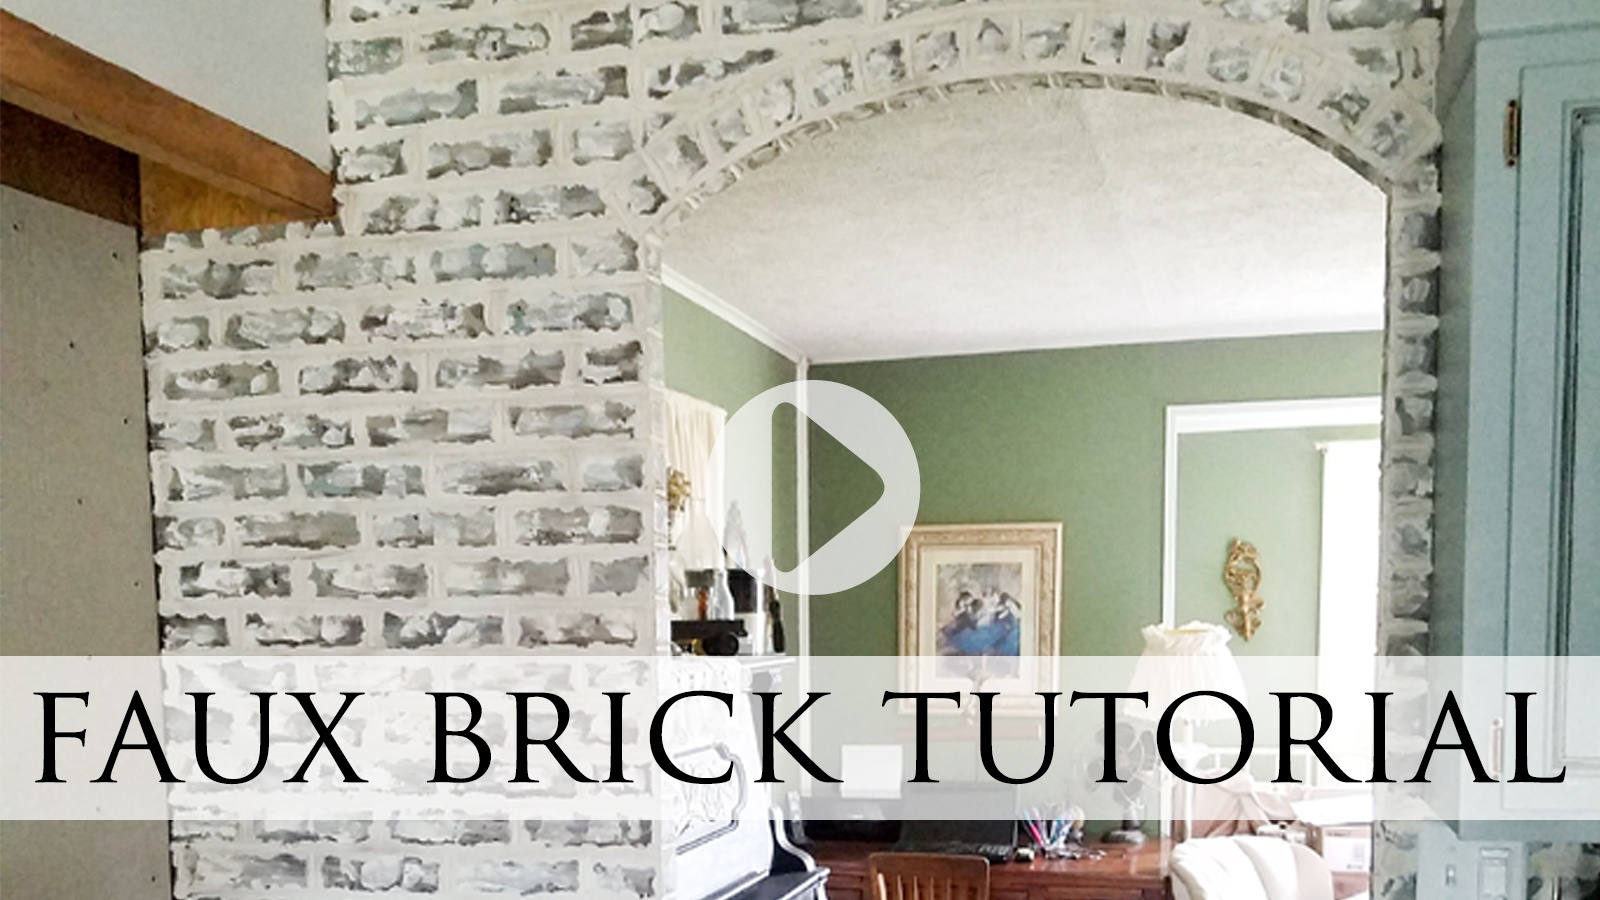
Today's the day!! I've been telling you that I was working hard to not only get some major steps done in our kitchen remodel, but also create a video tutorial so you can do it too. {{applause}} I'm all about brick - old brick, new brick, brick on the walls, brick on the floors...I love it! So, without further adieu, here is my DIY faux brick tutorial and an update to my kitchen.
 brick and spend half the money. Easy video tutorial by Larissa of Prodigal Pieces | prodigalpieces.com")
You are not going to believe how EASY this is. Seriously. When you take over 2 years to remodel your kitchen, laundry, and dining, and you're like me, you tend to...ummm...keep adding to the project. ahem. Did we plan to cut open our doorway in the beginning? NO.
Though we had planned brick, just not taking a saw to our wall. haha. However, what fun is that if we don't do what we want while we're up to our eyeballs in a hot mess anyway? Here is our tiny doorway in the before. Never mind the clutter and junk everywhere, k? Our living room is on our remodel hit list, but until then is a storage container. I'm so ready to have my house back.

After many years of knocking my knuckles on the door frame while carrying my laundry basket, or trying to squeeze a piece of furniture I need to stage through there brought me to the conclusion that it was time to break out the saw. Truth be told that JC didn't want to do it. Not because he didn't like the idea, but because his remodel list just got longer. Gotta love me!
THE BEFORE
Here's the view from the other side looking in. See how small it is? JC grabbed his circular saw and had at it. At this point I'm screaming, "YAHOOOOO!!"


TRUTH BE TOLD
One of the benefits of living in a home with wood walls is that we can cut and have at it like nobody's business. Drywall doesn't afford you such easy steps for sure, but it can be done just the same. Once he got the side opened up, we traced our arch onto the top and broke out the Sawzall. That was a gift to self in the first year I earned a paycheck from blogging. Woot! Remember my motto: toolsoverjewels!! Oh, and notice the cutie standing by...always in a leotard to be ready to dance. That's my girl!

Saw dust settles and JC is feeling pumped that he did it. I'm doing a happy dance at how easy that was AND that JC actually did it and I didn't have to. (cause you know I would have if he didn't) haha.

DIY TIME
Now for the fun part. I have been adding this brick paneling in our laundry around my ducting to make a faux chimney look. You can get these sheets at your local home improvement store for about $25 for a 4' x 8' sheet. Here it is unfinished. It is currently finished like the other brick, but wanted to show you it in the "before".

In
my oven cleaning tutorial, I showed you that we custom built a cabinet for our new double-oven and then added brick to it.

Here it is in the rough while I was working on it.


It's so easy that even my kids were helping me. Oh, and notice yet another leotard so at a moment's notice she can break out and dance. I love it.

MORE DIY
Once done with that, I continued behind our refrigerator. Why? Because I'm one of those that believes you should complete a job right. Will anyone see it? Maybe. Maybe not. But...I know it's done and our half-wit house, as I like to call it, is not half-wit anymore. tee hee.

MORE BRICK
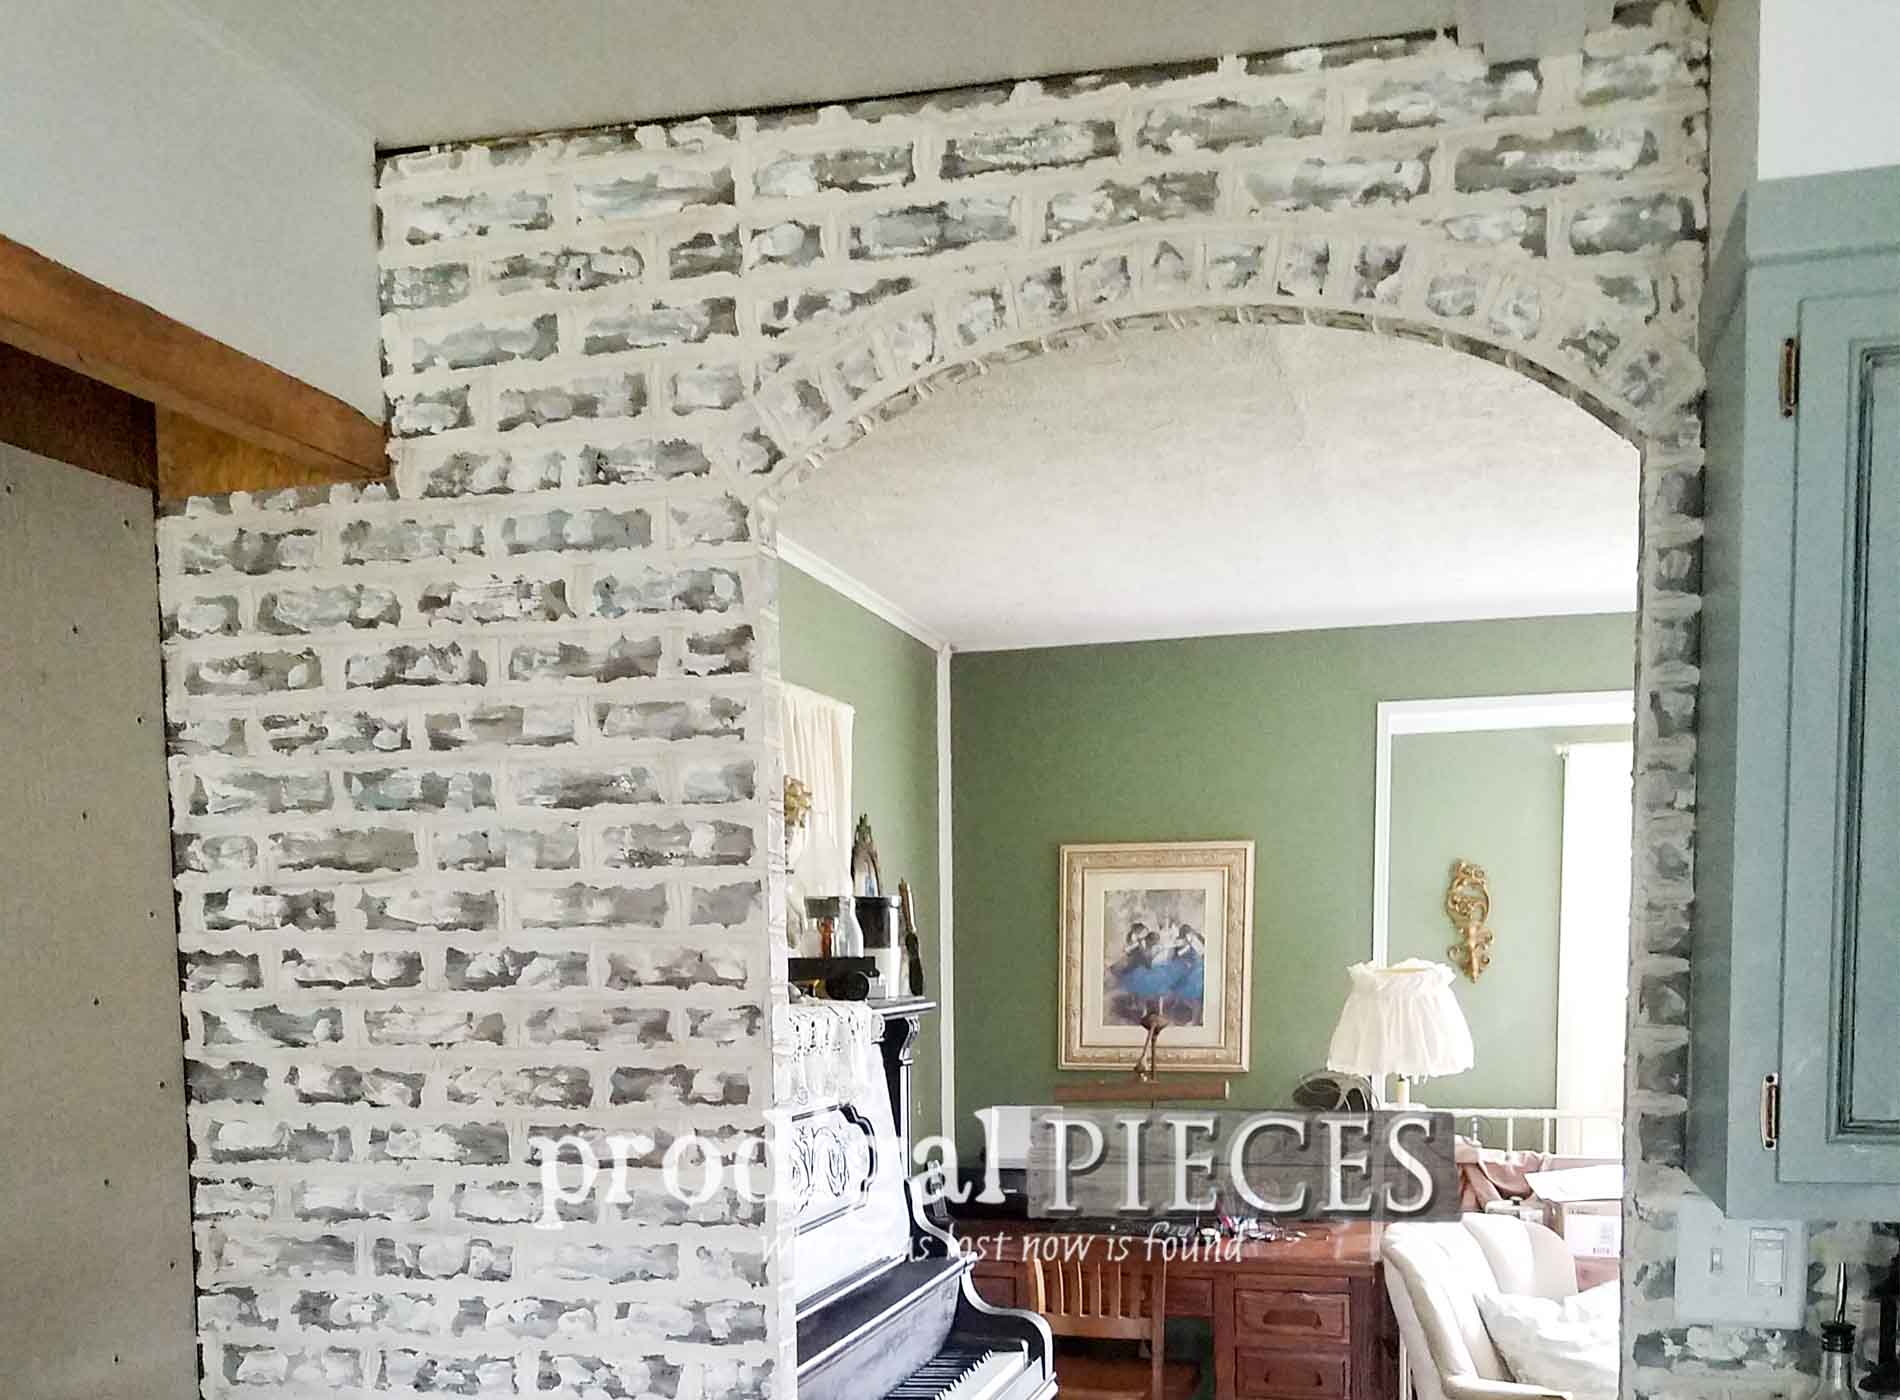
The brick continues under the cabinets and around the door where it will meet our new tile in the corner.


Here's the doorway in the rough waiting for the DIY faux brick whitewashed look I'm showing you today. We've cut the panels with our jigsaw, and JC is awesome at making sure all the panels match up. I cut all the small brick pieces with the jigsaw as well. We then attached it all with a heavy-duty paneling adhesive and stuck them on using our nailer. So much easier than putting up brick
AND if we ever want to change it out, we just pop the paneling off.

THE NEXT STEPS
So, are you ready to see how easy this is? I've got the full video for you below. And for those that can't make use of the video, I have the full tutorial written out below as well.
Okay, so you want to give this a try? Here's what you'll need:
Materials
- brick paneling
- paneling adhesive
- aqua blue, soft white, gray, tan or your color choices
- brown wax or your color choice
- topping joint compound
- pre-mixed sanded grout - Alabaster or your color choice
Tools
- jigsaw
- table saw or circular saw with Rip-Cut edge guide
- nailer
- ½ brick jointer
- utility knife
- carpenter's square
- tape measure
- paint brushes
- spray bottle
- rags
- couple of empty cans
Step 1
Let's get started! First, you can pick any color you like as they have oodles of choices to match your decor. These are fantastic neutrals that go well most anywhere. The best part is you can practice on scrap before giving it a go on your wall. I actually suggest you do this to get a feel for the technique.
First, begin by prepping your floor or any other areas with dropcloths, etc. Pick one of your colors to start with and apply it quickly to about 5 sections of brick in a completely random manner. You want to work in small sections so that paint stays moist for blending. If you notice, I brushed it out in my pictures, and in my video kinda blobbed it on. Either way works fine.

Step 2
Next, work your way through each color until you've applied them all.

Step 3
Once all the paint colors have been applied, grab your rag and begin to blend the colors wiping side to side horizontally. Don't worry about getting it in the grout lines because they will be covered up. If you feel the paint is drying too quickly, use your spray bottle and lightly mist before blending.

After I finish a section, I go on to the next section and do all the paint I want to do at that time. Then, I move onto the next step.
Step 4
Now it's time to grab your topping joint compound and your putty knife for our DIY faux brick effect. Get a small bead of compound on your putty knife and smear a bit of compound working horizontally in random spots - like doing a skim-coat of each brick.

After the compound is applied, take a rag, even the one you just used for paint, and pounce it to create a stippled effect (or bumps). We're looking to create texture, so have at it and have fun. After you're done, let the compound cure for about 20-30 minutes. When you clean up the compound tools, make sure to do so outside as you don't want to plug up your pipes with it inside. Same goes for the next step.
Step 5
Your compound is cured (hard to the touch) and we're ready to get messy. haha! This is where you will need to allow the most time since the first steps go so fast. You'll need your grout, a medium empty can or container, and the same putty knife you just used.
Place a grapefruit sized amount of grout in your container and close up the tub of grout to prevent it from drying out. Working in small batches again as you did with the paint, swipe across the grout lines (swipe vertically across horizontal lines, and horizontally across vertical lines), filling each line wiping excess off as you go. I like to hold my can of grout underneath my hand as I work to catch the excess and have less waste.

As soon as you've wiped in the last bit in the area you are working in, grab your brick jointer. Use the ½ end and begin to press and slide down each vertical brick joint. Do those first and then press and slide across each horizontal grout line.

Repeat this process until your entire brick area has had grout applied. Let cure for about 30 minutes to and hour or longer until cured.
Step 6
You can stop at the last step if you like the look of the grout as-is, or if you're like me I like even more texture, so I add a hint of color. In addition, I chose to use a brown wax, but there are other colors too.
My goal is to highlight all the nooks and crannies and warm up the colors a bit to create an earthy feel. To get the look, I place a small amount of wax in a separate container to keep from getting the sand in my can of wax. Then, I use my old paint brush and lightly pick up a bit of wax and brush it across the grout lines and brick to catch the raised parts creating definition.
Here is a side-by-side comparison of with the wax and without:

Either way, it's fun to experiment and give this DIY faux brick treatment a try.

WRAP-UP
Feel free to ask any questions as I am happy to help. What's next for us is waiting for the local wood shop to drill holes for us to mount our reclaimed open shelving on the adjoining wall. While waiting, we are hanging our tile and building our custom range hood. I've had parts for that hood from an old house for several years just waiting for their new purpose. I can't wait!
SEE THE FULL KITCHEN REVEAL HERE
Last, do pin and share this DIY faux brick video tutorial to inspire others to give DIY a try and make their house their home. It doesn't have to break the bank and it's FUN!!

Up next I will be giving this thrifted find a makeover. See the after
in this post HERE.

Stay tuned to see and be sure to
sign up for my newsletter. Until next time!

Also, more projects like this DIY faux brick tutorial: