You know that it's hard for me to pass up an offer for not only a free piece of furniture, but also an antique. Can you blame me? No joke...I had just emptied my home of any extra furniture when my cousin tagged me in her friend's feed offering up this antique chest of drawers. I felt obliged to...er...help. tee hee. The fun thing is that this piece inspires me to give it a DIY denim paint effect. Hang on to see what I mean.

You might be thinking...denim?? Well, let me explain. When I get a well-loved, free piece of furniture I count it as fair game to have some fun. Thankfully, all of the original brass knobs were present (some inside drawers). Those knobs totally remind me of rivets on blue jeans.
After I did my initial assessment of the hot mess-ness, I found that this is a piece that has potential for revival. Aside from the damaged top with burns, watermarks, etc., it's at least solid.

It's also evident that the veneer is in rough shape not only on the drawer faces, but also on the bottom sides. I see that kind of wear on this age of piece all the time. It just means some serious DIY fixin' is needed. woot!
TIME FOR REPAIR
First, I knew without a doubt that the flaking veneer had to come off those drawers. On all my past projects I have had success with
my towel-soak method. It's easy, obviously affordable, and just takes patience.

I literally soak bath towels in water, lay them on overnight or all day, and then pour even more on. Yes, it doesn't always work without fault, but I have only had one case where I probably shouldn't have used it on a very parched chest. See what I mean
here in my Rustic Chic tutorial.
The water permeates the veneer and soaks the adhesive so that it releases like butter on hot toast.

Then, while I'm waiting for the soak, I apply wood filler to the sides of the chest getting it ready for my DIY denim paint effect.

In addition to repairs to the chest, I also needed to rebuild the bottom drawer that had a jerry-rigged repair done to it. Thankfully, it was a straightforward fix and all is ready to go for the next step.
BRING ON THE PAINT
Now that everything is prepped, it's time to get this DIY denim paint technique started. First, I begin with using a seconds paint color that has a slight aqua tint to it.

Only one base coat is needed for the effect I'm after. I let that first coat cure for about 2 hours and then it's time for some layering fun. You can see how I've used this same blending technique on
my past projects HERE.
What you see below are the three paint colors I chose to get this denim effect. I already used that aqua color (yet to be named), and then a darker blue called Deep Arctic Night, and Dove White. Notice that I also have 3 separate brushes ready to go.

Then, I lightly mist the surface with water and apply a dry brush coat of the white paint, mainly focusing my paint in the center of the panel.

Once the paint is applied, I mist it with water again and begin to blend. I am using both the white brush, but also the aqua color brush on the edges. This is a fun step that lets you get creative. If you don't like what you first see, just paint over it and try again when cured.

MORE PAINT FUN
Now this is where it gets even more fun. Even with the white blending fresh, I grab my dark blue and deepen the edges and corners. Then, I use my aqua and dark blue brushes to work the paint to a soft blend. Next, I even use a very dry dark blue brush to make crosshatch marks horizontally and vertically to imitate thread-worn jeans.

In addition, I continue using the dark blue to dry brush the rest of the chest front and legs. Once I'm happy with the results, I let it cure completely.
BRING ON THE TYPOGRAPHY
I've said it before, and I'll say it again...I LOVE TYPOGRAPHY. I've always found old store windows painted by hand enchanting. Even looking at the artistry of old advertisements for the most basic of products. It's an art in and of itself. So... whenever I get a chance, I love to take the beaten-up beauties and give them some whimsy, spunk, flavor...whatever you want to call it. You can see my past typography projects in
THESE POSTS.
In the past I've shown you how I used my $10 thrifted
overhead projector to get the job done. I also use
my transfer method most often too. In this instance, I wanted some sort of iconic feel to the DIY denim paint effect. I print my custom design on an overhead projector film and transfer easily.

Notice I have quite the helper coaching me how to proceed. hee hee.

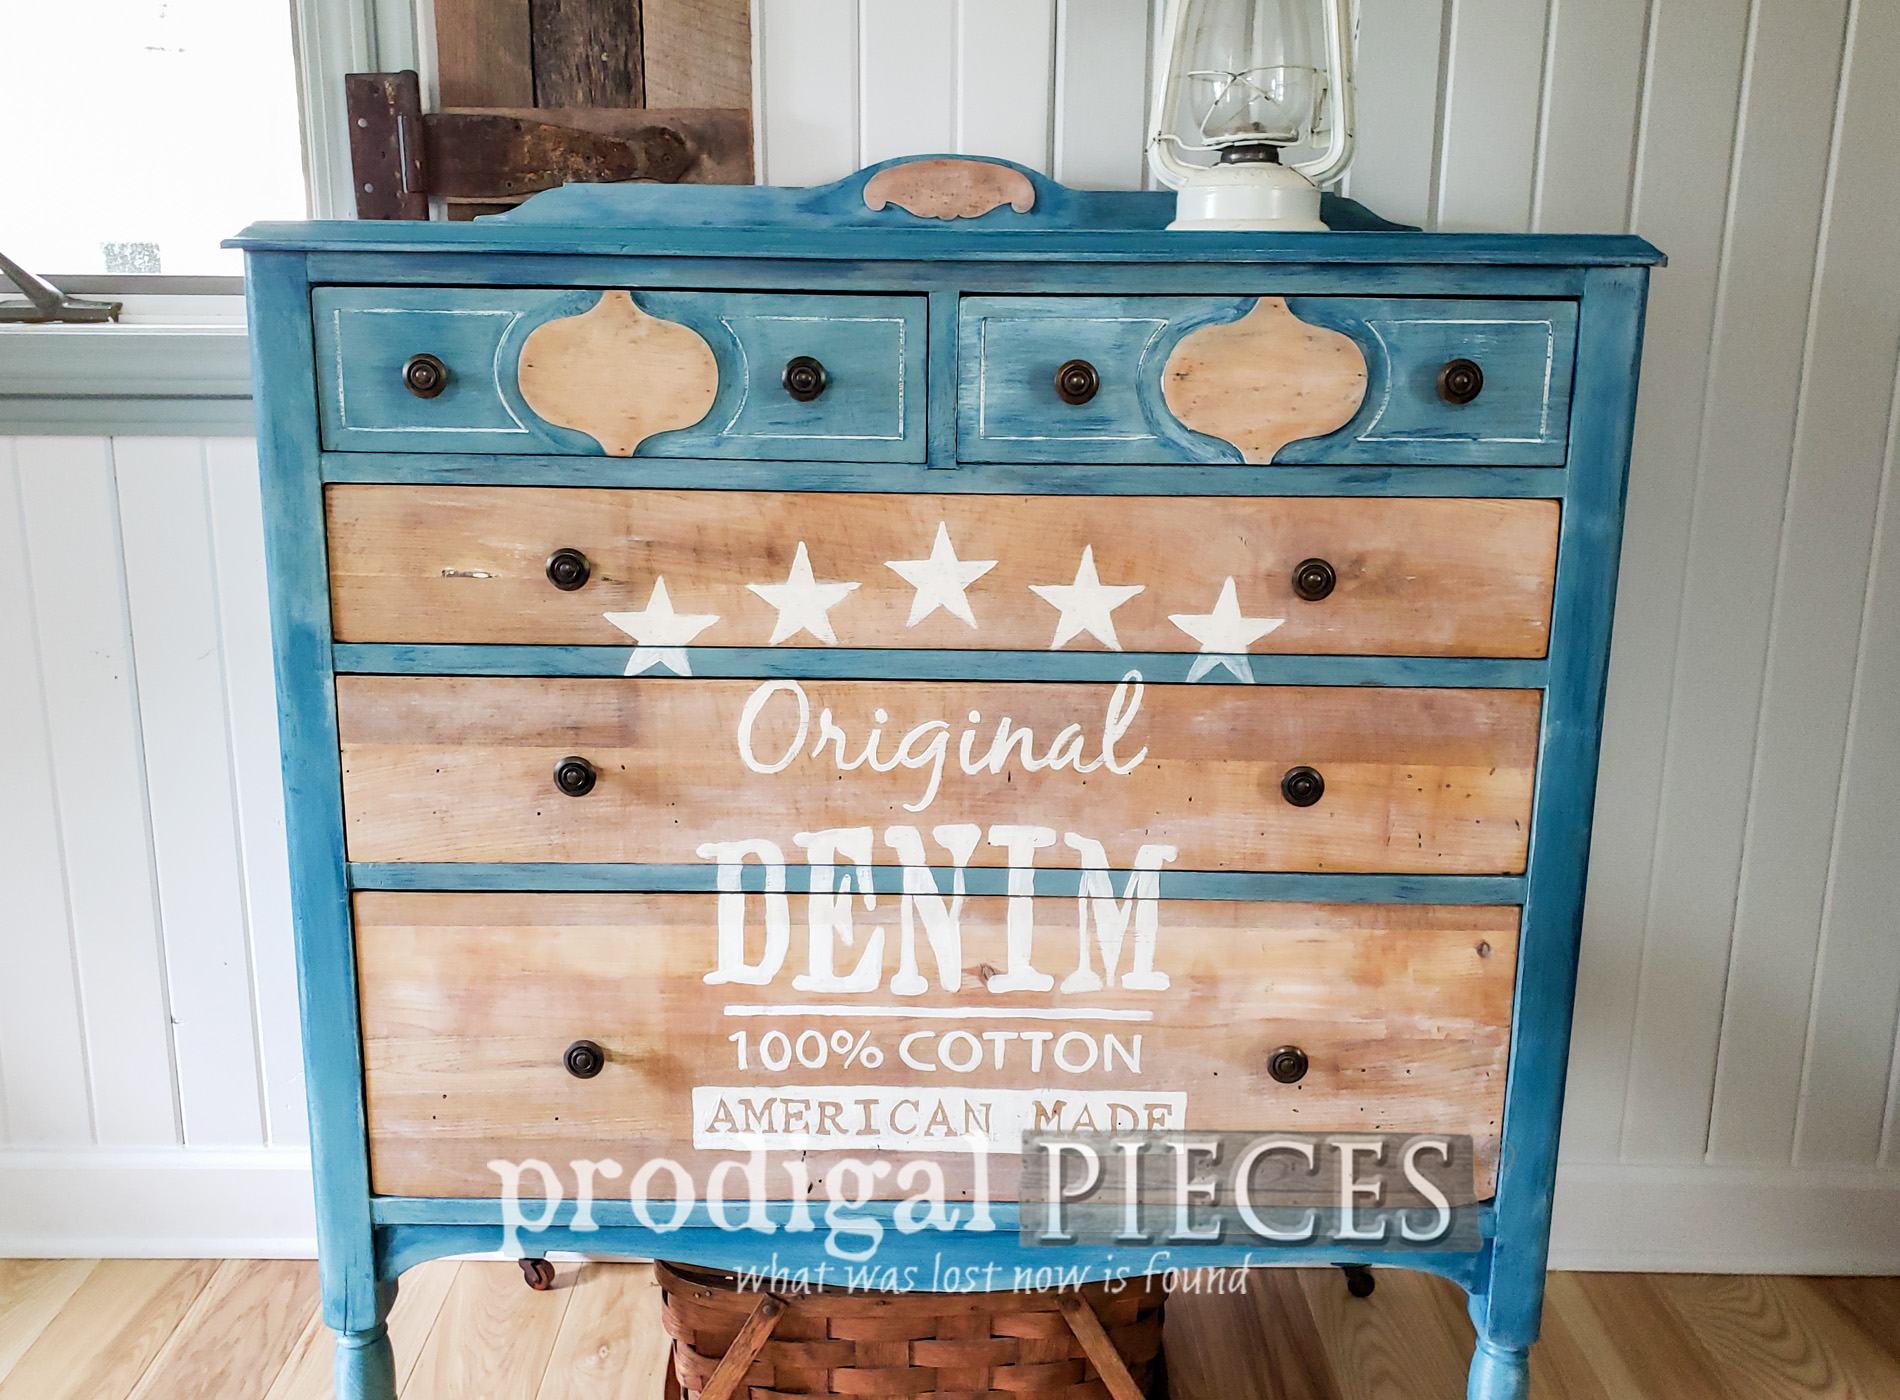
I chose to paint the art on the worm hole raw drawer fronts because it reminded me of the old leather labels on your favorite pair of jeans. Then, as soon as the paint cures, I use an old brush and white wax to add more aged appeal and also nourish and seal it in.
REVEAL TIME
Can you tell I had so much fun with this?! From my original inspiration of the brass knobs, I came up with this funky fun chest of drawers. woot!


This antique tells a story of long-lasting determination, just like a story that can be found in loved pair of jeans. Y'all know what I'm talkin' about right?


My goal is to inspire you to break out your great aunt's old beaten-up furniture and give it an entire new life. Make it your own and keep the stories coming. If you'd like to own this chest, you can find it available in
my online store along with much more. We do ship to your door for half the price of most.


Additionally, pin and share to inspire others to see past the obvious wear to the potential instead.

Up next, is this handmade wooden cabinet shelf from the curb. Gotta love
trashure!
SEE THE AFTER HERE.

Before you go, be sure to
sign up for my newsletter. Until next time!

 PINTEREST | EMAIL
Also, more paint techniques like my DIY denim paint: