I'm a gal of my word, so I'm coming to you today with the second part of
my upcycled headboard project I first showed you a day ago. Call me crazy, but I'm not one to toss perfectly good wood. Even wood that has large slots routed into it. haha. One may think...whaaaat?? Hang with me as I create a DIY cat cot (or dog cot)...a sort of hammock for our furry friends.

Not only do I love to create for my family and friends of the biped sort, but our family also consists of our pets and animals that we love like family. You can see how I've made
natural cat toys HERE or an
upcycled sweater for my beloved dog, Teddy. So, it makes perfect sense to me to create a cozy spot for my little girl, Lily. You can see her featured in my DIY cat grass using upcycled hyacinth bulb vases in the video below.

Or here she is in one of her favorite spots. Notice she has the Garfield pose going on. Yes, Lily, we all feel Mondays.

DIY TIME
It's time to get my build party started. Keep in mind that I'm calling this a cat cot, but you can make this as large (or as small) as your pet needs fit. The options are limitless if you're willing to try.
TERMS OF USE: If you want to create a pet cot of your own, you agree to the following: it cannot be shared or distributed for monetary gain in any way, it may not be modified in any way, and you may not claim the work as your own.
First, I chop those pieces in half with my miter saw making them about 8" long.

However, as you can see, the pieces have slots and not equally so. That's okay. I have a plan to remedy that situation. Next, I dig into my dowel stash for pieces to work as supports. Every good DIYer should have a stash of dowel...I always do! I cut the ¾" dowel into 19" pieces. Then, to assemble it all, I use my drill with a forstner bit to make coordinating holes in my posts. Here it is in dry fit form.

Then, to finish it off, I use wood glue and my brad nailer to make it stable and secure. I debated on filling the slots with scrap ply, but I really didn't need to as this hard maple is sturdy enough to do my job. Especially because I drilled through the entire post so the dowel will act as support as well.
Last, but not least, I dress it up with a fun color of spray paint. It's the same color I use on my
upcycled bar stool.

NEXT STEPS
I now have my cat cot frame built, but I need to sew up the fabric part. If you're not into sewing, you can definitely do this with seam tape and a snap machine or similar. They key is to make it fit your frame, whatever size it is. Also, feel free to design this however you like. I'm only sharing what I did that works for me.
STEP 1
First, I measure out a large piece of fabric. My cut is 38" W x 38" L. I'm using a denim wash linen, but any heavier fabric would be best (upholstery, canvas, etc).

STEP 2
Then, I center the cat cot frame on the square and cut up the corners to the inside edge of each post.

Step 3
Additionally, we want to mark the inside as well. I trace the actual post, but also create an arch from dowel to dowel. This marks where I am cutting on the curve.

Notice I cut up to the mark of the actual post, and not on the curve.

That's because we need to make different cuts to allow the fabric to bend (or ease) in the proper fashion. I make 5 slits in each corner.

With this in mind, I then iron all the edges and corner with a half-inch seam allowance preparing them for sewing. Stitch your edges down and you're ready for the final steps
STEP 4
Afterward, I need to create the flaps that attach the cot to the frame. I place the cot and frame on the floor with the tops down. Then, I fold my flaps in and under the dowel braces and pin.

Here is my DIY cat cot with all flaps pinned so you can have a visual.

STEP 5
Last, we need to make the cot able to hang on the frame. I debated on which to use, hook & loop, buttons, snaps, etc. While I do have a snap machine, I decide to go with hook & loop. Back many years ago, I found a huge stash of all sorts of colors of hook & loop and bought it ALL. haha. I use it all the time, so why not, right? So, I cut it to fit, pin down, and sew it on.

THE REVEAL
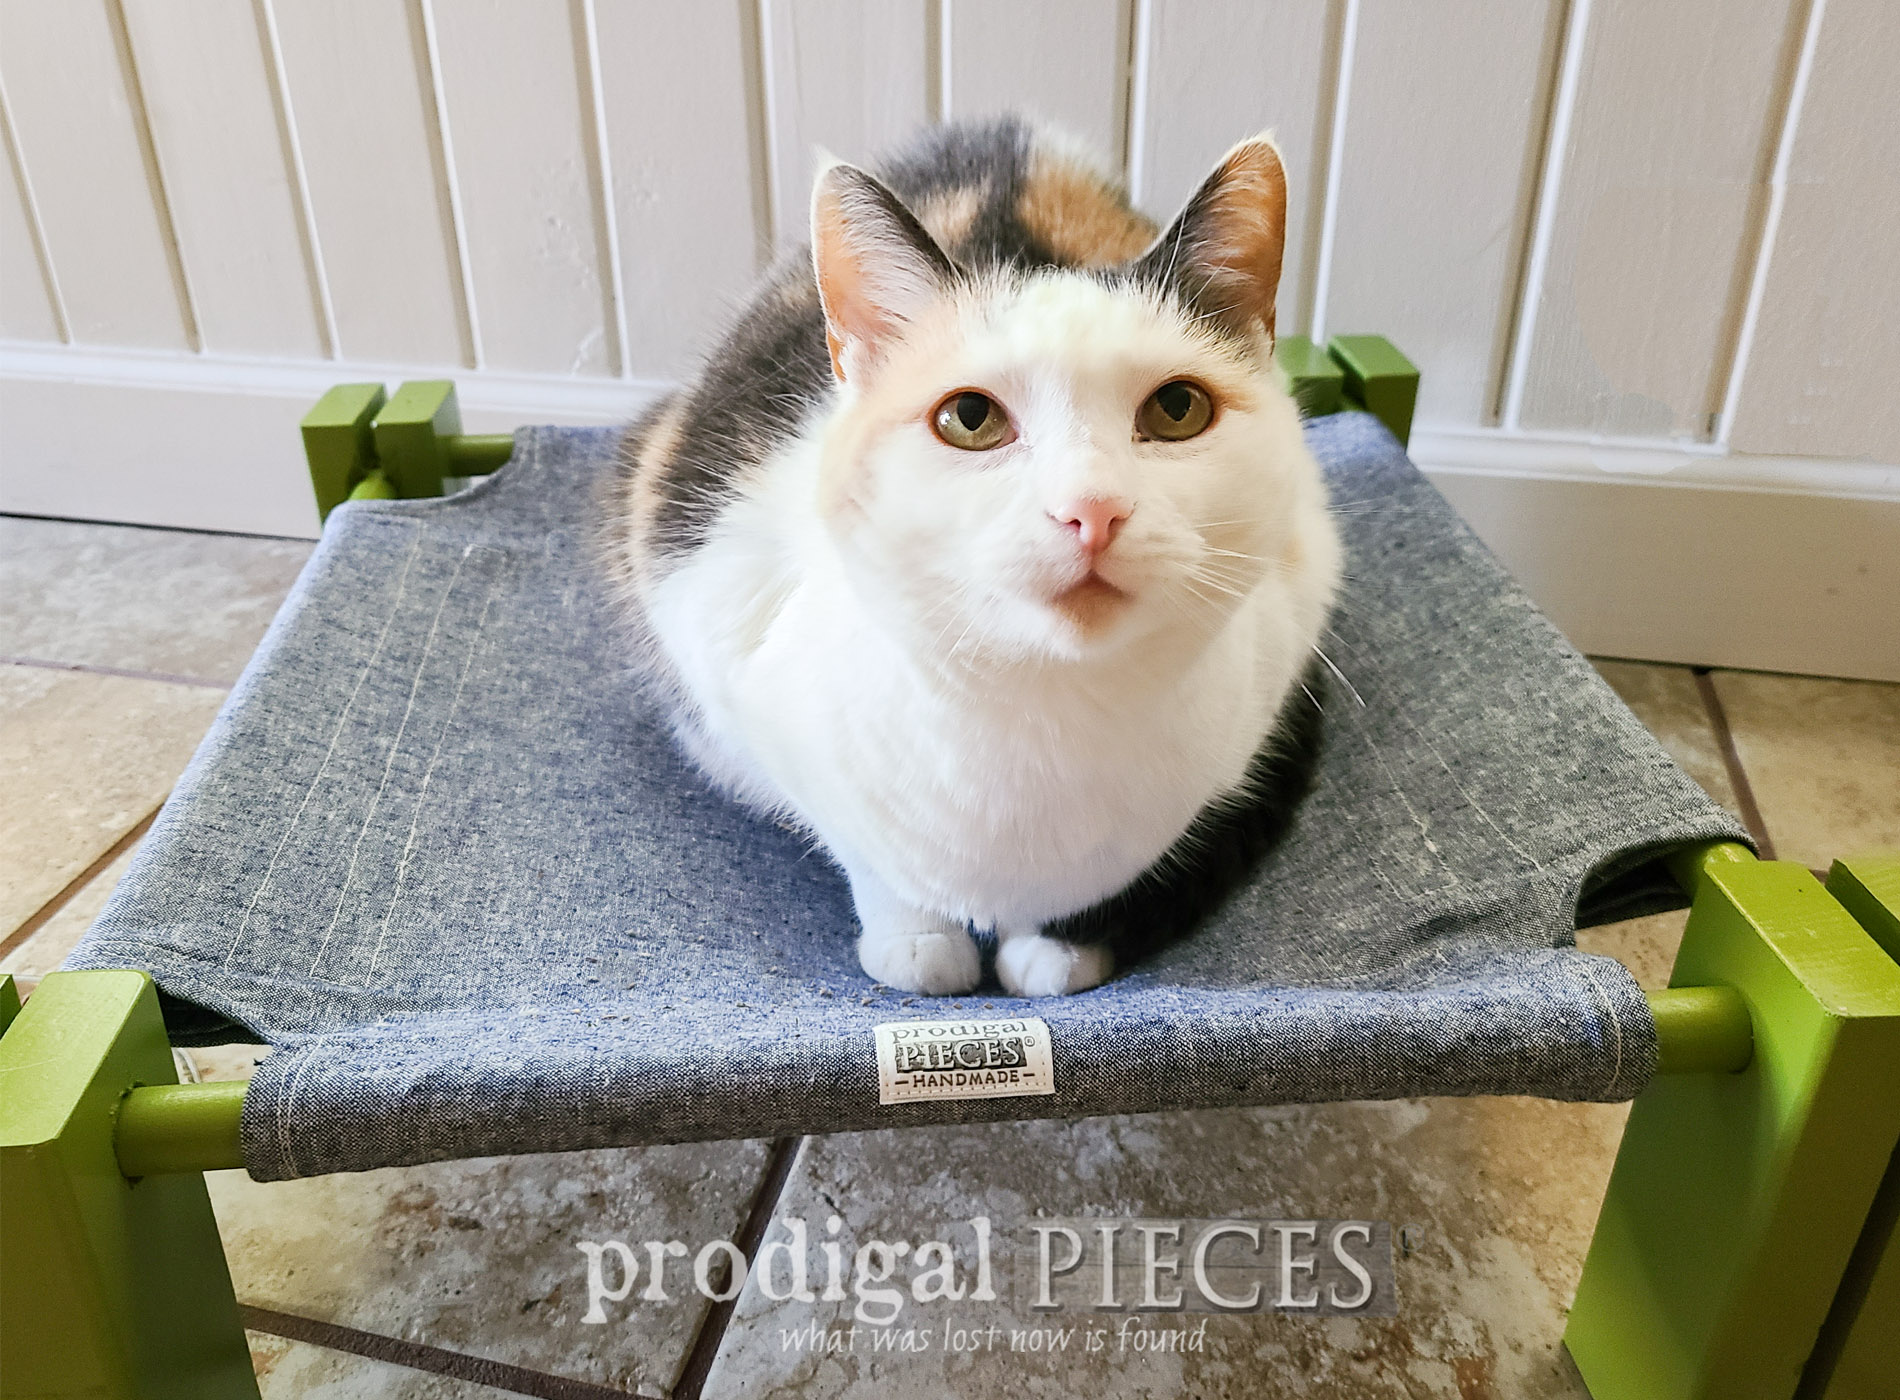
Well..the proof is in the puddin'. See what Lily (aka. diva) thinks of this DIY cat cot I created from my upcycled headboard scraps. tee hee.

I think we have a winner! Lily is content, even proud of this new spot to beckon us all to do her bidding. She is a riot and I love her.


Lily's favorite spots on on rectangular or square things...a piece of cardboard, a table top, a board game, a piece of paper, or even a cloth napkin on the table. I know some cats are drawn to circles, but my girl has the right angle (pun intended)

NAKED COT
Also, here's the DIY cat cot without my diva girl showing her stuff. My favorite part is that it's removable for ease of washing.


And, here's a peek at the bottom for assembly's sake. Easy-peasy.

To conclude with a smile, do tell Lily and I what you think of the upcycled bed scrap. There are many ways to go with this even for uses outside of pets. Likewise, feel free to improvise!


Not only is this build available in
my online store, but so much more. Come see!

In addition, do pin and share my DIY cat cot. With gift-giving a season worth celebrating all year, I'm sure we can make our furry friends happy.

By the way, up next is
Reduce, Reuse, REFASHION time. This damaged wool sweater dress is going to get a new look.
See it now HERE!
To get these DIY tips & tricks in your inbox, be sure to
sign up for my newsletter. Until next time!

 PINTEREST | EMAIL
Also, more pet fun projects like my DIY cat cot:

 for your Cats, Dogs, and YOU. Video tutorial by Larissa of Prodigal Pieces | prodigalpieces.com prodigalpieces diy pets cats dogs food health home homedecor")