
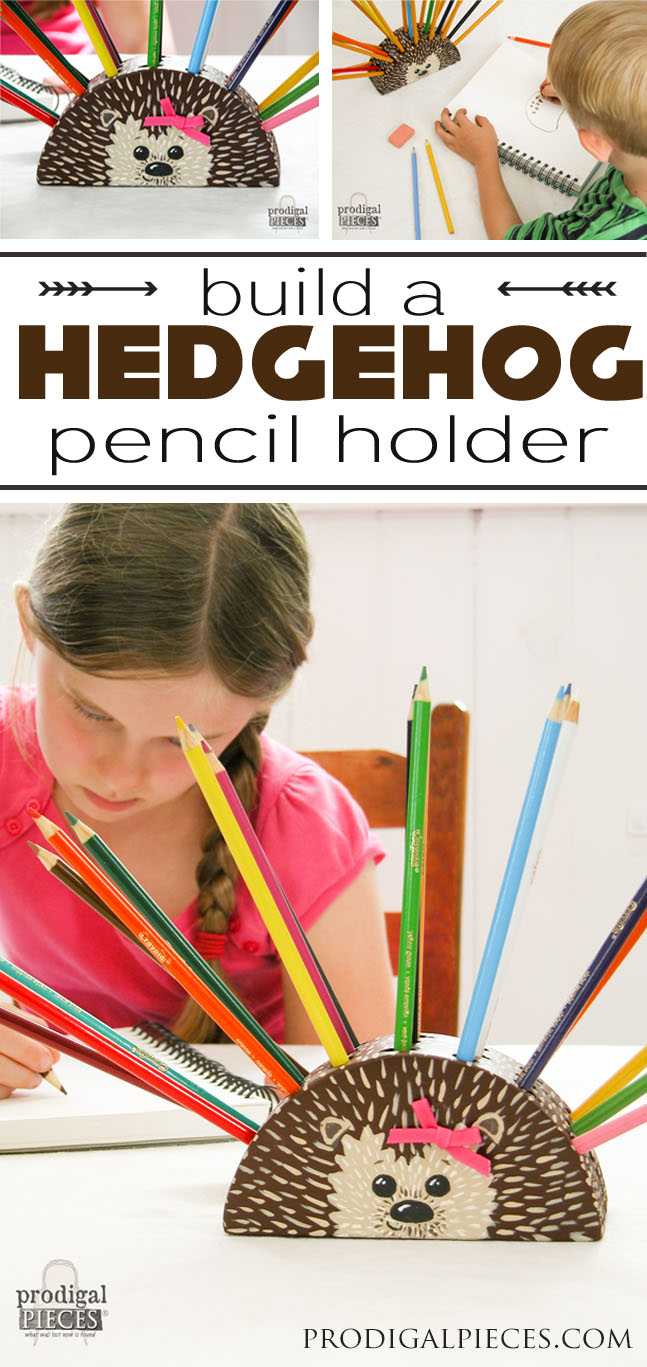
 Today, I have a back-to-school project that is fun and functional. Meet my sweet little hedgehog pencil holder...
 She's a cutie patootie, but also versatile too. With this basic shape, you could create a rainbow, a bear face, a car, a bumble bee....endless possibilities for this shape!
 Let's get started making our own hedgehog pencil holder.
Here's what you'll need:
- Jigsaw
- 1" x 6" pine board - at least 25" long (they can cut it for you at Home Depot)
- Drill
- sandpaper (with or without sander)
- 5/16" and 1/4" drill bits with pilot points
- pencil
- tape measure
- brown spray paint
- craft paint in: white, beige, black, dark brown
- artist's paint brushes
- colored chalk (sidewalk chalk will do)
- ¼" wooden dowel
- wood glue
- safety glasses
- 6.25" diameter circle (make it out of cardboard, use a plastic lid, etc)
- clamps
STEP 1
Start with your tape measure and measure up 3" from the long edge of your board and draw a guide line. (I was backwards and figured out my circle first then copied it) Set your lid up against the guide line and trace.
 Do that three times to get three half circles.
STEP 2
Ideally, you would use a thick board and cut with a bandsaw, but that's when we get our big kid panties on. hee hee. This method will do just fine. Grab your safety glasses and jigsaw and get ready to cut. (I prefer a scrolling jigsaw, which enables you to do rounded cuts much easier and is versatile too) I used my saw horses and a scrap board to clamp down my stenciled board. You want to make sure you clamp down your board because the saw will make it jump. Start at the edge and work slowly letting the saw cut - no need to rush it through. This will help keep your cuts from becoming beveled and uneven. After you're done cutting them all, you'll have your three half circles.
STEP 3
Now, we want to connect these three together, and in order to do that, we're going to cut four ¾" long pieces of ¼" wooden dowel to be used as pegs. You can use a utility knife or hacksaw to cut the pieces. (be careful!) The pegs will give the hedgehog pencil holder stability and also keep the pieces from spinning. You will mark on one of your half circles, two marks at 1" and 2" from top center. Drill about 5/8" deep. * Use electrical tape to mark 5/8" on your bit so you don't go through your half circle. If you do, that's okay. That's what wood filler is for.

STEP 4
Once you're done drilling, you will add a small amount of wood glue into the hole and onto one end of the dowel peg. Insert pegs into holes, tapping lightly with a hammer. We need to make matching holes on our next piece, and instead of measuring and marking, I like to use chalk to coat the ends and then press the two half circles together to make matching marks.
 This is how it should look when you line them up.
 On this second half circle, you're going to drill holes completely through the board. In between each board, also be sure to add glue to the board surface as well.
STEP 5
Once you've glued in your second set of pegs, you are going to repeat the process of chalking the pegs, and pressing them onto the third half circle. This time, you will want to use your taped drill bit as a depth guide to not go completely through. No worries if all is not perfect. To be honest, I was flying like a bat out of you-know-where to get this done, and my cuts are lacking. That's what sandpaper is for. hee hee. After they're all glued together, you will want to clamp them tightly. I bought my clamps for a couple of dollars each and they are wonderful to have. (psst...I bought these for my hubby, but we all know who they were really for - tsk). If you don't have any, you could also use weights or tons of books. I let my pieces dry overnight. *note: if you need to add wood putty to any imperfections, do so before clamping so it can dry at the same time.STEP 6
Now they've dried and it's time to sand. I used my orbital sander with a 150 grit sandpaper, but you can sand it down by hand too. Ready to drill the pencil holes? I went to use my 5/16" bit with a pilot point and it was absolutely dull, so I was forced to use my other 5/16" bit. See the difference?
 The problem with the regular bit is that your drill will jump around when trying to enter a curved surface. I did not get the hole placements exactly how I wanted, but they work nonetheless. So, I highly suggest the drill bits with pilot points. I place hole marks starting 1" from the end and 1" apart.
To smooth everything out, I used my Dremel with sanding attachment to go inside the holes. You don't have to do this, but it gives it a finished touch.
The problem with the regular bit is that your drill will jump around when trying to enter a curved surface. I did not get the hole placements exactly how I wanted, but they work nonetheless. So, I highly suggest the drill bits with pilot points. I place hole marks starting 1" from the end and 1" apart.
To smooth everything out, I used my Dremel with sanding attachment to go inside the holes. You don't have to do this, but it gives it a finished touch.
STEP 7
When you're done sanding, give it a good cleaning and then we're ready for the fun part...paint!! I used up some brown paint for my base coat. The spray paint works great to get into the pencil holes. After that, I use my hand-drawn graphic as a guide to my design.
 Start with the beige characteristics, then layer on the others. See pics as example. Hint: I use a piece of chalk to draw on my "rough draft" and then paint over it. It's easy to fix any mistakes so you get the end prouduct you want.

 I continue the quivers onto the back and add a little naked tail. ♥
 Then, white quivers on the face, brown inside beige ears, around nose, and for eyebrows, and then accents of white on eyes and nose create dimension.

THE REVEAL
I'm so pleased with my little woodland creation. You can add embellishments like I did for a girlie version, dress it up...whatever you want. Have fun with it!
 Yes, my holes are a bit wonky, but I don't mind. It adds character, right?
 I know your kids will love having a friend looking on while they work...wouldn't you?
 My hedgehog pencil holder can be found in my shop, (SOLD) if you'd rather skip the DIY and get down to fun.
[metaslider id=30251]
 I hope you've enjoyed this project and will give it a try. Please feel free to contact me with questions.
Additionally, pin and share to inspire others to give DIY a try.
I hope you've enjoyed this project and will give it a try. Please feel free to contact me with questions.
Additionally, pin and share to inspire others to give DIY a try.
 To get these DIY tips & tricks in your inbox, be sure to sign up for my newsletter. PLUS, you will get your FREE Furniture Buying Checklist and special discount to my shop. Until next time!

Also, more tutorials, like my hedgehog pencil holder:

