 Back in 2003 when we moved in, this spot held a small shed that would house trash cans. We never used it for that, but did store other items inside. After a few years it became dilapidated and I took it down. The wood from it became part of my coffee table for our patio makeover seen HERE.
 This spot already had concrete laid down from our previous shed there and was the perfect spot for us to tuck our bikes away. However, the tarp look wasn't doing it for us. It was annoying to fuss with, caused a trip hazard, and wasn't the best use of the space.
 That's where the DIY bike garden shed comes in. With 7 of the 8 of us in our family having bikes, we needed something to solve our problem. Some bikes were here, some bikes in our garden shed, and helmets a mess in our workshop. My goal is to build a rubber boot storage spot here when we got the helmets out. Boots off the ground is a blessing!

*post is sponsored by HomeRight (see full disclosure)
THE REMEDY
Okay, so I've established that something needed to be done. Since our code says that we are allowed to rebuild since there was already a structure there, we didn't need to do anything else. To make this easy to understand our process, I put together a short video demo below of how we assembled and attached the shed. For the build plans we saw no need to reinvent the wheel and found a fantastic design by Ana White using affordable cedar fence pickets. If you've made use of her site yet, it's surely a must see. We've used several plans to help us DIY our home projects. While we used her plans as a basis for ours, we made our dimensions different as well as our door design. It needed to work for our space and what we had in mind. Our rough all-in budget was $350-$400. If we had bought a shed this size it would have been around $2K. Yikes! Also, I call it a garden shed too because we realize not everyone has 7 bikes or that we will always need storage for that many. However, this shed design is versatile enough for your garden tools, grilling tools, toys, etc. Here's what we used to create our DIY bike garden shed.Tools & Supplies:
- Paint Sprayer
- Thompson's WaterSeal
- Pocket Hole Jig
- Jigsaw
- Miter Saw
- Drill
- Nailer
- Sander
- Respirator
- Bike Hooks
- Hinges
- Small latches (for bifold door)
- Large barrel bolt latch
- Bi-Fold Hinges
STEP 1
First, we built a fame out of ripped treated pine 2"x 4's and attached it to the wall. The plans above have an added back to the design. We felt no need since we were building this as a lean-to.

Step 2
As the video shows, we then built the walls and then attached them to the frame.
 You can see the roof line was pitched at a 15° angle, so when we got to the top, we used our jigsaw to cut it to size.


Step 3
Attaching the walls, was pretty straightforward. We just needed to be sure all was plumb and square so that our finished project of a lean-to wasn't...er...leaning. tee hee.


Step 4
Next, it's time to add the roof. First, we add the header to the front. This will support the roof framing. built the frame and attached it. Then, we built the frame and attached it to the top of the walls.
 It always pays to have a little helper. ♥
 Once the frame was up, we added the ply sheathing, a water barrier on that, and then the cedar shingles.


Step 5
Next, we built the doors out of the same cedar pickets but attached them in a vertical position to a cedar 1" x 4" frame. I can't say enough how having the right tools make the job not only easier, but safer too as it makes a better build. That's why my motto since a teen has been: toolsoverjewels!
 Since we are building bi-fold doors, I first assembled the doors with hardware. That would give me the correct line-up of hinges and such. Then, I took the doors apart at the middle and hung the outer door on each side. Once I got the outer door square and level, I added the second inner panel.

 One set on and we're almost done. Yay! Huge thanks to my oldest daughter for being the extra pair of hands I needed. During this entire build we battled rainy day after rainy day, so when we had sunshine, we had to bust a move!
Step 6
Last, but not least, we need to add a protective coat to our shed. Yes, it's cedar and would do fine without it, but this will add longevity to our hard-earned efforts. We chose to use a simple clear Thompson's WaterSeal because we like the idea of the cedar taking on the natural gray patina. You could certainly use a stain too. Now, because we are battling the weather and have to move fast (and also because I have no intention of brushing this entire shed by hand), it's time to pull out my sprayer. If you want to see how to assemble and use the sprayer, you can view my video demonstration HERE. I simply follow manufacturer instructions on the WaterSeal, fill up the canister, and get ready to have a blast...literally! I had this shed finished in less than 10 minutes. You just can't beat that!
 I was even able to tackle the cedar shingles on top. Imagine having to brush all of that. NO THANK YOU.
After the WaterSeal was applied, I added our other latching hardware and finished up the interior.
I was even able to tackle the cedar shingles on top. Imagine having to brush all of that. NO THANK YOU.
After the WaterSeal was applied, I added our other latching hardware and finished up the interior.
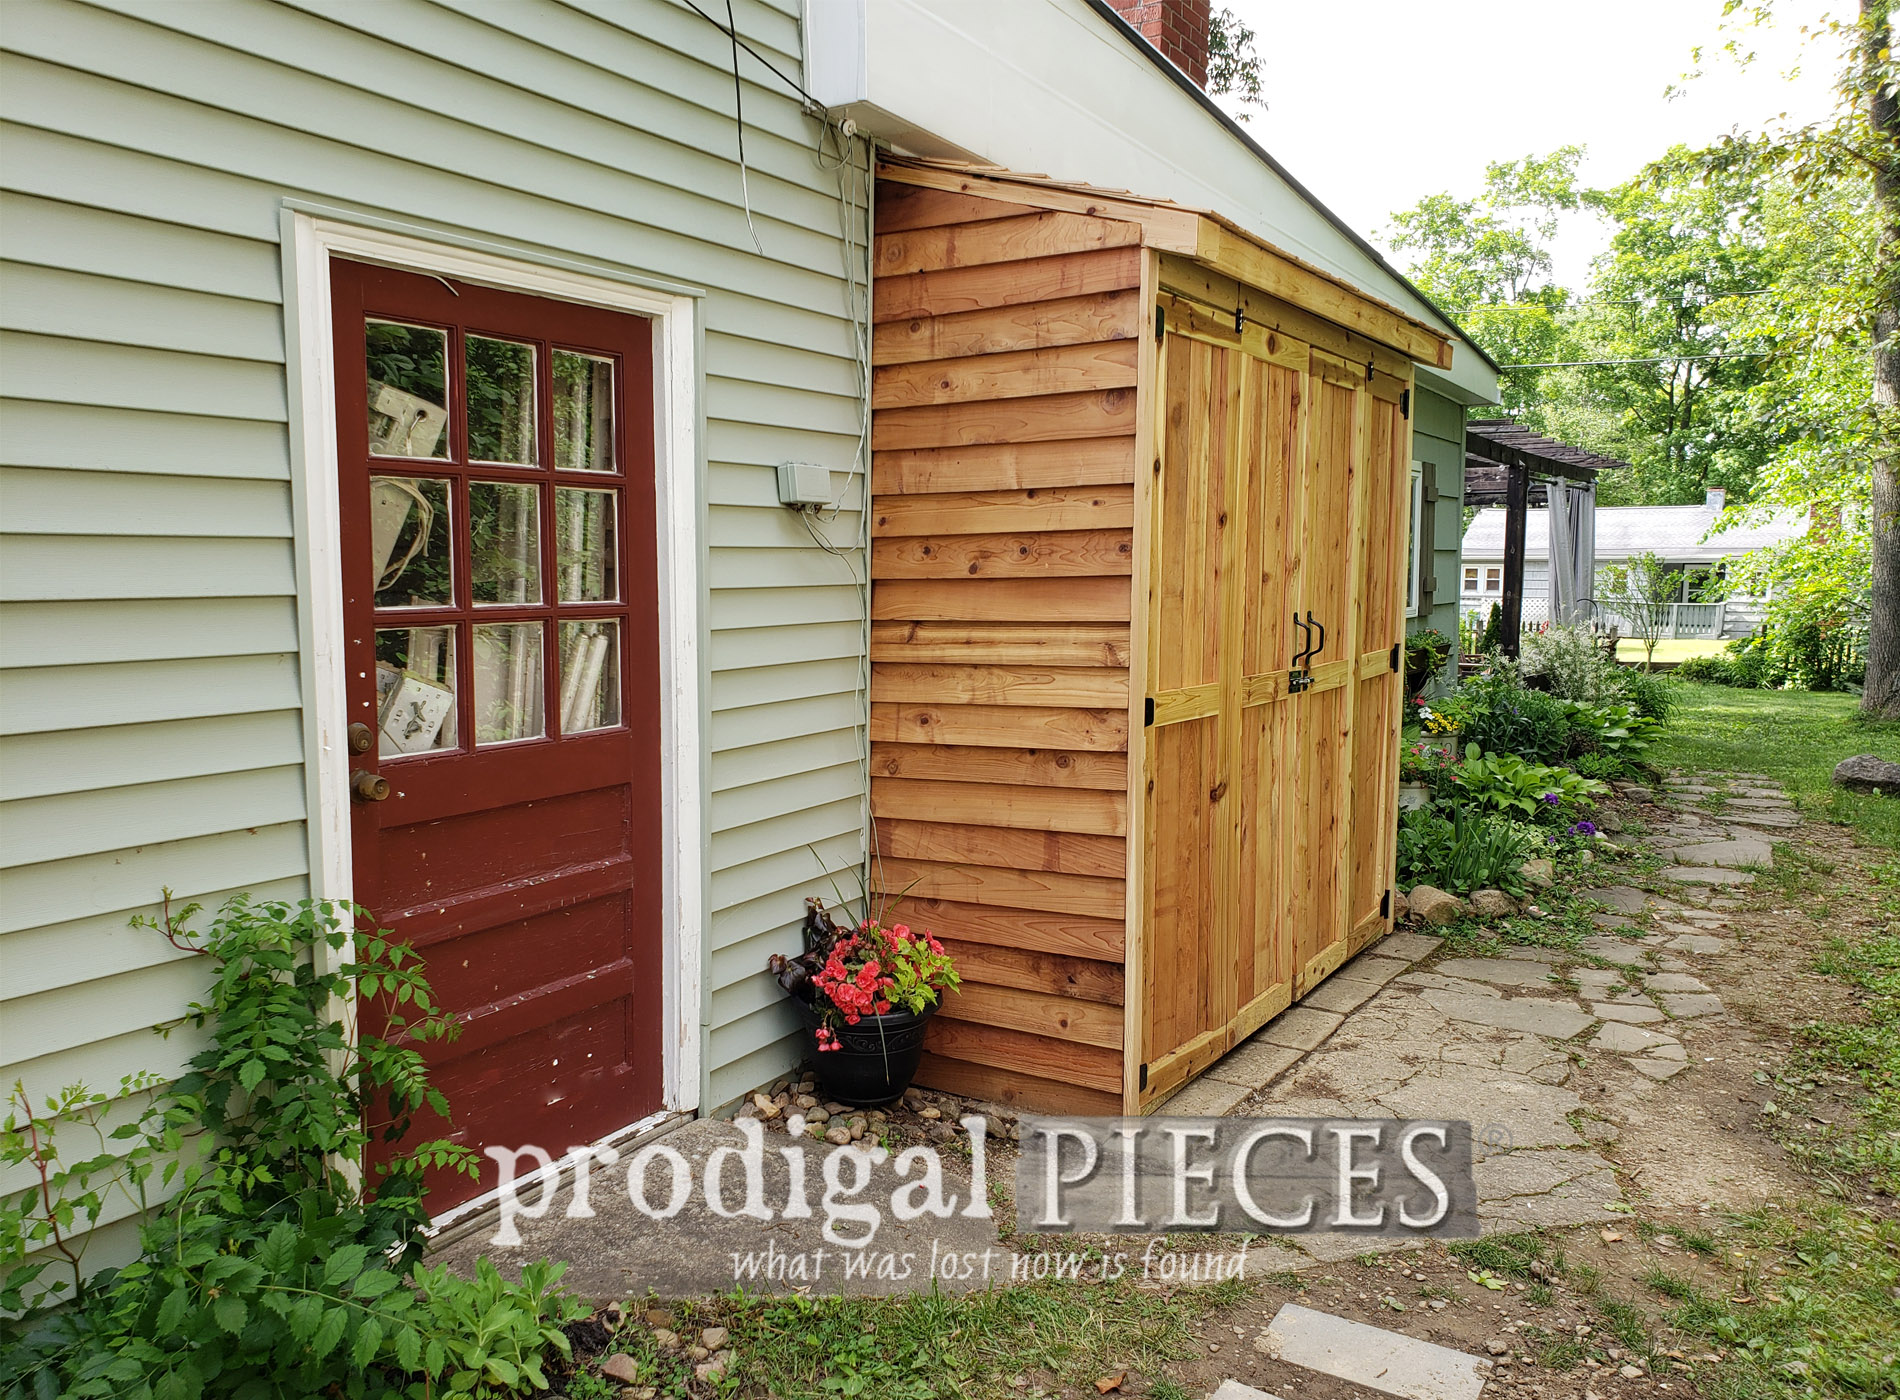
THE REVEAL
Finally, here it is complete and restoring my sanity. Yahoo!


 Here's a look at the setup inside. All 7 bikes fit and helmets too - even our pogo stick and stilts! Our rough dimensions are: 33" deep (not counting roof) x 102" wide x 8' tall at back.


 We hope you've enjoyed our latest adventure. Likewise, feel free to ask questions as we are here to help.
Also, pin and share this DIY bike garden shed. So many are looking for affordable, space-saving storage too.
We hope you've enjoyed our latest adventure. Likewise, feel free to ask questions as we are here to help.
Also, pin and share this DIY bike garden shed. So many are looking for affordable, space-saving storage too.
 Up next, our garden got pummeled over the winter and we've got to remedy that DIY style. Likewise, see our updates HERE.
 Before you go, be sure to sign up for my newsletter. Until next time!

In addition, more garden projects like our DIY bike garden shed:

