
 I will be honest that when I see the picture of the chairs... I hesitated. Why? Well, if you've followed me for long, you know that I have undoubtedly sworn off working on all painted furniture. For good reason too, I've earned my promise to self by mentioning past problems before.
 However, I adore rose back carved chairs. There were 6 of them, so that meant I could have an entire set. Now to find a table to match this Mid Century style. Oh, and by the way, these chairs are by Park Furniture Company, known for their gorgeously, intricate pieces.
STORY CONTINUES
My story continues when I hopped on Craigslist to find a table. I was determined to not drive outside of my city to make a purchase. I have no spare time and needed to know if this was going to work. Amazingly, within 5 minutes I found the perfect table to go with this dining set makeover. I was stoked, but also that pit in my stomach feeling like headed up the first hill of a roller coaster. Know what I'm sayin'? Now, when I say this table was perfect, I mean that the leg taper matched the chairs, and the routed top match the lines of the seat of the chairs. As for the actual table, it needed much TLC. Nothing I can't handle, right?

 In addition, the table is made of solid maple and has potential. However, I definitely have my work cut out for me. Even the legs had been chewed up by a dog.

*post sponsored by HomeRight (see full disclosure)
Not a problem for my Bondo. hee hee. I've used this awesome stuff in many makeovers, as seen here, and works like a charm. In this picture, I've applied it and it just needs to harden and then be sanded down. While the leg repair was curing, I set about to sand down the table top with my orbital sander. Since the finish was so worn, it came off pretty easily with a 120 grit paper.
 While sanding, I did notice a few deep watermarks and stains. They were slight enough that I hoped would be invisible once stained.

FINISH TIME
After all the sanding and prep work was done, it looked as though all was good to go for staining. I chose to try a new-to-me product this time, General Finishes Gel Stain in Java. My reasoning for choosing this particular stain is because maple can be hard to stain. It can come up blotchy and I'm all too familiar with the headaches it can bring. I have only heard rave reviews on General Finishes gel stains, and did my research to find out they are known for breaking the blotchy barrier. What I mean is, no wood conditioner needed. Thankfully, there are no taking lengthy steps to get the blotches to go away. Honestly, it sounds too goo to be true, but I am game to try.
The stain went on easily and gave the look I was after. However, there was one minuscule spot that resisted about the size of the tip of my pinky finger. Ugh...for real? It had to be because I missed it while sanding. Since it was on half of the table I fixed that side only. First, I wiped it down with mineral spirits to remove any residual stain so it wouldn't clog my sanding pads. Then, I used the 120 grit paper again to tackle it one more time.
It worked like a charm, but too well since the extra sanding opened up the grain to soak more stain in. The side I just redid was a bit deeper than the other side and the extra leaf. Do you see where I'm headed with this? I head-smack myself and then tackle the extra leaf and other side in the same way. Needless to say, this was a user problem, not the stain and am happy to report all worked out fine. Whew!!
My reasoning for choosing this particular stain is because maple can be hard to stain. It can come up blotchy and I'm all too familiar with the headaches it can bring. I have only heard rave reviews on General Finishes gel stains, and did my research to find out they are known for breaking the blotchy barrier. What I mean is, no wood conditioner needed. Thankfully, there are no taking lengthy steps to get the blotches to go away. Honestly, it sounds too goo to be true, but I am game to try.
The stain went on easily and gave the look I was after. However, there was one minuscule spot that resisted about the size of the tip of my pinky finger. Ugh...for real? It had to be because I missed it while sanding. Since it was on half of the table I fixed that side only. First, I wiped it down with mineral spirits to remove any residual stain so it wouldn't clog my sanding pads. Then, I used the 120 grit paper again to tackle it one more time.
It worked like a charm, but too well since the extra sanding opened up the grain to soak more stain in. The side I just redid was a bit deeper than the other side and the extra leaf. Do you see where I'm headed with this? I head-smack myself and then tackle the extra leaf and other side in the same way. Needless to say, this was a user problem, not the stain and am happy to report all worked out fine. Whew!!
TIME FOR PAINT
While the top was curing, I gave the skirt and legs a nice coat of a soft white with my paint brush. Now for the daunting task of getting those painted chairs ready for a new coat of paint. Honestly, I dreaded all the prep work. However, I was also excited to see them made new at the same time. My little Corner Cat sander worked like a beast to help me whip these chairs into shape. What a workout that was!
 Once the chairs were done, I cleaned them up and headed out back to break out my HomeRight Super Finish Max Extra Sprayer. mwahahaha... Bring on the fun!
 Likewise, I've used it in these past posts.
 I filled up the sprayer and am ready to go. The key to a great finish is:
- Use the right tip for the job (I used blue)
- Have the right paint consistency (follow manufacturers instructions)
- Get the flow right. I suggest practicing on scrap wood or cardboard before you start.
 Then, I used a custom color I had from a previous project. I love its muted, neutral tone. It's a flat finish, but I intend to use a satin poly topcoat once my paint has cured from two layers with two hours in between. Can you believe I had each layer on all six chairs done in less than twenty minutes? No brush could beat that! Onward with the dining set makeover...yippee!

FINE DETAILS
Before I added my poly topcoat, I wanted to draw out those lovely carvings. To do that, I applied a bit of glazing with another custom color I had on hand. After the paint cured, I applied the two topcoats with my sprayer and let cure. Then, during that time, I recovered the chair seats in new upholstery using my stapler, and we're ready to roll. I've always referred to tackling upholstery is like wrestling a cat as it can be painfully scratchy. This was no different, but my AirStrike sure made the job of putting on new upholstery easier!

THE REVEAL
Let's see this motley crew dining set makeover, shall we? The outcome is just as I'd hoped and more so. Here's to deadlines and crummy weather! haha.

 Isn't that top such a rich looking beauty? That stain did such an awesome job getting that dark contrast I was after. And the three coats of poly I used made it shine new again.

CHAIRS
Then there's the chairs... Seeing the soft muted tones of the chairs play against the table makes my heart sing. The fabric sets it all off nicely, I think...do you?
 I've always thought that the best part about extension tables is that you can have a large space or small depending on company and your home size. When friend and family come, break out the leaf. Yay!
 My dining set makeover is complete, and I hope you've enjoyed seeing how one man's trash is turned into another's trashure. You can find this set and more available for purchase in my online store


SHARE
Additionally, pin and share this dining set makeover to inspire others to make their own home story using thrifted (or even curbside) finds.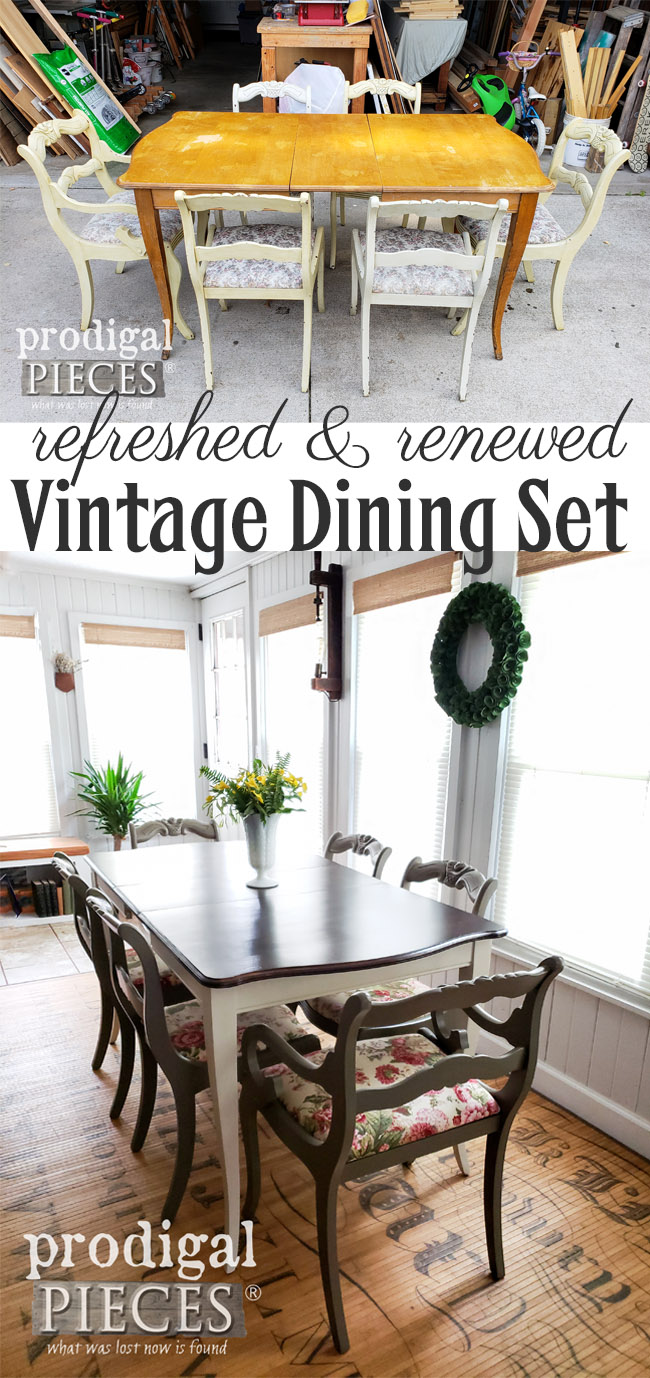
FINDING HOME
Up next, I have the BIG announcement for my Finding Home program. We're so excited!! Join us HERE.
 To get the updates & news, be sure to sign up for my newsletter.


Also, more projects like this dining set makeover:

