 You're looking at a hot mess of seconds paint, waxes, cleaning supplies, and so much more. oy. At the same time, I'm also excited because this means I finally get to take care of a space just for me. Not being selfish, but we've been here nearly 20 years and it's yet to have been touched and I use it daily. Let's get this DIY party started!
THE BACKSTORY
As you can see, there is tons of space in there, but not a great use of it. It's always made my brain tick on how to make use of it in the best way possible. If you recall in my kitchen/laundry room remodel, I have a set of the original metal kitchen cabinets to make use of and I love them! You can see how I have some of my paints and supplies tucked inside this one above the sink. Plus, I have two others with tools, batteries, stain, and glues. They all got filled as life went along. Finally, it's time to wrangle them all together.

 Additionally, I built in shelves by the washer, and also in the other corner as well....around to the left there. Then, you can see this paint closet o' mine. Hidden just as it should be.


*post sponsored by HomeRight (see full disclosure)
DIY TIME
First, I drag it all the contents out and stuff it into boxes to sort through later. Yes, I actually enjoy doing this kinda purge thing. Notice those crack in the bottom? That's because the board on bottom are awesome for letting all kinds of things fall and SPILL on my basement steps. Ask me how I know...ahem. I will remedy that!
 Aside from vacuuming out the dust and dirt, I also wipe everything down. Then, I build and build. I want to bring all the stuff tucked into my metal cupboards and have it in one spot. Therefore creating a DIY hub and freeing up my cupboards for things that make more sense to be there. whew!
BUILDING & PAINTING
Aside from adding a few strips on the sides for paint, I also try my hand at building a sliding shelf. I will say that I've never installed self-closing hardware (leftover from our kitchen remodel), so I'm a bit anxious, but I know I can do this. {{fist pump}} And, after a bit of frustration lining it up, I got 'er done and in on the first try. Yeah, baby! However, before I go any further, it's time to paint. I'll be adding a new bottom after that, but for now it's time to break out my tools.
 Not only is it perfect for paint, but also poly, stain, and pretty much anything you can spray. You can see how I've used it in these past posts too. Check it out in my video below where I stained our backyard fence.
 For today's purpose of my closet update, all I need to do is fill the canister per paint manufacturer instructions, check my nozzle and flow on a piece of cardboard or scrap wood, and then have at it. If I use a brush or roller to do this space, it will take me over an hour.
 Not only am I done with the first coat in less than 15 minutes, but also the clean-up is done in less than 10 minutes. YEAH, BABY!! Who needs to waste time with the wrong tools. This sprayer saves my joints, my time, and my sanity. All I need to do is spray and second coat, let it cure, then fill it up! Isn't that SO much better?

THE REVEAL
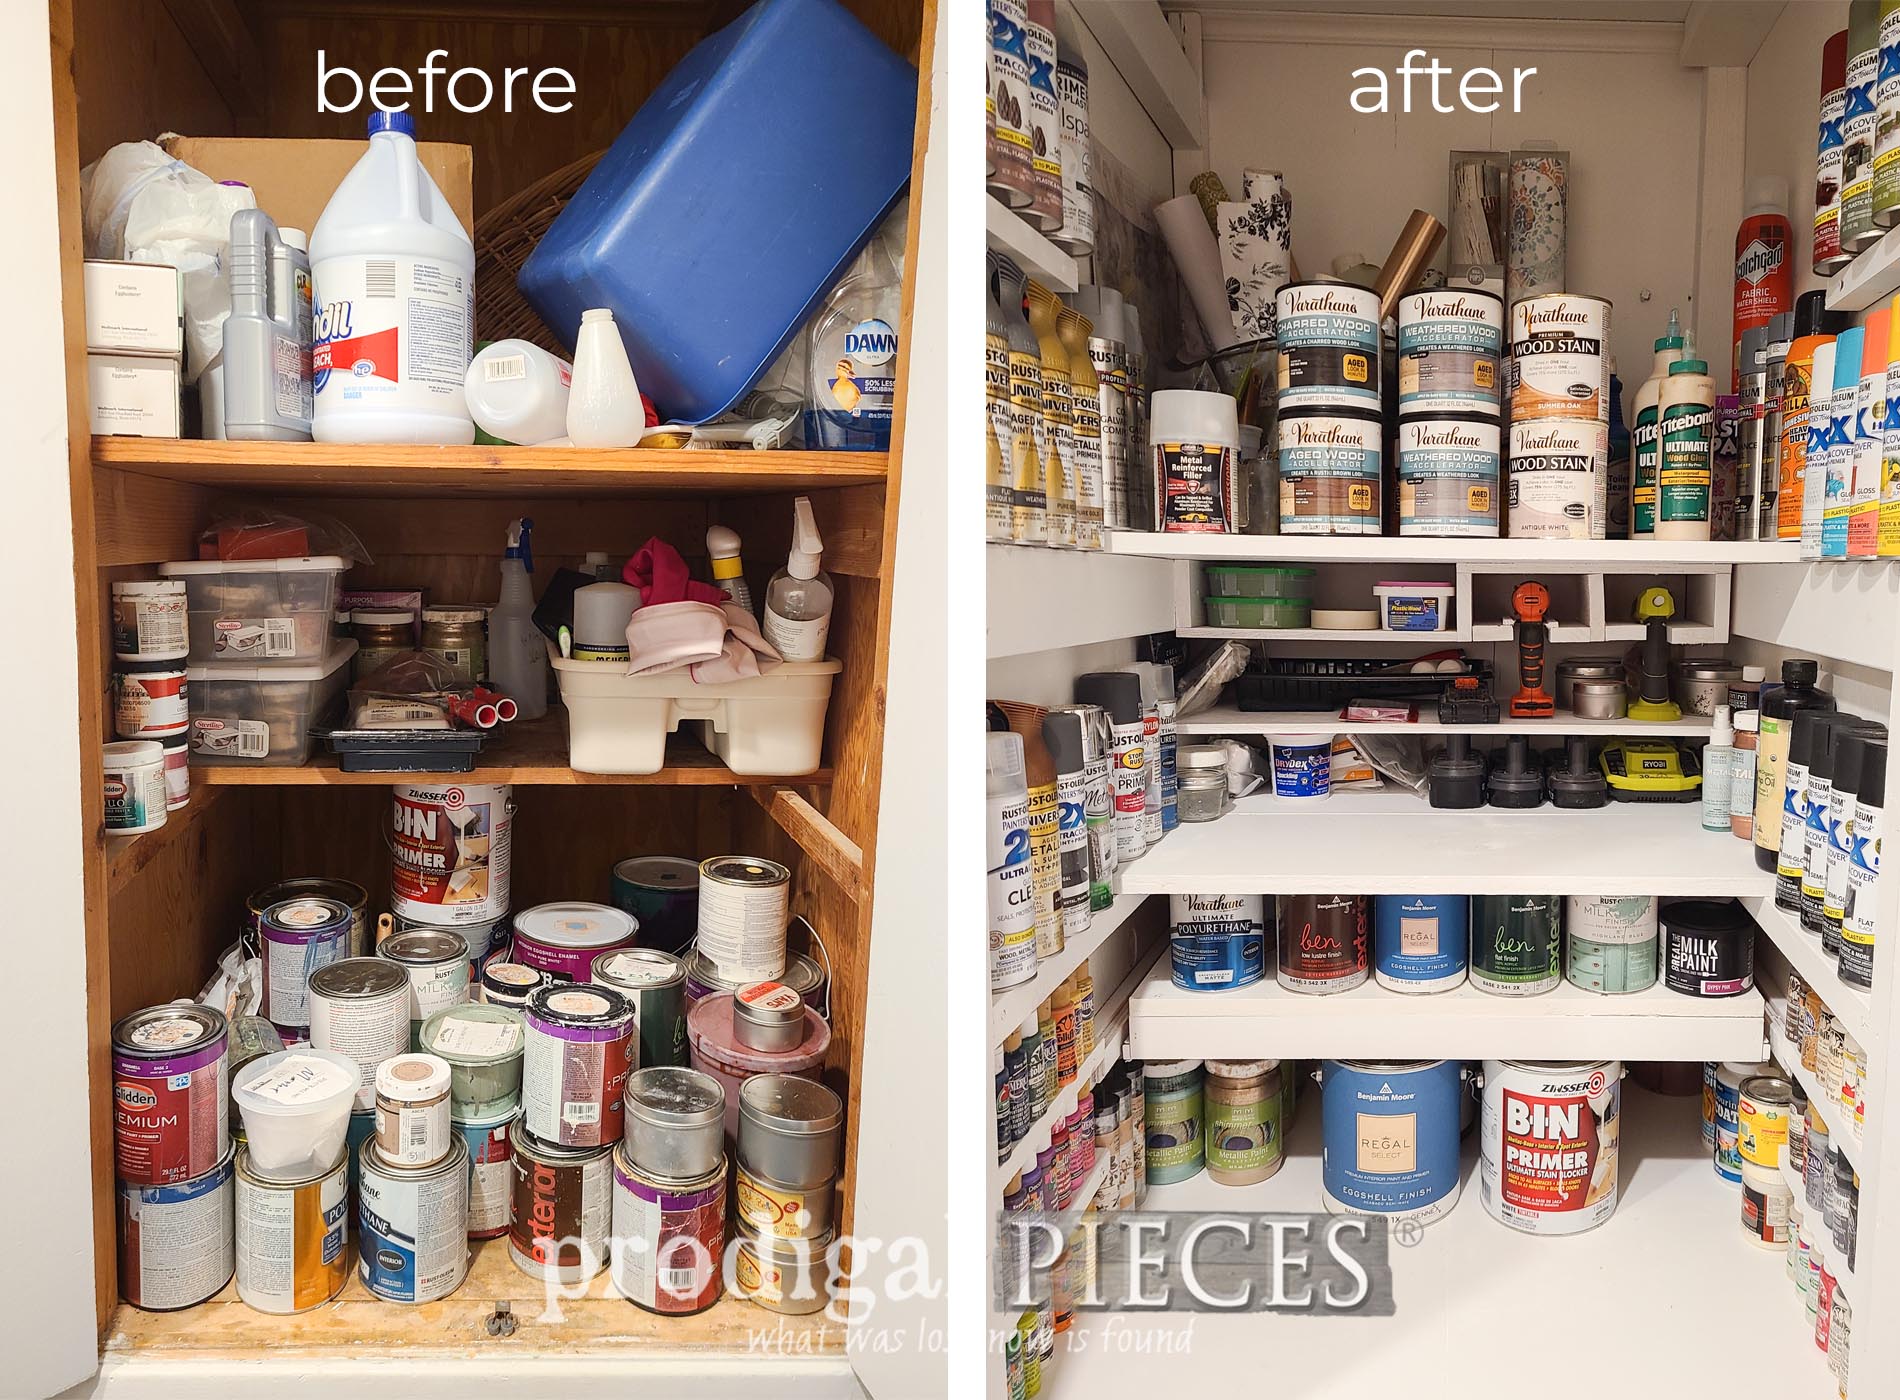
Last, here's my closet update complete and definitely better than the before, is it not? My DIY heart is happy, and my eye no longer ticks at the mess.

 Now I just need to head to one spot for my needs, including my kids who love to DIY too and often dig into my stash. Likewise, I now have 3 empty cupboards to use for better use of space as well. Yay! Did you see the shelf I built? It's a self-closing handy-dandy shelf for my quarts. Much easier than stacking and digging!
 Unfortunately, my only bummer was I had a hydraulic shelf designed for the top empty space and my hardware didn't come in. So, I hope to get back to that in the future.

[metaslider id=30251]
SHARE
Additionally, let's inspire others to do a closet update - pin and share. It's fun to DIY. Up next, a wooden casserole trivet needs to have a new look and purpose, don't you think? Come see it now HERE.

To get these DIY tips & tricks in your inbox, be sure to sign up for my newsletter. PLUS, you will get your FREE Furniture Buying Checklist and special discount to my shop. Until next time!

Also, more DIY fun like my closet update and upgrade:

 brick and spend half the money. Easy video tutorial by Larissa of Prodigal Pieces | prodigalpieces.com")