Do you ever find yourself saying, "I wish I had more storage space"? However, finding ways to add more storage space is always in demand, and this DIY tutorial is going to help you create a very versatile piece for your home. Not only is it aweseomt that once you build this wooden storage bin, but you'll also have the ability to recreate it again and again making use of it in many ways.

First, for this project, I am creating a storage bin for
my kitchen since we are in the middle of a remodel. I, for one, am tired of having my counter look like this when we are trying to either ripen our fruits or just don't have anywhere to put our goods. Can you blame me?
This plan is for home use only and not to be redistributed or used to make items for sale. Plans are owned and copyrighted by Prodigal Pieces.

Ready to get started building one of your own? Also, you can build this in as many tiers as you want, and even mount it to the wall. Likewise, mix it up and add legs or feet to create a different style of bin. Have fun with it!
DIY TIME
Here is what you'll need: (note: to customize a kitchen bin, be sure to measure the space from you counter to kitchen cabinet and adjust height accordingly)
Tools:
- pencil
- measuring tape
- small level
- quick square
- carpenter's square
- drill/ drill bits
- circular saw or miter saw
- table saw
- jigsaw
- Kreg Jig Pocket Hole System
- brad nailer / 1½" brads
- orbital sander
- 150 grit sandpaper
- wood stain and/or paint
- poly topcoat or wax
- paint/stain brush
- safety protection: goggles, ear plugs, chemical-resistant gloves
Cut List: use any species you choose
- 1" x 12" x 10' board
- 2 - 11¼" x 15¼"
- 1 - 16½" x 9"
- 2 - 14" x 8 7/8"
- 1" x 4" x 8' board: 2 - 14" lengths
- From a bead board or plywood panel - 15" x 15" square
Let's get building! Using the one of the two 11¼" x 15¼" boards, you are going to create a template in 6 steps.
Step 1
Measure 2" in from the left side of your board and draw a vertical line.

Step 2
Using the photo for reference, measure and mark on the 2½", 5", and 3"spots noted. Then, measure and mark ¾" up from the bottom between the 5" and 3" marks. Using a slightly curved line, connect the two points as shown.

Step 3
Measure ¾" up from the line you just created and draw a line. This is where your bottom shelf will be. From this line, measure 6½" up and draw another line to mark the bottom of the top shelf. Doing the same as before, from the 6½" line, measure up ¾" and draw a parallel line to show where the top shelf will be. (There should be 6½" between both shelves as shown below)

Step 4
First, starting at the top of the board, measure down 3" and mark. From line marking the bottom of the top shelf, measure 3" down as well and mark.

Step 5
Then, measure down from the top left corner 4¾" and mark. Measure up from the bottom left corner 3½" and mark.

Step 6
Next, using a square, connect the points as shown in the image below.

Now you have your template drawn and it is time to use your jig saw to cut out the shape you created. I love using our
DIY workbench complete with Kreg Clamp Trak System to hold my pieces while cutting.

Once you have that piece completed, use it as a template to create the same image on your second 11¼" x 15¼" board, the cut out with a jigsaw.

Once you have cut both pieces out you will have two boards with a mirrored image effect like this:

Next, lay your two pieces of 1" x 4" board that are cut into 14" lengths in front of you and measure and mark as shown.

Cut out notch with your jigsaw.
NEXT STEPS
Now, in order for these bin fronts to lay at an angle, you will need to set your table saw at 37° and your fence at ¾" on the left. Then, run your board through with the outside face of the bin facing the fence. You cut will look like this profile:

Place your shelf board against the bin front and mark where they meet as shown:

Leave your table saw blade set at 37° and reset your fence on the right to match the depth of your mark, and run the board through. Now your cuts should look like this profile:

Next, moving on to the shelves. First, use your Kreg Jig, to create pocket screw holes on each short side of the board (8 7/8" side) measuring 2" in from each 14" side.

Then, use your orbital sander and 150 grit sanding pads to smooth out all boards and create a rounded corner on the top edge of your side panels and feet, and also the bin face corners.
ASSEMBLY
Last, lay the cutout side panels we created earlier on your surface and attach the shelves in the designated spots from your template. First add glue to each end, then screw down.

Attach the 16½" x 9" (your top board) using a wood glue and a nail gun with 1½" brads.

Using your bin fronts, apply wood glue to the angled edge and then attach with a nailer with same size brads. Nail in from the outside angled edge as shown.

Here is what your assembled frame should look like:

Notice the rounded corners and edges to make reaching in and out of the bins a pleasant experience.
FINISHING
At this point, I leave the beadboard back off because it is easier to stain or paint this way. There are so many options on how you can finish this project.
- Simply use Boiled Linseed Oil (like I did on my antique pew) to bring out natural colors and protect
- Stain in your choice of color with a topcoat.
- Paint in a flat, eggshell, satin, semi-gloss, or gloss finish - don't be afraid to mix it up: light inside with dark outside, multi-colored, add graphics, etc.
- Stain and then paint with distressing to create a time-worn appeal
- Add wallpaper or decoupage the back to create even more design elements
Since this storage bin is for my own kitchen, I am using Briarwood stain by Rustoleum for my base coat.

One coat is all you need. Now since this is a bit darker than I'd like, I'm going to use a white wax to create a textured effect.
I place a small amount of wax in a piece of cheesecloth and rub evenly over the surface. See how it is highlighting the wood texture?

This will not only look better but will protect the wood as well. After waxing is done, I attach the beadboard back with my nailer and 1½" brads. Then...we're done. Yay!
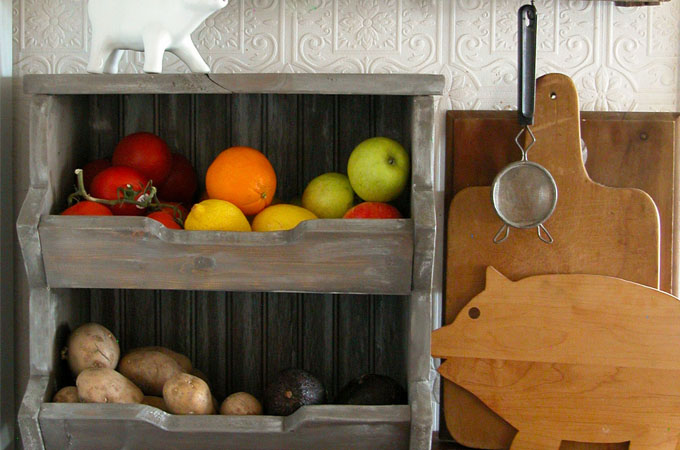
THE REVEAL
No more clutter, no more mess, and I have a stylish new addition to my kitchen decor.


The storage options for this bin are endless really. How about one for your sewing essentials...

...desk top storage...

... in your bathroom...

and even toy storage.

Totally endless possibilities!

Likewise, this would be a great gift filled with essentials for any occasion. So go on and get your DIY on! If you're not into woodworking.
Please feel free to ask any questions. I hope you've enjoyed my wooden storage bin tutorial. In addition, pin and share so others can build one too! ♥
Next week I'll be sharing a few fun furniture and paint projects as our kitchen remodel continues.

While you're at it, here are more DIY projects like my storage bin:


 First, for this project, I am creating a storage bin for my kitchen since we are in the middle of a remodel. I, for one, am tired of having my counter look like this when we are trying to either ripen our fruits or just don't have anywhere to put our goods. Can you blame me?
This plan is for home use only and not to be redistributed or used to make items for sale. Plans are owned and copyrighted by Prodigal Pieces.
First, for this project, I am creating a storage bin for my kitchen since we are in the middle of a remodel. I, for one, am tired of having my counter look like this when we are trying to either ripen our fruits or just don't have anywhere to put our goods. Can you blame me?
This plan is for home use only and not to be redistributed or used to make items for sale. Plans are owned and copyrighted by Prodigal Pieces.
 Ready to get started building one of your own? Also, you can build this in as many tiers as you want, and even mount it to the wall. Likewise, mix it up and add legs or feet to create a different style of bin. Have fun with it!


 Now you have your template drawn and it is time to use your jig saw to cut out the shape you created. I love using our DIY workbench complete with Kreg Clamp Trak System to hold my pieces while cutting.
 Once you have that piece completed, use it as a template to create the same image on your second 11¼" x 15¼" board, the cut out with a jigsaw.
 Once you have cut both pieces out you will have two boards with a mirrored image effect like this:
 Next, lay your two pieces of 1" x 4" board that are cut into 14" lengths in front of you and measure and mark as shown.
 Cut out notch with your jigsaw.
 Place your shelf board against the bin front and mark where they meet as shown:
 Leave your table saw blade set at 37° and reset your fence on the right to match the depth of your mark, and run the board through. Now your cuts should look like this profile:
 Next, moving on to the shelves. First, use your Kreg Jig, to create pocket screw holes on each short side of the board (8 7/8" side) measuring 2" in from each 14" side.
 Then, use your orbital sander and 150 grit sanding pads to smooth out all boards and create a rounded corner on the top edge of your side panels and feet, and also the bin face corners.
 Attach the 16½" x 9" (your top board) using a wood glue and a nail gun with 1½" brads.
 Using your bin fronts, apply wood glue to the angled edge and then attach with a nailer with same size brads. Nail in from the outside angled edge as shown.
 Here is what your assembled frame should look like:
 Notice the rounded corners and edges to make reaching in and out of the bins a pleasant experience.
 One coat is all you need. Now since this is a bit darker than I'd like, I'm going to use a white wax to create a textured effect.
I place a small amount of wax in a piece of cheesecloth and rub evenly over the surface. See how it is highlighting the wood texture?
One coat is all you need. Now since this is a bit darker than I'd like, I'm going to use a white wax to create a textured effect.
I place a small amount of wax in a piece of cheesecloth and rub evenly over the surface. See how it is highlighting the wood texture?
 This will not only look better but will protect the wood as well. After waxing is done, I attach the beadboard back with my nailer and 1½" brads. Then...we're done. Yay!

 The storage options for this bin are endless really. How about one for your sewing essentials...
 ...desk top storage...
 ... in your bathroom...
 and even toy storage.
 Totally endless possibilities!
 Likewise, this would be a great gift filled with essentials for any occasion. So go on and get your DIY on! If you're not into woodworking.
Please feel free to ask any questions. I hope you've enjoyed my wooden storage bin tutorial. In addition, pin and share so others can build one too! ♥
Likewise, this would be a great gift filled with essentials for any occasion. So go on and get your DIY on! If you're not into woodworking.
Please feel free to ask any questions. I hope you've enjoyed my wooden storage bin tutorial. In addition, pin and share so others can build one too! ♥


