 No worries though, because I'll get to the table on the left next time. I can't wait for Trash to Treasure Tuesday!
Okay, so maybe it is a little crazy to gasp when you look out your window on trash day and see a table sitting on top. For me, I'm all about keeping it out of the landfill in any way possible. I grabbed the tiered table first and really was planning on donating it to a local charity. However, I kept eyeing those wooden spindles, and then an idea hit me for the shelves. That sealed the deal that it was time to make a trashure upcycled Christmas tree. {{happy dance!}}
I took the table apart to get a better vision of the creation in my head.
No worries though, because I'll get to the table on the left next time. I can't wait for Trash to Treasure Tuesday!
Okay, so maybe it is a little crazy to gasp when you look out your window on trash day and see a table sitting on top. For me, I'm all about keeping it out of the landfill in any way possible. I grabbed the tiered table first and really was planning on donating it to a local charity. However, I kept eyeing those wooden spindles, and then an idea hit me for the shelves. That sealed the deal that it was time to make a trashure upcycled Christmas tree. {{happy dance!}}
I took the table apart to get a better vision of the creation in my head.

*post sponsored by HomeRight (see full disclosure)
Like I mentioned, the spindles and feet were solid wood. However, the tiers were made of particle board wrapped in a veneer edging. meh. Not too much you can do with that stuff, but it's still wood, so I can work with it to an extent.DIY TIME
My first order of business was to fill the holes in the shelves with wood filler. The key to getting a good filled hole is to overfill it. When the filler is curing, it will shrink so you want a little excess to sand away. After the wood filler cured, I sanded it down with my sander, as well as all the raised places from water damage to the table.
To make this into my upcycled Christmas tree, I needed a trunk, right? I headed to my wood stash and pulled out a 1" x 3" piece of scrap. I stained it and then used my drill and some wood screws to attach them to the board. To assemble, I started from bottom up so the screws would be hidden behind each layer. When I got to the top piece, I attached from behind.
After the wood filler cured, I sanded it down with my sander, as well as all the raised places from water damage to the table.
To make this into my upcycled Christmas tree, I needed a trunk, right? I headed to my wood stash and pulled out a 1" x 3" piece of scrap. I stained it and then used my drill and some wood screws to attach them to the board. To assemble, I started from bottom up so the screws would be hidden behind each layer. When I got to the top piece, I attached from behind.

NEXT STEPS
Next, for extra stability, I used my nailer to drive in a few brads to tack each layer together. Do you see where I'm going with this? All the while I was working, I keep wondering if my neighbors can see me messing with their cast-off table. haha!
Now the main part of my upcycled Christmas tree is assembled. I wanted it to have a cohesive base, so I used some stain to darken the filler as well as all the scuffs on the tiers.
All the while I was working, I keep wondering if my neighbors can see me messing with their cast-off table. haha!
Now the main part of my upcycled Christmas tree is assembled. I wanted it to have a cohesive base, so I used some stain to darken the filler as well as all the scuffs on the tiers.
 Now, I needed to add a base as this can't stand alone as-is. That's where my winter wood pile came in handy. JC (aka. husband) helped me cut off the end of a log so I could have a real pine tree trunk as a weighted base. I attached that from behind as well to hide all the hardware.
PAINTING
Time for some painting fun!! It seems kind obvious I needed to paint my little upcycled Christmas tree. It was looking rather ragged, don't you think? We can all get like that every once in a while. {{raises hand}} My goal was to create an aged rustic feel with this, but also make it quick. First, I brushed on some crackle medium and let it cure. Next, I bust out my tools. You can see how I've used these lovelies in these past posts. I love how this shelter pops right open and is all like "I'm here and ready to get started!" Yes, my tools and I have fun conversations. ahem.
 I gave the upcycled Christmas tree a heavy coat of paint and then use my heat gun to help the paint crackle and cure fast. The faster the cure the larger the crackle, in most instances. Typically, I use a brush and paint, but I wanted to see how spray painting would work with the crackle.
 It really helped create texture on my little tree. I'm going for a time-worn, aged look, so this was perfect. I'll show you what I did to finish it off in a bit.
MORE FUN
Now, did you think I forgot about the rest of the table parts? Let me show you what I did with those. I always save the hardware when salvaging bits. You just never know when it will come in handy. Those reverse threaded bolts are wonderful for making tiered stands and the like. I took them off and added them to my stash.
Those turned legs make for awesome tote handles. You can see my tutorial how to build one HERE. I dug out some scrap wood and whipped this baby up. See it pays to
I always save the hardware when salvaging bits. You just never know when it will come in handy. Those reverse threaded bolts are wonderful for making tiered stands and the like. I took them off and added them to my stash.
Those turned legs make for awesome tote handles. You can see my tutorial how to build one HERE. I dug out some scrap wood and whipped this baby up. See it pays to  Again, to make it cohesive, I stained it all to match. I didn't mind the stained wood look, but it looked too new. haha! Time to break out some paint and create layers. I used my crackle again to highlight edges and a few "worn" places. Once the crackle cured, I used my Small Spray Shelter again to give the tote a coat of paint. Notice how I used my Turn Table to make it super easy to hit all the sides at once.
PAINT TIME
*note: I like to cover my turntable with either a plastic grocery bag or a shower cap to keep the table clean. I'm not kidding when I say the right tools make a job SO much easier! I repeat as I've said before...my motto since being a teen: tooloverjewels.
Next, when my paint cured, I used the same Buffalo Plaid Check Stencil I recently used on my kids farmhouse play table see HERE.
I'm not kidding when I say the right tools make a job SO much easier! I repeat as I've said before...my motto since being a teen: tooloverjewels.
Next, when my paint cured, I used the same Buffalo Plaid Check Stencil I recently used on my kids farmhouse play table see HERE.
 While the tote and tree are curing, it was time to make use of those table feet. My tools come into play again to make my job a breeze. I'm also using the same flat white spray paint as I used on the tree and tote.
 You may be wondering what in the world I will do with those. Well, let me give you a history. I have 6 kids and each year since the oldest was born, I have given them a handmade Christmas ornament for our tree. This tradition actually started between JC and I when we were newlyweds. The challenge is to create an ornament from something from around the home (no buying anything) . These table feet are going to be gifted to each of my kids this year after I do some hand-painting. Fun!
THE REVEAL
Are you ready to see all my crazy projects put together? I am!
 My little tree is now decked with a twine garland made of jingle bells and ticking selvage ties. Isn't it cute? Then there's my rustic tote complete with buffalo check goodness.

 Those legs make for perfect tote handles, don't you think? They could also be candle sticks, legs for a fun animal creation, rungs for a ladder...you get the idea.
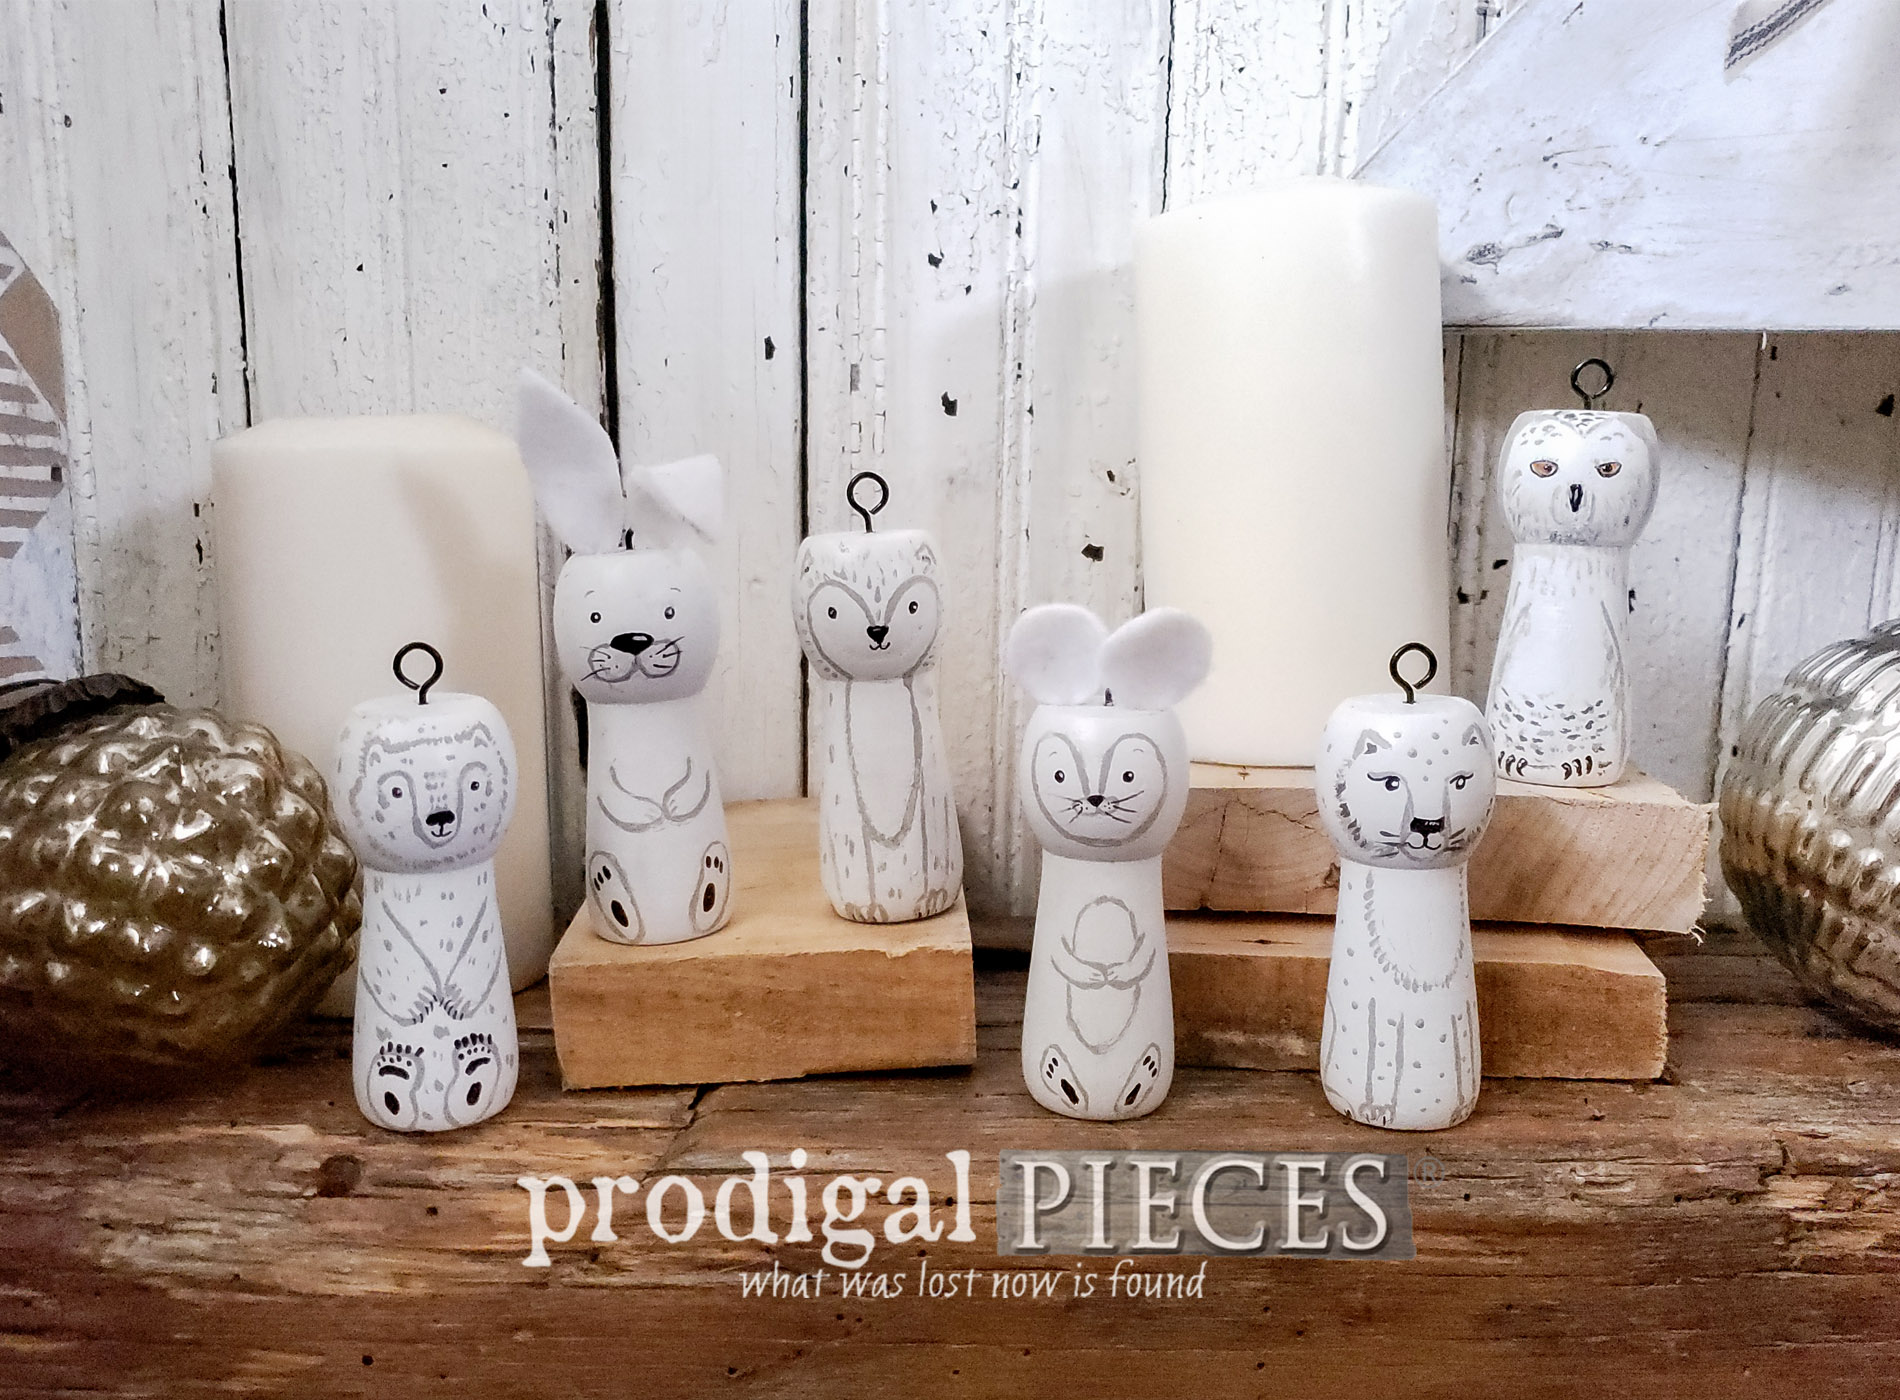
 Last, but definitely not least, my little arctic woodland animal ornaments.

 I made a polar bear, a rabbit, and a fox up above. While below, there is a mouse, a wolf, and a snowy owl.
 They each have an screw eyes on top, and I will be adding a hanger and little note to each one. I admit...I have fun!
 My wooden tote and upcycled Christmas tree are available in my shop, but I need to ask you to keep the ornaments a secret! It's been hard to keep them out of sight of 6 pairs of eyes. hee hee.
[metaslider id=30251]
SHARE
Pin and share this upcycled Christmas tree and decor tutorial. You never know what will inspire others - even a table in the trash. Up next, for the other table from the same neighbor's trash will be getting new life. See what it became HERE in this post.

Before you go, be sure to sign up for my newsletter. PLUS, you will get your FREE Furniture Buying Checklist and special discount to my shop. Until next time!

Also, more projects like my upcycled Christmas tree:

