It's been a while since I've done my own furniture makeover since I just recently helped
my son and both of
my daughters with
their furniture makeovers. It's not like I haven't been busy or anything. tsk. One piece that I have finished for a custom order is this Art Deco chest of drawers that has gotten a shabby chic detailing. Yup, it's not a
BEEP, but very similar to
my Dumpster Diva.

This lovely piece came from a client, Ruby, who allowed me to share the story of her chest of drawers. Back in 1954, Ruby's parents bought the entire set for her. It had weathered a small flood, and this is the remaining piece left. She used it in her parent's house until she married, and then her mother continued to use it until her death in 1991. So, in reality, it has been hers for 61 years. Ruby has decided to give it new life to suit her shabby chic love. How fun is that?!
The chest is in great shape, but has a few cosmetic problems, as well as some structural issues - all totally repairable with some TLC. I had to cut new drawer stops for the drawers and rebuild the faces a bit as they had split in a queer way. The board had a crack right down the face lengthwise. I believe it was because the dove-tailed joints had come loose and put too much stress on the face. Ya learn something new every day.

I call that awful bubbling and chipping veneer snaggle-tooth and my solution to it is simple.

DIY TIME
I have often used
my towel-soak method on numerous pieces, like
my desk and
this chest of drawers. It works like a charm, except for one time I learned
the hard way.

It took a couple of overnights to get both sides soaked down, but once done it was time to repair the rest. The front damaged veneer with fixed with wood filler and I then sanded everything down with my sander.
Ruby originally fell in love
this chest of drawers I did for
my shop a while back and wanted hers to be in the same likeness.

I can't say that I blame her because this is one of my favorite chests that have come across my path. In order to match that finish, I started out with a priming coat of Kilz since there were some chemical stains sure to come through. After that, I used two coats of the same
antique white.
PAINT TIME
One of the things that Ruby liked most about the inspiration chest was the gilded effect. To replicate that look, I used some DecoArt metallic paint in the carvings.

I even used it as a glazing on the pulls after I painted them with a RustOleum Heirloom White.

Here is with the gilding and drawer pulls yet to be added.

Kinda boring, eh? That's what I like about these Art Deco chests. They're like a blank slate waiting to be the star of the show. That's why I've created
my BEEP (VW chest)...

and this
boho chic lady.

THE REVEAL
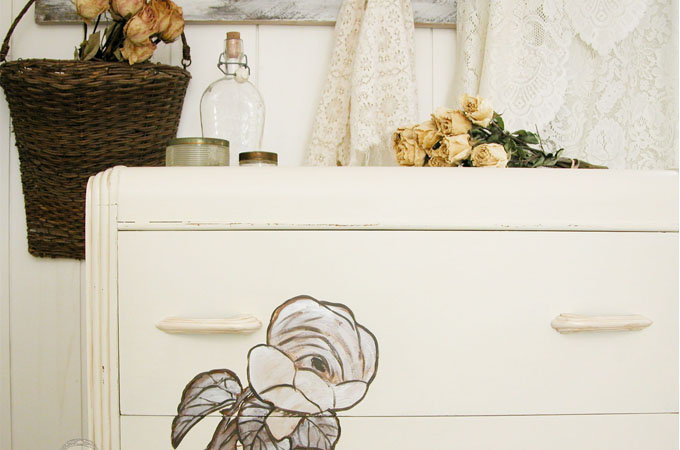
Roses catch Ruby's fancy, so roses it was to be. I hand-painted the floral accents with several different colors with metallic overlay as she described and here is the result.


She loves the finished piece and happy to have it as an addition to her new room makeover.

I'm with Ruby...there's just something about roses to make a girl (at any age) feel special.

I hope you enjoyed seeing this shabby chic transformation and the story behind it all. Also, maybe the next time you see a waterfall piece of furniture you can give it your own special touch, and maybe it will be shabby chic. ♥

To get these DIY tips & tricks in your inbox, be sure to
sign up for my newsletter. PLUS, you will get your FREE Furniture Buying Checklist and special discount to
my shop. Until next time!

 MEWE | PINTEREST | GAB
More projects like my shabby chic makeover:


 This lovely piece came from a client, Ruby, who allowed me to share the story of her chest of drawers. Back in 1954, Ruby's parents bought the entire set for her. It had weathered a small flood, and this is the remaining piece left. She used it in her parent's house until she married, and then her mother continued to use it until her death in 1991. So, in reality, it has been hers for 61 years. Ruby has decided to give it new life to suit her shabby chic love. How fun is that?!
The chest is in great shape, but has a few cosmetic problems, as well as some structural issues - all totally repairable with some TLC. I had to cut new drawer stops for the drawers and rebuild the faces a bit as they had split in a queer way. The board had a crack right down the face lengthwise. I believe it was because the dove-tailed joints had come loose and put too much stress on the face. Ya learn something new every day.
This lovely piece came from a client, Ruby, who allowed me to share the story of her chest of drawers. Back in 1954, Ruby's parents bought the entire set for her. It had weathered a small flood, and this is the remaining piece left. She used it in her parent's house until she married, and then her mother continued to use it until her death in 1991. So, in reality, it has been hers for 61 years. Ruby has decided to give it new life to suit her shabby chic love. How fun is that?!
The chest is in great shape, but has a few cosmetic problems, as well as some structural issues - all totally repairable with some TLC. I had to cut new drawer stops for the drawers and rebuild the faces a bit as they had split in a queer way. The board had a crack right down the face lengthwise. I believe it was because the dove-tailed joints had come loose and put too much stress on the face. Ya learn something new every day.
 I call that awful bubbling and chipping veneer snaggle-tooth and my solution to it is simple.

 It took a couple of overnights to get both sides soaked down, but once done it was time to repair the rest. The front damaged veneer with fixed with wood filler and I then sanded everything down with my sander.
Ruby originally fell in love this chest of drawers I did for my shop a while back and wanted hers to be in the same likeness.
It took a couple of overnights to get both sides soaked down, but once done it was time to repair the rest. The front damaged veneer with fixed with wood filler and I then sanded everything down with my sander.
Ruby originally fell in love this chest of drawers I did for my shop a while back and wanted hers to be in the same likeness.
 I can't say that I blame her because this is one of my favorite chests that have come across my path. In order to match that finish, I started out with a priming coat of Kilz since there were some chemical stains sure to come through. After that, I used two coats of the same antique white.
 I even used it as a glazing on the pulls after I painted them with a RustOleum Heirloom White.
 Here is with the gilding and drawer pulls yet to be added.
 Kinda boring, eh? That's what I like about these Art Deco chests. They're like a blank slate waiting to be the star of the show. That's why I've created my BEEP (VW chest)...
 and this boho chic lady.


 She loves the finished piece and happy to have it as an addition to her new room makeover.
 I'm with Ruby...there's just something about roses to make a girl (at any age) feel special.
 I hope you enjoyed seeing this shabby chic transformation and the story behind it all. Also, maybe the next time you see a waterfall piece of furniture you can give it your own special touch, and maybe it will be shabby chic. ♥
 To get these DIY tips & tricks in your inbox, be sure to sign up for my newsletter. PLUS, you will get your FREE Furniture Buying Checklist and special discount to my shop. Until next time!


