"It's pretty beat up..." those words are music to my junk-lovin' ears. I purposefully don't work on pieces that are just fine only to paint them. However, I look for the unwanteds, the misfits, the beaten down beauties just waiting for new life. Enter in this vintage serpentine dresser. Vintage Mahogany Serpentine Dresser Before Makeover by Larissa of Prodigal Pieces | prodigalpieces.com Damaged Serpentine Dresser Top | prodigalpieces.com This ol' gal was hiding away behind some clothing racks and bins with no price tag. When I inquired with the owner on asking price, she wanted to verify the cost with her husband. That quote above were her words, and it made me think to myself...just wait and see. tee hee. Yes, she is right. It IS in rough state, but that doesn't scare me. Everything is present as far as hardware and drawers go. The only major issues are missing, damaged, and chipped veneer, chemical stains, and carvings into it. Damaged Veneer on Right Side of Serpentine Dresser | prodigalpieces.com Damaged Left Side of Serpentine Dresser | prodigalpieces.com Aside from a few numbers and letters etched into the top, it looked as if someone purposefully felt like damaging the top edge. geesh. Closeup of Damaged Serpentine Dresser Top | prodigalpieces.com

LET'S BEGIN

Aside from the cabinet being a veneer layered piece, the drawers are actually faced with solid mahogany. cha-ching! Talk about a gorgeous wood. Naturally, my sander came out to play. Sanding mahogany drawers on vintage serpentine dresser | prodigalpieces.com Thankfully, removing the original finish wasn't too bad. However, there was a chemical bleed through on one of the center drawers. You can see it in the before pics. While I don't think it's going to be an issue for my final outcome, I won't know for sure until I take the next steps. Then, I grab my white wax to bring out that gorgeous grain. Waxing Mahogany Drawers with White Wax | prodigalpieces.com prodigalpieces Limed Drawers with White Wax by Prodigal Pieces | prodigalpieces.com prodigalpieces

NEXT STEPS

The cabinet, however, had too much damage to the veneer, so it got patched all over with wood filler and sanded. In addition to that, I removed the damaged veneer, then stain the bare spots to match. Veneer Removed from Serpentine Dresser Sides | prodigalpieces.com prodigalpieces Then, I begin my phases of layers to get this serpentine dresser a brand new look. My goal is to create a time-worn feel using paint. When beginning a project with layers, you kinda have to think in reverse. First, I began with a coat of this really funky caramel color over a stain blocking primer layer. First Coat of Paint on Serpentine Dresser | prodigalpieces.com prodigalpieces This color serves as a great base for the next two layers. Here it is in the final state with one layer complete. First Paint Layer on Serpentine Dresser | prodigalpieces.com prodigalpieces Not too bad, eh? Before you think me crazy, take a peek at how I used this very same color on an antique buffet HERE. Also, I used it on layering paint on candlesticks over HERE (or see in video below) and on my faux wood garage door in this post HERE. So, I think it works wonderfully for what I'm after. Farmhouse Style Decor Video Tutorial by Larissa of Prodigal Pieces | prodigalpieces.com

LAYER 3

Next, it's time to break out my spray bottle of water and, again, using that same 2" brush. This time, however, I'm using a soft beige over the cured caramel color. Adding a Second Layer of Paint to Vintage Serpentine Dresser | prodigalpieces.com prodigalpieces I guess you call this layer a wash, but it's kinda different too. I lightly spritz the surface I'm painting with water and then brush on my paint in the directions I want to highlight. I've used this blending technique many times in the past and love how it allows me to be spontaneous and creative. Last, I use the same method, but this time my color of choice is a basic white in an eggshell lustre. After all the painting is done, I apply waxes to highlight details and also protect the top.

THE REVEAL

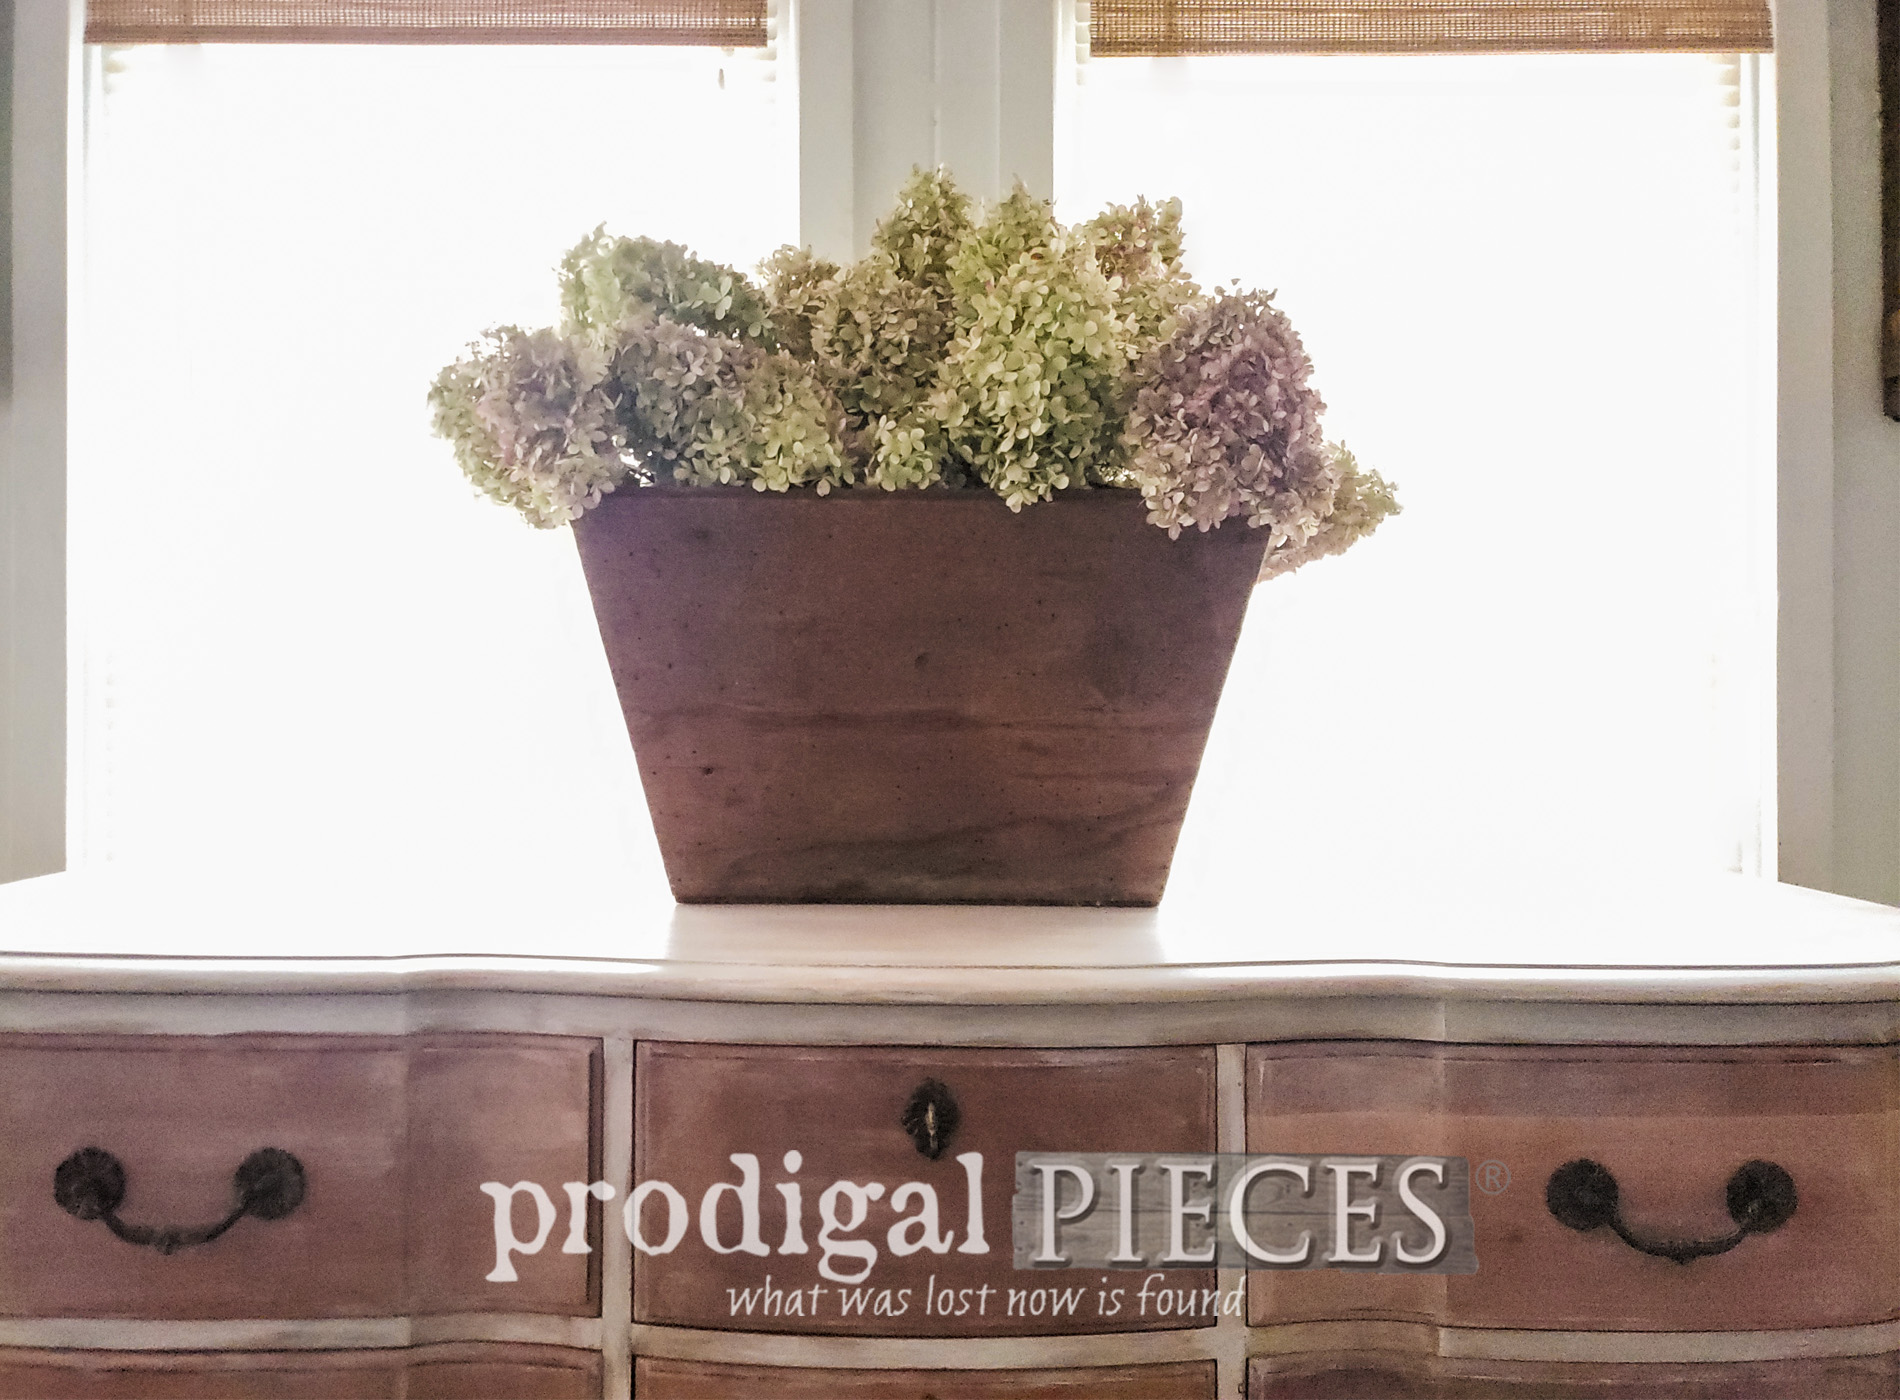
Are you ready? Here is the brand new look for my vintage serpentine dresser. French Country Dresser with Serpentine Front by Larissa of Prodigal Pieces | prodigalpieces.com prodigalpieces furniture farmhouse french home homedecor Side View Vintage Serpentine Dresser by Larissa of Prodigal Pieces | prodigalpieces.com prodigalpieces furniture diy home homedecor farmhouse Quite the different piece now, isn't it? Yahoo! I LOVE IT. This dresser not only has a fresh feel, but the new look allows all those gorgeous details to shine. Vintage Serpentine Dresser with Paint Layering Technique by Larissa of Prodigal Pieces | prodigalpieces.com prodigalpieces home farmhouse french homedecor diy furniture Paint Layering Technique showcased on Vintage Serpentine Dresser by Larissa of Prodigal Pieces | prodigalpieces.com prodigalpieces diy home furniture farmhouse homedecor Plus, the best part about dressers like these is that they can function as a buffet, an entertainment center, an entry console, etc. You get the idea. Also, in case you were wondering, I didn't feel the need to change the hardware up. It already has a gorgeous patina because the swags are solid brass and the plates are a tin. However, I did clean them up a bit. Dried Hydrangea Centerpiece on Vintage Dresser by Larissa of Prodigal Pieces | prodigalpieces.com prodigalpieces furniture home homedecor Gorgeous Vintage Serpentine Dresser with Paint Layering Technique by Larissa of Prodigal Pieces | prodigalpieces.com prodigalpieces diy home homedecor furniture farmhouse If you'd like to own this dresser, you can find it available in my online shop (SOLD) along with many other goodies. We do ship to your door and have been in the biz for over 7 years now. Crazy how time flies, isn't it? Shop Prodigal Pieces Furniture, Vintage Finds, Handmade Goods, & Supplies for your home | shop.prodigalpieces.com prodigalpieces In addition, pin and share my serpentine dresser with paint layering technique to inspire others to give DIY a try. It's fun! Learn this paint layering technique applied to this vintage serpentine dresser as demonstrated by Larissa of Prodigal Pieces | prodigalpieces.com prodigalpieces diy home homedecor furniture farmhouse Up next, I mentioned being on a short furniture kick. I am sharing this vintage entertainment center and its new life. SEE HERE. Vintage Entertainment Center Before Upcycle by Larissa of Prodigal Pieces | prodigalpieces.com prodigalpieces To get these DIY tips & tricks in your inbox, be sure to sign up for my newsletter. PLUS, you will get your FREE Furniture Buying Checklist and special discount to my shop. Until next time! blog signature

let's get socialMEWE  |  PINTEREST  |  GAB

Also, more furniture projects like my serpentine dresser:

What a difference! This vintage Dixie dresser with bow front style got a facelift using frottage technique to create time-worn wear. Get the DIY details at Prodigal Pieces | prodigalpieces.com prodigalpieces diy furniture home homedecor homedecorideas vintageOutdated Bentwood Rocking Chair Gets Embroidered Makeover by Prodigal Pieces | prodigalpieces.com


Alison S

Shared publicly - 2019-11-05 06:37:20

I have a dresser I would like to paint.

KellyM

Shared publicly - 2019-11-05 06:55:43

Wow, you are such an inspiration. I have a small table that I would just love to try some paint techniques on. It is hidden in the corner right now because the finish is sooooo bad. lol

Amanda Pennington

Shared publicly - 2019-11-05 07:33:27

I love how you purposely look for the pieces that everyone else overlooks, and then bring them to life in unexpected ways. It reminds me of the Father's work in His children; a lovely parallel! I'd use the brushes on some tables in our living room that need to be refreshed after being enjoyed by the family!

Susie Wilcox

Shared publicly - 2019-11-05 07:36:22

These brushes would be great to win in my workshop where I have started redoing furniture. I love reading your posts as you give step-by-step on how to do this.

Amy Mercier

Shared publicly - 2019-11-05 07:56:29

Oh how i wish I had your time management and creative skills.

Larissa

Shared publicly - 2019-11-05 07:56:57

funny...it has to stand in the corner. haha.

Larissa

Shared publicly - 2019-11-05 07:57:33

What a sweet compliment to hear. That's exactly my feeling on it and why my brand is named as such...the prodigal son. Thank you, Amanda.

Larissa

Shared publicly - 2019-11-05 07:57:47

Thank you. You will love the brushes for sure.

Lori Sawyer

Shared publicly - 2019-11-05 08:20:08

What a beautiful piece! You always inspire me ?

SONJA HANSEN

Shared publicly - 2019-11-05 08:20:59

I do like this piece and think you made the right call to show off the beautiful wood in the drawers. You always inspire me.

Micah

Shared publicly - 2019-11-05 08:21:35

Beautiful dresser! I love those brushes!

Deirdre

Shared publicly - 2019-11-05 08:22:41

I love to bring new life to an old piece like this. Great job!

SONJA HANSEN

Shared publicly - 2019-11-05 08:26:28

#2. Thinking about your piece and forgot. I am deep into painting my kitchen cupboards, trim, etc., etc. and I can really use some Zibra brushes.

Ruth Holt

Shared publicly - 2019-11-05 08:30:26

Love learning your techniques. I’d love to paint an old headboard.

Sonya Allstun

Shared publicly - 2019-11-05 08:34:00

I have a microwave stand that needs a face lift bad after I painted the cabinets in the kitchen

Larissa

Shared publicly - 2019-11-05 08:37:15

I'm delighted to hear it. Thank you!

Larissa

Shared publicly - 2019-11-05 08:37:40

Thank you. I sure was excited to find that mahogany was solid. Yay!

Larissa

Shared publicly - 2019-11-05 08:37:50

Thank you. Me too!! :D

Larissa

Shared publicly - 2019-11-05 08:38:16

It sure gives me all the joy. Thanks so much, Deirdre.

Larissa

Shared publicly - 2019-11-05 08:38:40

That is my LEAST favorite job...ugh. But...the brushes make it so much easier. You will love them!

Larissa

Shared publicly - 2019-11-05 08:38:54

That's music to my hears, Ruth. Thank you!

Kelly D

Shared publicly - 2019-11-05 08:51:36

This was a great makeover. I would paint my coffee table.

Cheryl Atkinson

Shared publicly - 2019-11-05 09:03:02

Hi Larissa! I absolutely love what you did to this dresser. I am working on one now that has beautiful wood and i am thinking about just doing a light white wash. Thank you for the chance to win the brushes. Cheryl

Toia

Shared publicly - 2019-11-05 09:18:08

The dresser has a huge chance at being loved again! Beautiful! I am going to be trying a chevron pattern on a dresser and special detail brushes would be awesome! Thank you for the opportunity to win these brushes!

Angie

Shared publicly - 2019-11-05 09:36:52

Nice! Seems to be the trend lately, less paint, more natural wood. I like!

Larissa

Shared publicly - 2019-11-05 09:53:36

Thank you. Sounds good.

Larissa

Shared publicly - 2019-11-05 09:55:10

Wonderful! It's a great way to update and refresh a piece.

Larissa

Shared publicly - 2019-11-05 09:55:21

Ooh... that sounds like fun! :D

Larissa

Shared publicly - 2019-11-05 09:55:36

I've always saved the wood when possible. It's a must in my book. :)

Lori

Shared publicly - 2019-11-05 10:40:05

I love these kinds of dressers. You did a wonderful job and you always inspire me. Thanks.

Larissa

Shared publicly - 2019-11-05 10:48:55

Aren't they so fun! :D They truly are classic beauties. I'm so glad you enjoy how I reworked it. Thanks!

Lorene Dehl

Shared publicly - 2019-11-05 10:59:53

What a coo technique and turned out so beautiful!

Lynn

Shared publicly - 2019-11-05 11:34:15

Another gorgeous piece! You have inspired me. I just found a beautiful old dresser I want to redo into a kitchen island with a bar for my granddaughter who likes to help me cook. It is covered (very haphazardly) in about 4 layers of paint....and needs new hardware. Its been sitting forever but I am pulling her out today! Thanks for the inspiration!!

Larissa

Shared publicly - 2019-11-05 11:49:13

Thanks! You've gotta try it sometime. ;)

Larissa

Shared publicly - 2019-11-05 11:59:58

Ooh...that sounds like a doozy, but also well worth it. Have fun!!

DARLANE RILEY

Shared publicly - 2019-11-05 12:01:52

Another beautiful piece. Your work is always great. I really like the wet blending technique

Linda C Johnston

Shared publicly - 2019-11-05 13:12:13

Don't stop what you are doing! You inspire, motivate and, on some days when I need it the most, you make me laugh and remember God has a plan. I would love to win the brushes. Truly,

Larissa

Shared publicly - 2019-11-05 16:24:42

Thank you for the kind words, Darlane. It's fun to do this technique and see it come alive.

Larissa

Shared publicly - 2019-11-05 16:26:06

I need that, Linda. Thank you for the encouraging words. It can be hard at times. :) Hugs!

Dale Cundy

Shared publicly - 2019-11-05 19:24:19

Another beautiful masterpiece! ⚘

Denise

Shared publicly - 2019-11-05 20:08:39

I’m always inspired by your posts, either with new techniques to try, different color combinations, or beautiful decorating ideas. Thank you!

Melanie

Shared publicly - 2019-11-05 20:27:09

Really pretty dresser! Well done!

Larissa

Shared publicly - 2019-11-05 21:21:07

Thank you, Dale. :)

Larissa

Shared publicly - 2019-11-05 21:21:22

What a wonderful compliment, Denise. Thank you!

Larissa

Shared publicly - 2019-11-05 21:21:36

Thank you so much, Melanie.

Rita Reeves

Shared publicly - 2019-11-05 22:21:13

I love your work. I would use the brushes to finish a vanity that I am redoing.

Larissa

Shared publicly - 2019-11-06 06:17:37

Thank you. Sounds good!

Kaycee

Shared publicly - 2019-11-06 08:45:08

Hello Larissa, I am so happy to see your beautiful work on a piece of furniture again! I know you are so busy with your remodel, home schooling, teens learning to drive and everything else, where did you find the time? I love the layering technique that you used on this curvy lady. I have got to say it again, thank you for rescuing her and making her gorgeous again.

Donna Gonzalez

Shared publicly - 2019-11-06 09:39:19

I love that style of dresser. I've been looking for one in rough shape for a good price, but no luck yet. This has convinced me to not give up looking. Beautiful finish.

Larissa

Shared publicly - 2019-11-06 20:03:30

I do enjoy it, but lack the space and energy to keep it up as I used to. It's so fun to do! :D Thank you, Kaycee.

Larissa

Shared publicly - 2019-11-06 20:03:56

It will come! I can't wait to see it when you do, Donna. Thank you.

Susan

Shared publicly - 2019-11-06 20:20:10

I love how that paint layering works to bring a vintage patina to the wood. It never occurred to me to use a caramel color s the base. Thanks for the tips and inspiration! Great job Larissa!

Larissa

Shared publicly - 2019-11-06 21:04:00

It truly is fun. :D I'm glad you are excited - that's what I'm all about. Thanks!

Mya Murphy

Shared publicly - 2019-11-07 02:05:59

The guy that owned the condo beforehand, painted the kitchen cabinets an ugly brown.. I realllllllly want to have a redo!

Eileen Boyce

Shared publicly - 2019-11-07 02:09:05

What a great job. I would love to do my mom's cedar chest.

joann Collins

Shared publicly - 2019-11-07 05:48:13

I would paint my old chairs

Larissa

Shared publicly - 2019-11-07 05:52:53

Sounds like DIY fun! I hope you enjoyed my work shared today.

Larissa

Shared publicly - 2019-11-07 05:53:09

Thank you, Eileen.

Larissa

Shared publicly - 2019-11-07 05:53:51

Perfect. I hope you enjoyed my work shared today :)

Donna Porter

Shared publicly - 2019-11-07 06:14:28

My husband is making over my dresser I had as a child. It is over 60 years old and this is what we would use these brushes on first.

Larissa

Shared publicly - 2019-11-07 06:18:07

How fun that would be. I enjoyed working on this dresser with them too.

Ginn

Shared publicly - 2019-11-07 08:46:28

Another gorgeous piece of furniture! We have a stool that my kiddos use to sit on to practice on our keyboard that needs new paint desperately!! Thanks for the chance to win this useful giveaway!

Larissa

Shared publicly - 2019-11-07 09:29:27

Thank you! That would be a fun project for them, even. :D

Kayla Klontz

Shared publicly - 2019-11-07 09:38:47

I would repaint my daughter's dresser.

Heather Dawn

Shared publicly - 2019-11-07 10:08:38

I would repaint a French dresser that I have sitting in my garage.

Jane Clelland

Shared publicly - 2019-11-07 10:44:37

I have several dressers that I would like to do something with. You do wonderful work, keep it up!

laura bernard

Shared publicly - 2019-11-07 12:22:06

I would paint buffets!

Larissa

Shared publicly - 2019-11-07 12:47:46

Thank you much, Jane. :D

Rini

Shared publicly - 2019-11-07 13:23:30

Thank you so much for not painting every single piece white! There are times when I wonder if people actually realize that the world is full of other colors and options, great job!

Larissa

Shared publicly - 2019-11-07 14:06:05

I'm the last one to do that...haha. I'm known for so many variations and that keep my creative spirit flowing. Though, my last one was white. ;) I do love white too.

Mary Loveland

Shared publicly - 2019-11-07 20:07:25

The dresser is beautiful Larissa! Job well done.

Larissa

Shared publicly - 2019-11-07 21:05:51

Thank you so much, Mary.

Dolores Benedict

Shared publicly - 2020-07-04 11:37:43

I loved what you did with this dresser, I would love to do the same with my French Provincial bedroom set. Do you have a video or step by step instructions for this.. Thanks, Dolores

Larissa

Shared publicly - 2020-07-05 05:07:36

Thank you, Dolores. I tried to lay out the steps in my post - just sanded down what I could, applied the wax to the drawers. Then, I have mentioned my layering of paint to the cabinet.I also provide links to the other video tutorials I've made using the same technique and have the video uploaded. It's the same steps.

Sign Up To Comment