Who doesn't love a good thrift store run, right? Recently, I came across a good load and included in it were these two metal farm animals - a cow and a rooster. I have an addiction, not only to farmhouse stuff, but also to quirky metal art and these fit the bill.

My belief is that they are actually lanterns. Each one has a spot where you can insert a votive candle and see the light peeking out of the holes. However, I had to giggle because the rooster was missing his legs and I thought...what am I going to do with that? My kids loved them and I knew I could find some sort of purpose for them.
DIY TIME
In all of my repurposing projects, I head out to my stash and almost instantly something speaks to me. Here is what I dragged in...

What you see is a barn wood plank on the bottom, two leftover table legs from
my wooden totes, some luan remnants, a dowel, and a chunk of leftover wood from our
clients custom open shelving made from 1800's beech. Have I intrigued you yet? hee hee hee.
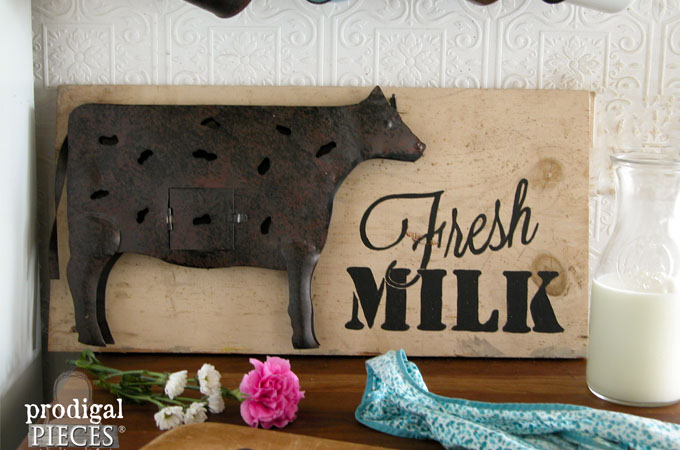
First up is the cow. I grab my drill and mount it to that barn wood plank with some screws. Then, I felt kinda funny drilling into the belly of this bovine.

However, there was a bit of room where I wanted to add some farmhouse funk. So, how about some milky goodness?

Next, using
my transfer method, I applied the text to the barn wood and then hand-painted it in - my therapy.

SIGNAGE
Now for some farmhouse goodness...isn't this metal art sign sweet?

In addition, I have a soft spot for cows as I used to collect any and all as a kid. Their genteel spirit and playful way just draw me in.

The best part...you can even still add a battery operated votive for some extra fun. Yay! Oh, and yes, that is really fresh milk that we get weekly from the lovely ladies at a local organic dairy farm.
UP NEXT
Next is that legless rooster...hee hee. After mulling around a few ideas, I totally saw a weather vane in this handsome fella. Then, I grab my drill and one of those leftover antique table legs, and take that hole completely through, making it open to both sides.

Next, I use the same boiled linseed oil I used on
my antique pew makeover to give that 1800's beech wood a nice natural color and finish. Look how it brings out the grain...swooning!

Once the oil has had a chance to soak in, I drilled to make a hole in the barn wood and also in the base of that antique table leg. I am creating a space for a dowel to connect the two together.

From that scrap pile I showed you earlier, I take the dowel and luan pieces and create the cross-piece of the weathervane. Finally, here it is in the raw.

Notice I added a ceiling plate from an antique light fixture to the base. But this guy's not finished yet. I want patina, so I go to a copper metal effects set that I used on
my Art Deco vanity. Let me tell you...this stuff ROCKS!

This is metal in a jar and when added to wood, metal, plastic,
anything...it becomes oxidized with the green aging solution. See, I told you it was cool. tsk.
PATINA
I gave my faux weathervane a coat of acid blocking primer and, next comes the gorgeous reactive copper paint.

While I could stop there, I am aching to see this thing take on that wonderful green patina. After that, I spritz it with the aging solution and watch the transformation take effect in minutes. Likewise, this is a cool experiment to show my homeschooled children. Science is fun!
THE REVEAL
Finally, are you ready to see my legless cock turned rustic weathervane? Meet Sir Clucksalot. (yes, I give quirky names to my creations at times)

I love the character this metal art has and find it amazing that it's mostly made of wood. Additionally, how about that butcher block...swoon! It is available in
my online store along with my cow and rooster creations. Come on over to see all there is to offer.


My kids kept giggling at this rooster turned weathervane because they like it so much. I have to admit, he's kinda cute.

And not only that, but I love this green patina created in a half hour.

Additionally, if you love those faux cotton stems too, I have a
video tutorial for you so that you can make two arrangements for less than $4.

I hope you've enjoyed seeing my metal art creations come to life and find a new purpose. Are you inspired to take the chance on some thrifted goods? tsk. I know you are.
SHARE
In addition, pin and share to inspire others to get out there and DIY too. ♥

Up next, I'm showing you what I do with that other table leg and this pile of reclaimed goodness.
Come on and see here!

To get these DIY tips & tricks in your inbox, be sure to
sign up for my newsletter. Until next time!

 PINTEREST | EMAIL
Also, here are more of my projects like my metal art:


 My belief is that they are actually lanterns. Each one has a spot where you can insert a votive candle and see the light peeking out of the holes. However, I had to giggle because the rooster was missing his legs and I thought...what am I going to do with that? My kids loved them and I knew I could find some sort of purpose for them.
 What you see is a barn wood plank on the bottom, two leftover table legs from my wooden totes, some luan remnants, a dowel, and a chunk of leftover wood from our clients custom open shelving made from 1800's beech. Have I intrigued you yet? hee hee hee.
First up is the cow. I grab my drill and mount it to that barn wood plank with some screws. Then, I felt kinda funny drilling into the belly of this bovine.
What you see is a barn wood plank on the bottom, two leftover table legs from my wooden totes, some luan remnants, a dowel, and a chunk of leftover wood from our clients custom open shelving made from 1800's beech. Have I intrigued you yet? hee hee hee.
First up is the cow. I grab my drill and mount it to that barn wood plank with some screws. Then, I felt kinda funny drilling into the belly of this bovine.
 However, there was a bit of room where I wanted to add some farmhouse funk. So, how about some milky goodness?
 Next, using my transfer method, I applied the text to the barn wood and then hand-painted it in - my therapy.

 In addition, I have a soft spot for cows as I used to collect any and all as a kid. Their genteel spirit and playful way just draw me in.
 The best part...you can even still add a battery operated votive for some extra fun. Yay! Oh, and yes, that is really fresh milk that we get weekly from the lovely ladies at a local organic dairy farm.
 Next, I use the same boiled linseed oil I used on my antique pew makeover to give that 1800's beech wood a nice natural color and finish. Look how it brings out the grain...swooning!
 Once the oil has had a chance to soak in, I drilled to make a hole in the barn wood and also in the base of that antique table leg. I am creating a space for a dowel to connect the two together.
 From that scrap pile I showed you earlier, I take the dowel and luan pieces and create the cross-piece of the weathervane. Finally, here it is in the raw.
 Notice I added a ceiling plate from an antique light fixture to the base. But this guy's not finished yet. I want patina, so I go to a copper metal effects set that I used on my Art Deco vanity. Let me tell you...this stuff ROCKS!
 This is metal in a jar and when added to wood, metal, plastic, anything...it becomes oxidized with the green aging solution. See, I told you it was cool. tsk.
 While I could stop there, I am aching to see this thing take on that wonderful green patina. After that, I spritz it with the aging solution and watch the transformation take effect in minutes. Likewise, this is a cool experiment to show my homeschooled children. Science is fun!
 I love the character this metal art has and find it amazing that it's mostly made of wood. Additionally, how about that butcher block...swoon! It is available in my online store along with my cow and rooster creations. Come on over to see all there is to offer.
 My kids kept giggling at this rooster turned weathervane because they like it so much. I have to admit, he's kinda cute.
 And not only that, but I love this green patina created in a half hour.
 Additionally, if you love those faux cotton stems too, I have a video tutorial for you so that you can make two arrangements for less than $4.
 Up next, I'm showing you what I do with that other table leg and this pile of reclaimed goodness. Come on and see here!
 To get these DIY tips & tricks in your inbox, be sure to sign up for my newsletter. Until next time!


