You know I love our
Trash to Treasure Tuesdays and this one is easily one of my top 5 projects. Not only that, but I get to join in with a few ladies who share the same passion. Be sure to read through to see what they have to share with you as well. Okay, let's take a peek at what I found on the curb during city cleanup. That there is about to become a reclaimed workbench DIY style. yeah!!

If you don't know what that is, it's a set of underbed drawers. Custom made out of pine and has plenty of life left to it. I can't say enough how blessed I was to not only be able to source awesome things I've been sharing over the last few weeks, but it's exactly what I asked God to help me find - wood. All I asked to find was old wood and wooden things. I've completed my
louver door project here, my
repurposed plant stand here, and last week my
TV tray stand project here. So fun!
TRASH
I mean, look at this. I had to beat the Amish to what was left in our quadrant. They are lean, mean
trashure picking machines! This couple had stopped at our neighbor's pile and I waited to snap a pic. I think they thanked me by the road apples the left at the end of my driveway.
note: See the snow flying? We had some serious cold in April!

LET'S ROLL
Anyhoo, today is all about those set of drawers my oldest son and I hauled home and how they became a reclaimed workbench built by moi. He got his driving hours in and I got to hop out and inspect the potential loot. I will honestly say that the minute I saw the drawers I gasped and told my son, "This is going to become a workbench!" I love when inspiration strikes instantly. All I needed to do was wait for the weather to cooperate and it finally did. {{happy dance}}
Here I am with a few things cut and getting started with this belly-up beauty. It just needed some basic structure added to it to achieve the design in my head.

DIY TIME
What you see is I removed the "L" braces holding the legs so the could fit square in the recessed corners. However, I jack the legs up a bit to allow clearance for the drawers to slide in and out. I also had to rebuild the existing frame and reinforce it so it would hold nice and tight. The 1"x 4" skirt is what made that pretty easy.

TOOLS
Once I got the basic frame set up and attached, I flipped it over and added the bottom shelf skirt. This not only gives me a place to add a shelf, but also keeps the legs in place. In between each leg short side I added scrap 2 x 4's as spreaders.
I can't say enough of how much I love my tools. Remember that my motto since a teen has always been toolsoverjewels. The sky's the limit when you have the right equipment.
MORE TOOLS
To attach the skirt to the top of the table, I used a couple of other favorite tools, my Kreg Pocket Hole Jig and my drill to create pocket holes so I could anchor it on.

My compound miter saw was best friend through this project. Just measure, line up, and cut. BAM! I love it.

Since it is only me working this project I only have one pair of hands. If you've ever assembled slats with pocket holes from underneath, that can be hairy.

BUILDING
What I bought a few years ago were these Right Angle Clamps. They are like an extra hand to help me hold the board in place while I anchor it. What a lifesaver! And I want to add that JC, my husband, helped me do the math of spacing the boards. After figuring it out, my head hurt and I was nervous to waste wood making wrong cuts. Building from scratch is easier than taking something and retrofitting it. Thanks JC!

Another handy gem is my jigsaw and my Kreg Klamp Trak Kit. The cordless jigsaw makes creating custom fit slats easy, and the clamps hold it nice and tight while I cut.

GETTING THERE
Bottom is complete to my reclaimed workbench and now it's time to add the top planks. While rebuilding the underbed drawers, I also add 2 x 4's with pocket holes to create inside drawer partitions. This is so I can anchor my top boards down without having to have screw heads all over my top surface.

There was a small gap from the hardboard top and where the planks would rest, so I used my stapler to add some bits of scrap as spacers.

I cut the 1 x 6 boards to length and attached by pre-drilling from the top down around the perimeter and anchored the center parts using those 2 x 4's I had added pocket holes too. After that, it all got a nice sanding down with my orbital sander.
Since I'm using new wood, I want to age it a bit with time-worn wear. This is fun to do with a hammer and random objects like my bucket of rusty old bolts, railroad spikes, and even an empty food can or two. I especially like using the threads of screws and bolts to make marks.


MORE WORK
I worked 3 straight days on this and it was actually hot, but I loved it! Getting this idea out of my head, plus being outside creating is the best. The next step was to add the finishing touches beginning with stain. Before I added the stain I went over the piece and added depth by using a watered down black paint to different places. It creates that rustic look I'm after and I have to do it before staining to get the full effect. I've used it many times before as seen in
my faux crate drawers in my kitchen.
FINISHING TOUCHES
My choice of stain was Provincial because it doesn't have much of an orange tint to it and has such a rich, deep effect, even on pine. I've used it on our reclaimed barn beam mantel and many other projects
seen HERE.

I begin by working from the underside and then flip it up to finish. One of the finishing touches is hand-forged hardware. Aren't these braces beautiful?! I couldn't wait to see them on my workbench. If you'd like to get a set of your own, you can purchase them from Joaquim and his shop on Etsy called
ECODECOPortugal.

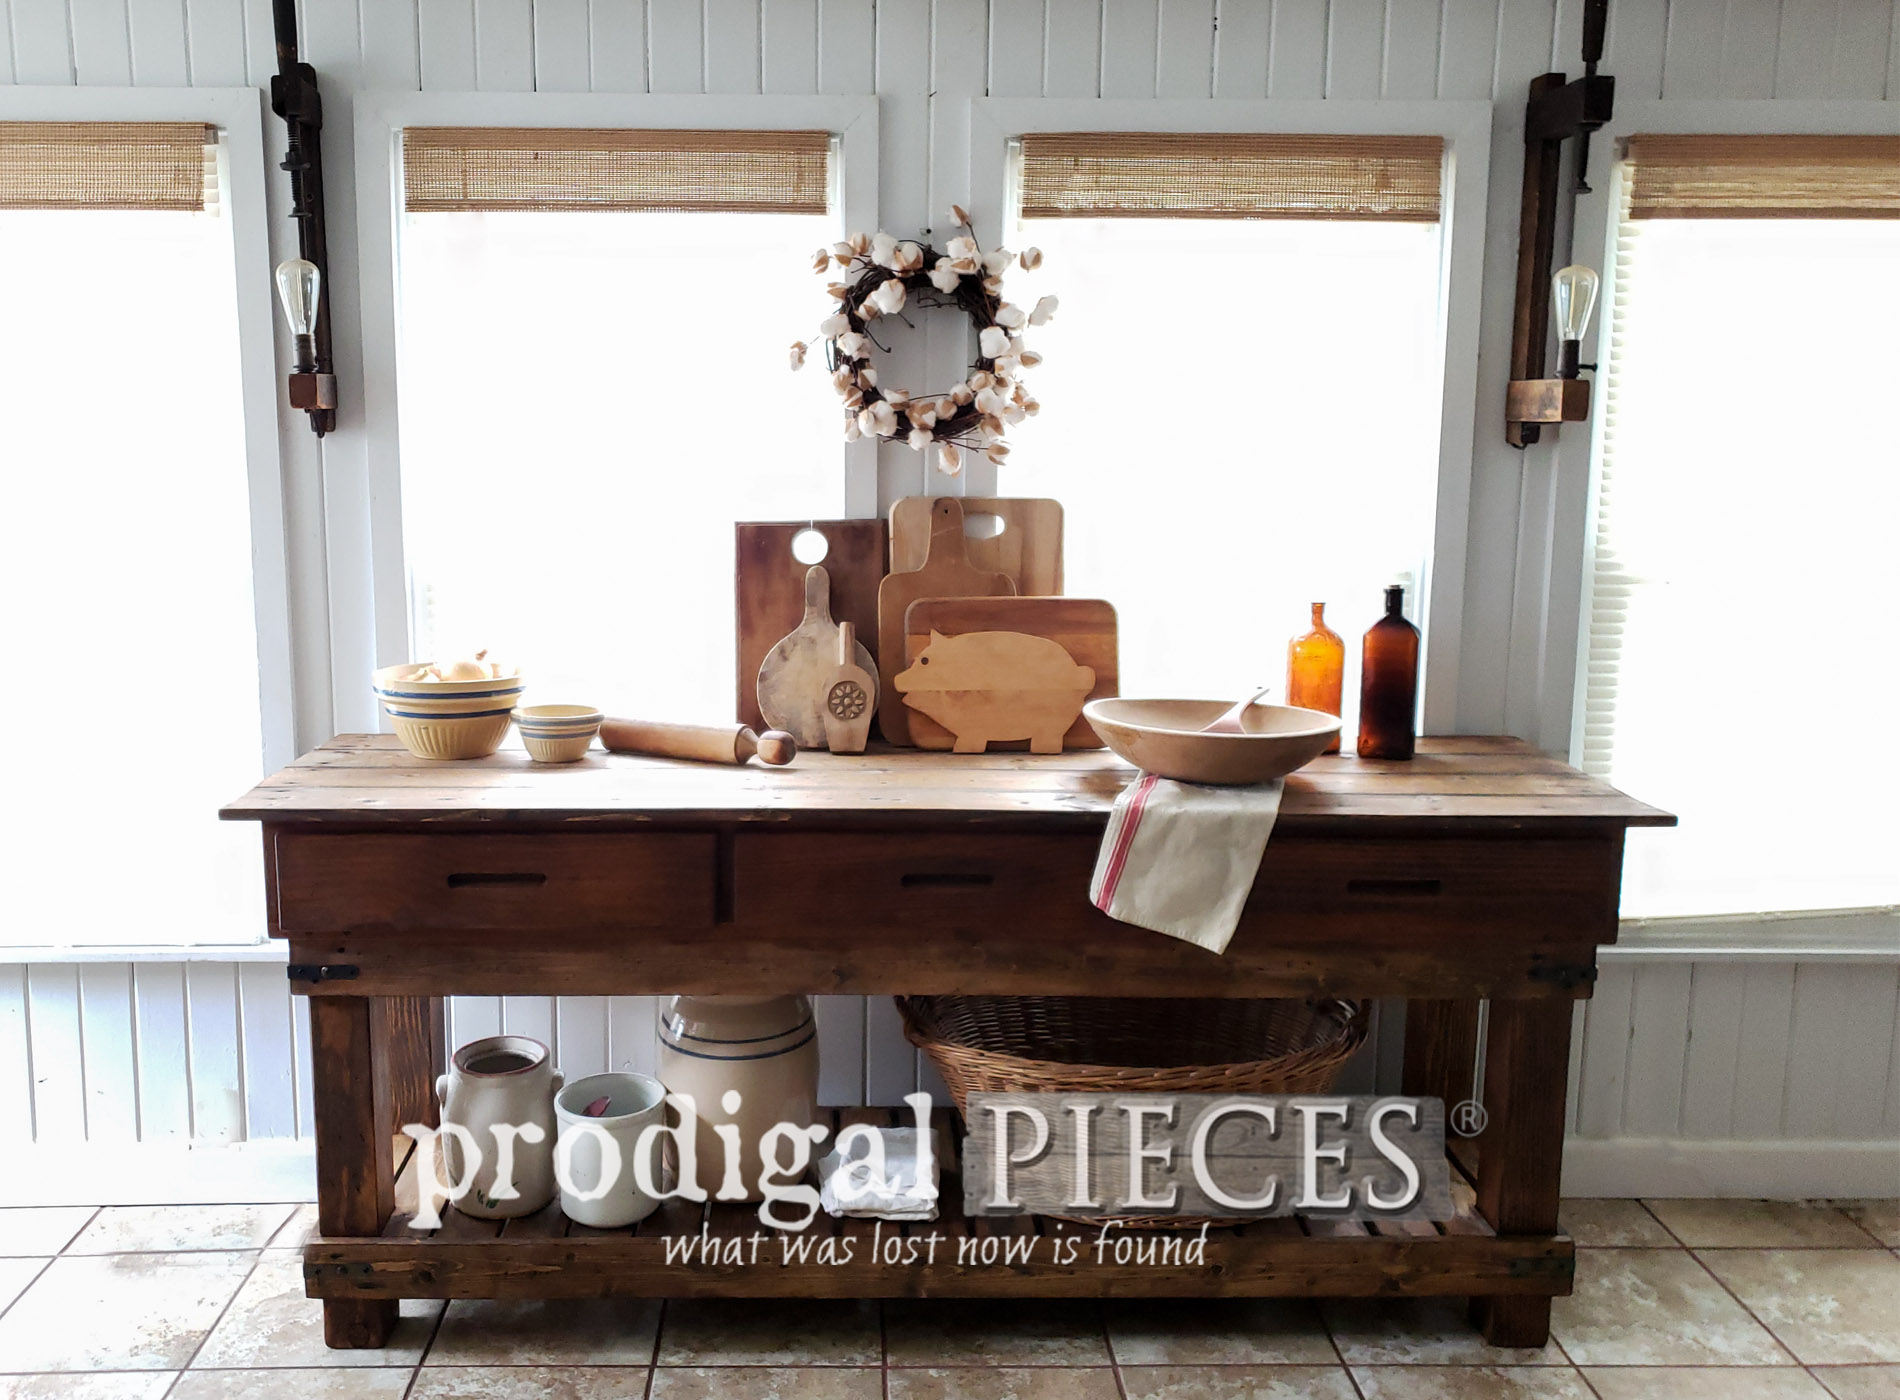
THE REVEAL
Alright...now we're ready to see the big reveal. How fun to finish this up and see it in place.


This reclaimed workbench came out just as I had envisioned and that's when I can step back and take a deep breath. sigh... Doesn't it feel good when you can see your vision come to life?


MORE FUN
Of course I had fun staging it with all of my farmhouse goodies too. You can even find some of these items in my shop. Take a peek! However, this reclaimed workbench can even be a TV console, entry table, shop counter and more. These tables have endless uses.


Now I can't forget about that awesome hammered hardware I showed you. Just look at 'dem corners! {{swoon}}


To say I had fun with this is an understatement. I love to build and get my creative juices flowing, but especially rescuing something from the trash is the cherry on top. I love me some trashure!


As with most of my creations, this one is also available for sale in
my shop (
SOLD) as my home has not a lick of space to keep it. But...I would if I could!


Do pin and share my DIY reclaimed workbench so that others can be inspired to get their build on too. Creating functional and beautiful decor is fun!

UP NEXT
Before you go, be sure to
sign up for my newsletter.
Don't forget to see below for all the other Trash to Treasure goodness!

 PINTEREST
Likewise check out what the Trash to Treasure ladies have for you:


- Bless'er House
- Artsy Chicks Rule
- Confessions of a Serial DIYer
- Girl in the Garage
While you're at it, here are more projects like this reclaimed workbench:


 Likewise check out what the Trash to Treasure ladies have for you: