 We adopted Teddy when he was 1 ½ years old, since the previous owner had an illness that meant she could no longer care for him as needed. He as been such a loyal, lovable dog. He resides with us 24/7 and is our alarm-barking nut at 9 years of age. Teddy already has a cozy den that he sneaks into where he sleeps, but he is getting older. I wanted to create a snuggly pet bed where he can be with us all the time.
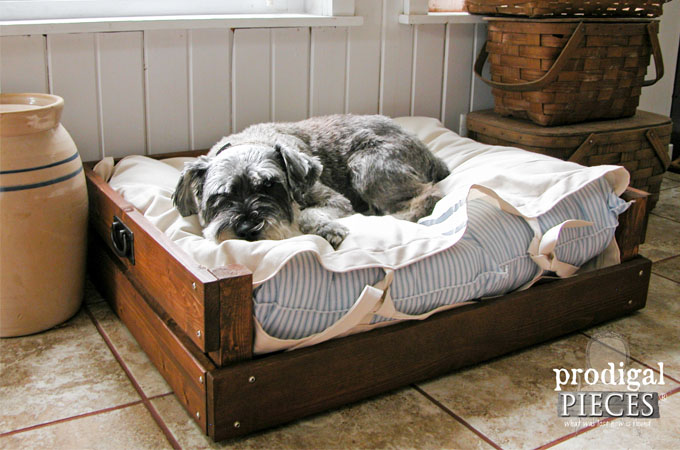
 Once I built his bed, there was no coercing him to get into it.
 He looks so content...I want one. hee hee hee.
DIY TIME
This is an easy build that can be done in a day with a few basic tools and supplies and is absolutely budget-friendly. You can build this for less than $30, including the cushion (see below for details). Not only is this affordable, but the best part is that it can be custom fit for any size cat or dog.
Before you cut
While this plan is suited to a small to medium size dog or cat, but it can easily be altered to suit your favorite pet cushion and pet size. In addition, this design was based on using two bed pillows inside a custom pillowcase. Feel free to alter the dimensions to suit any size pet bed. TERMS OF USE: If you want to create a pet bed using my design and plans, you agree to the following: it cannot be shared or distributed for monetary gain in any way, it may not be modified in any way, and you may not claim the work as your own.
Materials Required:
Tools Used:
- Kreg Pocket-Hole Jig
- drill
- jigsaw
- miter saw or similar
- sander
- builder's square
- table saw
- tape measure
- DIY workbench (optional, but oh so fun)
Wood Products:
- 1 - ¾" thick quarter sheet plywood
- 1 - 1" x 4", 10' board
- 1 - 1" x 4", 8' board
- 1 - 2" x 4", 16" board
Hardware/Supplies:
- 4 - felt furniture feet
- 42 - 1 ¼" wood screws
- 2 - trunk handles (optional)
Parts/Cut List:
- 1 - pet bed base: 30" L x 24" W
- 4 - bed posts: 8" L x 1 ¾" W x 1 ½" D
- 3 - long side rails: 31 ½" L x 4" W x 1" D (diagram is incorrect below)
- 4 - short side rails: 24" L x 4" W x 1" D
Cut bed parts
First, using the provided cut list and diagrams, cut the wood for your pet bed and sand smooth with a 120-150 grit sandpaper.
Trace and cut
Then take one of your 8" corner posts and place the end flush to each corner with the 1 3/4" face facing in and trace. Further, cut out corners with jigsaw.
Prepare bed base
Next, drill pocket screw holes on backside of bed base for 3/4" material following the diagram. See next step for a tip.
Tip for pocket holes
Since the bed base corners need pocket screw holes that can be tricky, mount your Kreg jig to the corner of your worktable and rest the base as shown.

Mark side rails
Find center of your side rails, and then mark for a 3/4" thick bed base lengthwise by measuring at 1 3/8" and 2 1/8" from a long edge and mark. Follow diagram.

Attach side rails
Attach your side rails using wood glue and 1 ¼" wood screws. As a matter of fact, by laying your bed base on the table and extending over the edge makes it easy to attach the rails. See photo.
Attach corner posts
Afterward, insert your 8" posts into the corner openings so that they are flush to the bottom edge of the bottom rails. Attach using wood glue and wood screws in the corner pocket hole openings. Pre-drill holes through the side rails into the posts and attach with wood screws.

Attach top rails
Next, pre-drill holes into your top rails and attach flush to the top of your corner post with wood screws. Additionally, use a scrap 1" x 4" in between the top and bottom rails to help space the board while drilling and screwing. N0tice the 24" rails are flush to the front posts, and the 31 ½" rail extends over the ends of the 24" rails as shown.

Finish
Finally, it's time to stain or paint your pet bed. Once dry, add felt furniture feet to protect your floor. Also, add a couple of trunk handles on the short sides for mobility and ease of cleaning. On the other hand, want to know how to create the cushion? Just head to the "Extras" tab to get the tutorial. Enjoy! Because your pet will love you for this treat. *note: the bed width is 31 ½"W, not 30".


 Now, you've got your pet bed made and want to create a custom cushion, right?
Here's how you do it (personal use only):
Materials- 1 yard of 60" wide fabric (or equivalent), PLUS 4 - 4" x 15" strips for ties.
- white thread
- 2 standard bed pillows
- fabric paint (optional) See tip below.
- masking tape (optional)
- sewing machine
- iron / ironing board
- sewing pins
- sewing scissors
- round foam brush
- tape measure
SEWING TIME
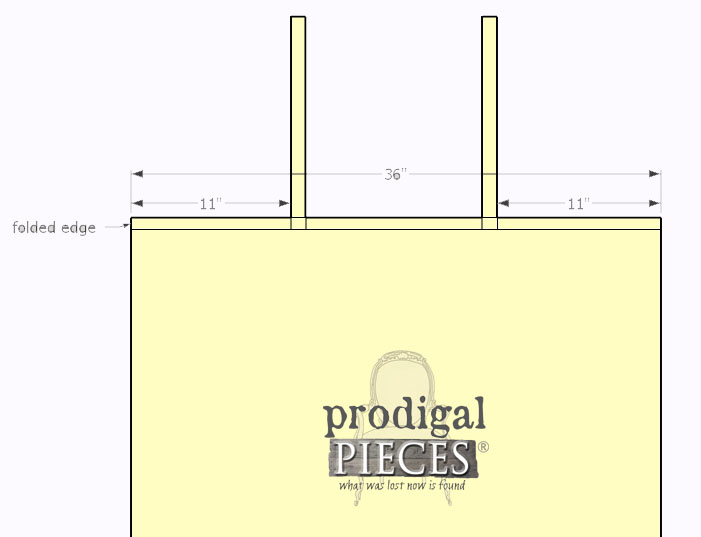
Once prepped, you are going to fold in your 36" edges twice in 1" intervals as shown below. Then iron down the folds to hold them in place. Lastly, pin and stitch down in a box format. In the meantime, you are going to create your ties. (see diagram below for details) Fold a short edge down ½" and iron down. Then, fold each long edge in to the center and iron. Last, fold each folded long edge inward to center and iron. Pin to secure and stitch around open edges.
 After you've created your ties, we are going to attach them to the pillow case. Line the unfinished edge with the bottom of the folded inside edge of the pillowcase and pin to secure. Also, do a box stitch to attach them to the pillow case.
 Now, all you need to do is fold the bag in half with right sides facing, line up top edges, pin, and sew a ½" seam up the sides as shown.
 Likewise, since you know I love rustic farmhouse, I used fabric paint (or acrylic paint with a textile medium added to make it washable), and masking tape to make faux grain sack stripes like I do on my furniture.
PET BED
Finally, stuff it with the two bed pillows and your pet bed is done! Not only does Mr. Teddy love his new spot, but also we do too.
 As a result, I hope you've enjoyed my latest creation. Likewise, I had a blast and am happy to share.
Before you go, be sure to sign up for my newsletter. Until next time!
As a result, I hope you've enjoyed my latest creation. Likewise, I had a blast and am happy to share.
Before you go, be sure to sign up for my newsletter. Until next time!

While you're at it, check out my other projects like my pet bed:

