It is truth that I love to repurpose and it is truth that I dig through other's trash. yup. Let's face it, we're a wasteful society and there's fun to be had on every corner! hahaha... Seriously though, I don't really dig spend my days digging through other's trash, but when something jumps out at me from the curb, I stop and get it. As a result, that's what I did when I spied this artist's clipboard during city clean-up a few years ago. Today, it becomes a magnetic message board ...do you see it?

Because I love to draw and relax while being creative with pencils, pens, etc., when I spied this in the trash I was so excited to use it when I have time to go out doors and draw. However, then comes the reality check...I have NO TIME to do such things. So instead of letting this go to waste, I decided to turn into something useful.
First, before I get too far, consider yourself invited to get to know me and my family a little more. If you aren't on my email list already, I share more bits and pieces of what's going on behind the scenes in our daily life and our latest projects. Since emails are only sent twice weekly as new posts are written, it's fun to get to know each other better. Just fill in the subscribe form in the sidebar on the right or at the bottom of this post on mobile. Yay!
Back to the project today...Initially, it spoke to me in many ways, but the one that stuck was the magnetic message board. Who doesn't love a grand central for all family to see? Here's how I got started:

Supplies:
- Rust-Oleum Magnetic Primer
- Paint Tape
- Foam Paint Roller and Pan
After reading the reviews online about the magnetic primer, I decided to do several heavy coats. In the end, I found that 5 coats gave me the magnetic power I was looking for. Likewise, since it only takes 30 minutes between coats, so it was a breeze to do it while doing something else. Fast and easy - my kinda painting. In addition to using it straight black out of the can, you can even paint a different color right over this. So since I like the black, black it is.

Then, to add some fun, I decided to make use of these numbered pulls that we had left over from
my daughter's vintage dresser makeover.

Also, because the board is a simple design, all I had to do was make some holes with my drill and cut the knob bolts short with my Dremel (you could also use a hacksaw).

Based on several of
my projects, you know I like to hand paint, so this is a blank slate. Finally, I use
my transfer method to create some wordy fun...

...and we're done!
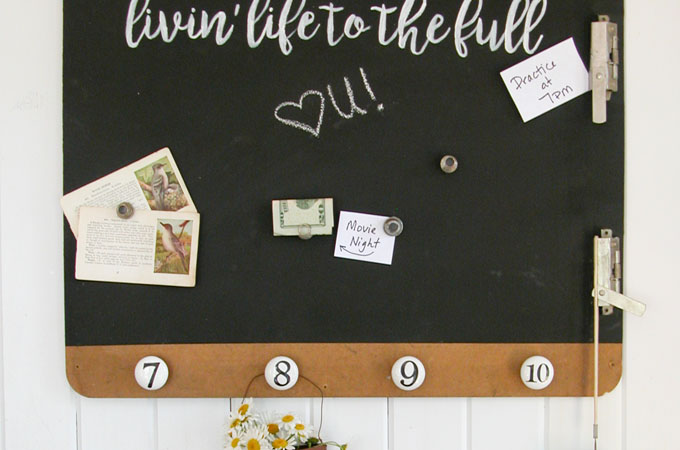
THE REVEAL


I love it! Not only does it offer functionality, but also versatility. In addition, it works as a chalkboard too!

My repurposed crib springs made some funky fun magnets.

My sneaky little self already has plans to make use of this magnetic primer in some upcoming projects. Are you going to give it a try?
You can find this and more in
my online shop.

Additionally, pin to share this fun tutorial and inspire others to get funky with their junk too. ♥

Next, I'm sharing with you this chest of drawers and how it's sporting a rustic look. eep! Head
HERE to see how to distress the easy way. ;-)

To get these DIY tips & tricks in your inbox, be sure to
sign up for my newsletter. Until next time!

Also, more projects for you like my magnetic message board:


 Because I love to draw and relax while being creative with pencils, pens, etc., when I spied this in the trash I was so excited to use it when I have time to go out doors and draw. However, then comes the reality check...I have NO TIME to do such things. So instead of letting this go to waste, I decided to turn into something useful.
First, before I get too far, consider yourself invited to get to know me and my family a little more. If you aren't on my email list already, I share more bits and pieces of what's going on behind the scenes in our daily life and our latest projects. Since emails are only sent twice weekly as new posts are written, it's fun to get to know each other better. Just fill in the subscribe form in the sidebar on the right or at the bottom of this post on mobile. Yay!
Back to the project today...Initially, it spoke to me in many ways, but the one that stuck was the magnetic message board. Who doesn't love a grand central for all family to see? Here's how I got started:
Because I love to draw and relax while being creative with pencils, pens, etc., when I spied this in the trash I was so excited to use it when I have time to go out doors and draw. However, then comes the reality check...I have NO TIME to do such things. So instead of letting this go to waste, I decided to turn into something useful.
First, before I get too far, consider yourself invited to get to know me and my family a little more. If you aren't on my email list already, I share more bits and pieces of what's going on behind the scenes in our daily life and our latest projects. Since emails are only sent twice weekly as new posts are written, it's fun to get to know each other better. Just fill in the subscribe form in the sidebar on the right or at the bottom of this post on mobile. Yay!
Back to the project today...Initially, it spoke to me in many ways, but the one that stuck was the magnetic message board. Who doesn't love a grand central for all family to see? Here's how I got started:

 Then, to add some fun, I decided to make use of these numbered pulls that we had left over from my daughter's vintage dresser makeover.
 Also, because the board is a simple design, all I had to do was make some holes with my drill and cut the knob bolts short with my Dremel (you could also use a hacksaw).
 Based on several of my projects, you know I like to hand paint, so this is a blank slate. Finally, I use my transfer method to create some wordy fun...
 ...and we're done!

 I love it! Not only does it offer functionality, but also versatility. In addition, it works as a chalkboard too!
 My repurposed crib springs made some funky fun magnets.
 My sneaky little self already has plans to make use of this magnetic primer in some upcoming projects. Are you going to give it a try?
You can find this and more in my online shop.
My sneaky little self already has plans to make use of this magnetic primer in some upcoming projects. Are you going to give it a try?
You can find this and more in my online shop.
 Next, I'm sharing with you this chest of drawers and how it's sporting a rustic look. eep! Head HERE to see how to distress the easy way. ;-)
 To get these DIY tips & tricks in your inbox, be sure to sign up for my newsletter. Until next time!


