Welcome back to those who have been following along.  For those who are just joining in, you will want to check out Part 1 and Part 2 to get yourself up to speed. Time to reupholster and see our work firsthand. Ready to finish?  Here we go! How to Reupholster & Paint a Rocking Chair by Prodigal Pieces www.prodigalpieces.com prodigalpieces Remember the batting, padding and old upholstery you saved for later?  Well, you'll need to grab your stash now. My rocker needed 2 yards of upholstery weight fabric and 6 yards of your choice of trim (it should be wide enough to cover your staples).  You will want to use a nice tight weave fabric so that it will withstand years of love and use.
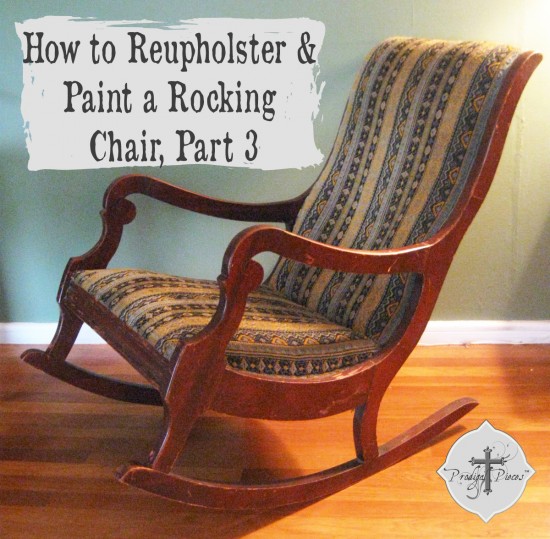
DIY TIME

Lay your fabric out flat and place your old, removed pieces and lay them out like below:
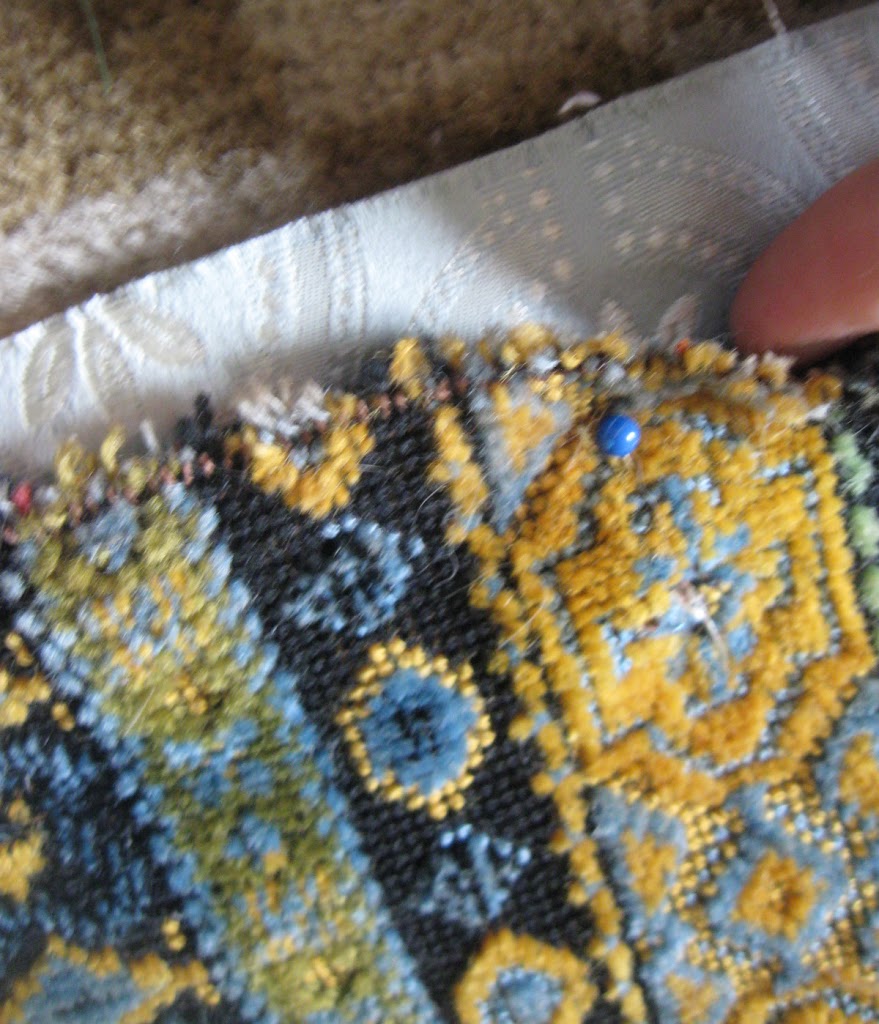
How to Reupholster & Paint a Rocking Chair by Prodigal Pieces www.prodigalpieces.com prodigalpieces
Notice that the top and seat are lined up so that the fabric below has the same pattern and design direction.  Use pins to secure them while cutting.
How to Reupholster & Paint a Rocking Chair by Prodigal Pieces www.prodigalpieces.com prodigalpieces
Just cut along the old fabric edge, no need for any allowances.  Simple enough, eh? Now for the fun part.  Grab your padding and batting and put them back on the chair and check to see if you need to add any extra.  I added more to the lumbar area and the seat.  While working on the chair I really had hoped that some new mother would be nursing her young one while enjoying her chair, so I wanted it comfy!

STAPLING

Time to add your upholstery, so grab your staple gun. I worked on the chair in this order: seat first, front, and the back last - to hide all the work.
How to Reupholster & Paint a Rocking Chair by Prodigal Pieces www.prodigalpieces.com prodigalpieces
Staring in the front center, tack down the fabric.  I folded my raw edge under just to prevent fraying over time.  Then, I work on each side of the center staple adding a couple on each side approx. every half inch, but don't complete it yet.  To create good tension, I then tack the center back down, and do the same as the front...add a couple on each side.  Do not finish the back at this point, head back to the front and finish it to the corners. Next, pick a side to start on and begin in the center, and add a couple on either side.  Again, like before, cross over to the other side and find center - tack it down and add a couple on either side. Now, go back to the side you started on and keep working back from one side to the other in this pattern: staple Left, staple Right - matching the tensions on either side (you can do a couple at a time).  This will create a lovely tension with a firm seat. You're going to use the same idea for the top and back. First, start at the center top on the front piece, adding a couple on either side, then go down to the opposing center on the bottom, adding a couple to either side, to get that good tension.

BACK SIDE

Use the same method to reupholster for attaching the back.  On my chair the top raw edge of the back was folded down over top of the front edge creating a finished look (you'll hide the staples later with your trim). I apologize for not taking a picture of this part!  Just finish with stapling about every half inch and working from top to bottom and then side to side to create good tension. When you are done stapling you might have a few wonky staples (staples that didn't go in completely).  I use a large head nail punch and upholstery hammer to lightly tap them in, so that I do not damage my paint job.
How to Reupholster & Paint a Rocking Chair by Prodigal Pieces www.prodigalpieces.com prodigalpieces
Now it's time to add the trim!  Remember from the first post that 4 out of 6 of my children had fevers, so I used what I had on hand - hot glue.  I have used hot glue before but prefer to use a fabric glue such as Fabri-tac, Magna-tac, or Tacky glue.

Pros:

a.) doesn't burn your fingers off b.) doesn't leave a stringy mess to battle with c.) doesn't come out in an uneven form d.) doesn't yellow over time - potentially

Cons:

a.) it takes a while for it to cure and I don't like to have to hold it in place and wait. TIP: if you use accidentally get a drip of hot glue on your fabric, DON'T touch it, just let it harden. Then, take your hair dryer and warm the glue. While hot use a blunt object (butter knife or like me, a paint can opener works great!).  It will come off perfectly if you're patient.
How to Reupholster & Paint a Rocking Chair by Prodigal Pieces www.prodigalpieces.com prodigalpieces
note: remember I folded down the top of my back piece to create a finished edge?  Add a strip of trim to that before starting as directed below.
Start at the bottom of the back right or left and work your way up and over the front side. Then, down and around the seat, and back up over the opposing front side (left or right). Last, finishing down under the bottom of the back.

THE REVEAL

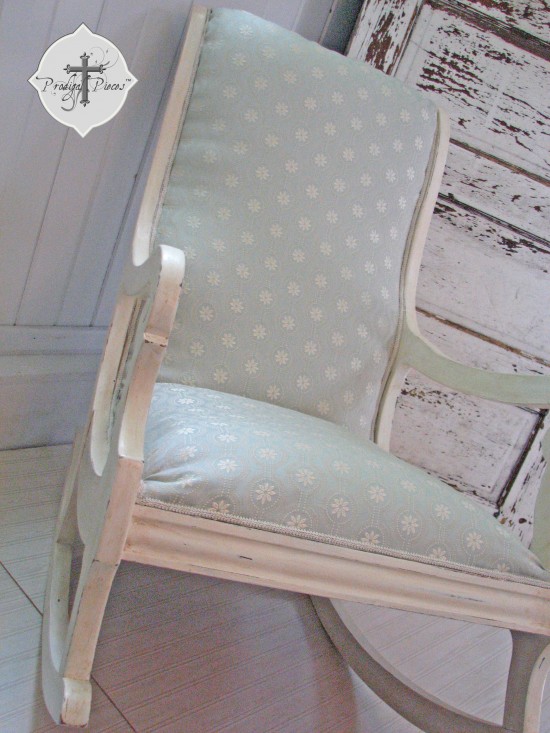
Clean up and unwanted hot glue if you used it and we're done!  I was thrilled that the chair sold within a couple of hours of being listed. Bonus, it's at its new home...for a mommy-to-be. My reupholster project is done.
rocker-before-after
How to Reupholster & Paint a Rocking Chair by Prodigal Pieces www.prodigalpieces.com prodigalpieces
reupholster a rocking chair part 3 via Prodigal Pieces
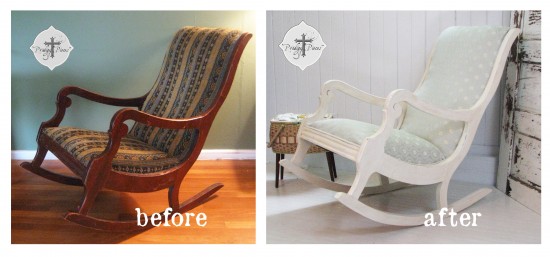
Please feel free to ask any questions about how to reupholster...I may have missed something!
To get these DIY tips & tricks in your inbox, be sure to sign up for my newsletter. Until next time! blog signature

Also, more projects on how to reupholster a piece of furniture:

$3 Garage Sale Channel Back Chair Gets Deconstructed Makeover by Prodigal Pieces www.prodigalpieces.com Vintage Chair Gets Feed Sack Makeover by Prodigal Pieces | www.prodigalpieces.com


Liz @ Quirky Vistas

Shared publicly - 2013-07-12 10:25:40

It's beautiful. You did a great job. It looks so comfy and sweet.
Liz

Larissa

Shared publicly - 2013-07-12 10:31:56

Thank you Liz! :o)

Elena

Shared publicly - 2013-07-12 16:43:10

Very pretty! I love the style of that rocking chair.

Larissa

Shared publicly - 2013-07-12 17:30:05

Thank you Elena! My youngest daughter is Elena...great name. :o)

Jamie {Better With Age}

Shared publicly - 2013-07-19 05:33:40

This is so pretty! You did such a good job. I’d love it if you could link this up to our party, Give Me The Goods Monday! {1 party, 4 blogs}
http://www.somuchbetterwithage.com/2013/07/give-me-the-goods-party-no-17/
Jamie @ Better With Age

Larissa

Shared publicly - 2013-07-19 10:18:45

Thanks Jamie! I'd love to link up, thanks for the invite!
Larissa

Roeshel

Shared publicly - 2013-07-20 18:09:42

Oh Larissa, it's gorgeous! Great tutorial too! Thanks so much for sharing! I'm including a link back in this week's DIY highlights! :)

Larissa

Shared publicly - 2013-07-20 18:14:28

I'm blushing. :o) Thank you, Roeshel!

Newton Custom Interiors

Shared publicly - 2013-07-21 11:56:32

This is a fabulous before and after makeover! Great tutorial.

Larissa

Shared publicly - 2013-07-21 12:02:21

Thank you! I hope it inspires someone to give it a try.

Rea T

Shared publicly - 2013-07-22 16:11:11

that looks beautiful and thank you for the tutorial!

stopping by through anything blue friday!

rea

Larissa

Shared publicly - 2013-07-22 16:46:15

You're welcome and thanks for stopping by!

Carissa Rasmussen

Shared publicly - 2013-07-22 17:42:16

i'm about to attempt my biggest upholstery project yet! yours turned out so fab you give me the confidence to just do it!

Larissa

Shared publicly - 2013-07-22 17:48:03

Wonderful Carissa! (I like your name, by the way) :o) I'd love to see it when you're done!

Beth @ Incomplete Guide to Living

Shared publicly - 2013-07-22 21:32:30

This is so great! What a fantastic, in-depth tutorial! Now...if I just had a chair to cover! :)

Larissa

Shared publicly - 2013-07-22 21:37:01

So glad to hear you liked it. Thanks for stopping by, Beth! :o)

meaningfulspaces

Shared publicly - 2013-07-22 21:55:30

What an amazing transformation, great job!

Larissa

Shared publicly - 2013-07-22 21:57:34

Thank you! Glad you stopped by. :o)

sew sweet vintage

Shared publicly - 2013-07-22 23:42:51

Love your chair flip! It's got a beach vibe to me, so i pinned it to my beachy board! I posted anchors aweigh to Rain on Tin Roof:)

Larissa

Shared publicly - 2013-07-22 23:45:41

Thanks for pinning! :o)

Julia - "Vintage with Laces"

Shared publicly - 2013-07-24 17:28:38

Great makeover! The rocking chair is very beautiful now. Love the white and your choice of fabric.

Larissa

Shared publicly - 2013-07-24 17:42:55

Thank you Julia!

Antonella

Shared publicly - 2013-07-25 11:23:15

Stupenda!

Larissa

Shared publicly - 2013-07-25 11:56:40

Glad you like it, Antonella. :o)

CamilleW

Shared publicly - 2013-07-25 15:44:43

This is GORGEOUS and gives me courage to try again. My upholstery attempts have not been good! lol Thanks so much for the great tutorial!

CamilleW

Shared publicly - 2013-07-25 15:45:23

Oh, by the way, I'm visiting from "From My Front Porch to Yours"

Larissa

Shared publicly - 2013-07-25 16:10:15

Thank you! Certainly don't give up! I do hope you give it a try again. :o)

Larissa

Shared publicly - 2013-07-25 16:17:00

Glad you stopped by! :o)

Deb

Shared publicly - 2017-02-15 16:51:43

This looks fabulous! We have two antique rockers we inherited from my husband's grandmother that need significant make-over. I think I will do one for ME and the other from my mommy-to-be daughter! Thanks for the inspiration!

Larissa

Shared publicly - 2017-02-16 06:31:41

That is a wonderful idea! Treat for all...love it. :D

Mary Lou

Shared publicly - 2019-08-16 12:19:32

Larissa, your tutorial was perfect. I have the same rocker and I am just finishing up. doing the trim now. i could not have done it without your instructions! thank you Mary Lou

Larissa

Shared publicly - 2019-08-16 22:02:34

How wonderful, Mary Lou! I'm am elated for you. :D

Debbie Rogers

Shared publicly - 2022-09-10 23:52:52

I have a chair that is almost exactly like this one, and I’m in the process of reupholstering it. Why type of padding should I use if I need to add some padding?

Larissa

Shared publicly - 2022-09-11 05:50:12

There is different types of upholstery "padding", from wool or cotton batting for under the foam, then different levels of thickness (durability) of foam as well. If you have the old padding, you can use that as reference, plus add a few inches of thickness because it will have condensed over time. Feel free to email me with additional questions.

Sign Up To Comment