Do you know what time it is? eep! It's
Trash to Treasure Tuesday and my gal friends and I are ready to inspire. Each month we get together to share our latest DIY projects with you. With that in mind, I'll share there's in a bit. Today, I'm eager to revisit a technique I use often. I'm sharing how to emboss anything: plastic, wood, metal, glass...you get the idea. Furthermore, meet my hot pink subject.

It was just sitting there in all it's hot pink-ness begging me to give it a makeover. Would you have answered the call?
What is more, I am by no means against pink in any form, however, it doesn't quite match my farmhouse/Nordic/French/cottage/industrial style. Consequently, so you know, this isn't the first pink revival I've done. Do you remember my pink bin turned bathroom storage? Take a peek
HERE.

Initially, when you look at my trash can, you'll see its brand new, shiny, and glossy. While you might think that would make for a hard case of changing it up. However, it's really all about know what steps on how to emboss it. I've not only created a video tutorial to show you how (see below), but I'm also outlining the steps in text form too.
Here's what you'll need:
- project to work on
- spray paint for base coat
- graphic of choice
- artist's pastels
- or use a window
- hot glue gun
- hot glue sticks or hot glue rope (mind-blowing new product!)
- X-ACTO Knife or similar
- 120 grit sandpaper
- cold galvanizing compound (zinc in a can) or other finish paint
- waxes or topcoat, if preferred
- small spray shelter (optional, but awesome)
- >turn table (also optional, and equally as awesome)
- safety gear - safety glasses & respirator with organic filters<
Step 1
First, when prepping any project, you need to make sure the surface is ready to receive paint. In this instance, we need to etch the glossy finish, so it has tooth to hold paint. Likewise, you can use a product called a de-glosser, as it does the same thing as sandpaper. However, I prefer to keep chemicals out of it.
Then, rub the surfaces with your sandpaper. After that, take a 2:1 water/vinegar mixture and spray down the surface. Last, wipe clean and let dry.

Step 2
Next, it's time to transfer our image. You can use any picture found most anywhere (just make sure it's not copyrighted) or create your own. I made this simple graphic in my software. The key to an effective design is to keep it simple. For the embossing to really stand out, choose simple text and design. You can also see how I embossed & upcycled glass pickle jars with a similar method
in this post.

First, place the graphic design side down on your light pad (love this thing!) or use a window too. Then, using your artist's pastel, rub over the design, mainly highlighting the outline. This is the same method I've outlined in my
image transfer method.

Step 3
Next, tape your graphic onto your project and then trace with a colored pencil the outline of text and design. Using a colored pencil helps you know where you are working (ask me how I know...ahem).

Afterward, pull back the graphic at one corner to make sure it is transferring. Last, but not least, when you are satisfied, remove the taped-on paper graphic completely.
This step is preparing us for using hot glue to emboss. However, if you prefer a hand-painted look, skip this step until after you've completed the painted layers. Also, I have another tutorial on how to use a stencil and topping joint compound or spackling to emboss furniture or wood items as well.
Head HERE.
Step 4
Ready to make some hot fun? Heat that glue gun up and have your glue sticks or glue rope ready. Keep in mind, I use almost 3 sticks for this design, so not too bad. As you can see in my video below, I just fill in making sure to hold my gun above the surface. Then, let the bead of glue fill in. It's kinda like piping a cake.

You can use a toothpick to move it around while hot. Also, fill in air bubbles while it's still hot to avoid a layering effect. Unless, of course, that's the effect you're going for. Oh, and don't freak out if it looks all wabberjawed. See the next step.
Here's my glue before trimming. Kinda wonky, but not too bad.

Step 5
Then, once your glue has cooled, feel free to take an X-Acto knife to trim it up to your liking.

Step 6
Next, pop up that spray shelter to avoid explaining overspray messes...ahem. Add the turntable for easier work and have at it. What is more, don't forget your safety gear. Additionally, glasses keep the spray out of your eyes and the respirator protects your lungs - it's worth it.


Step 6
Furthermore, after one coat of paint, let it cure. Subsequently, when the paint cures, use an old candle or beeswax to lightly rub the places you want wear to show through.

This will allow us to distress without going down to the original hot pink color.
Step 7
Finally, it's time for our final coat of paint. For this step, I'm using the Cold Galvanizing Compound. Likewise, this is the same product I've used in
my past posts for an aged zinc effect. Spray one coat and let cure.

Step 8
Next, after the zinc paint has cured, use the same sandpaper to distress the gray lightly down to the black paint. This will give it a time-worn feel we're after.

Step 9
Last, but not least, you can add a dark gray wax to give it an even more aged look and highlight our embossing. Also, I like to use my paint brush and even an old toothbrush to apply it into all the nooks and crevices.

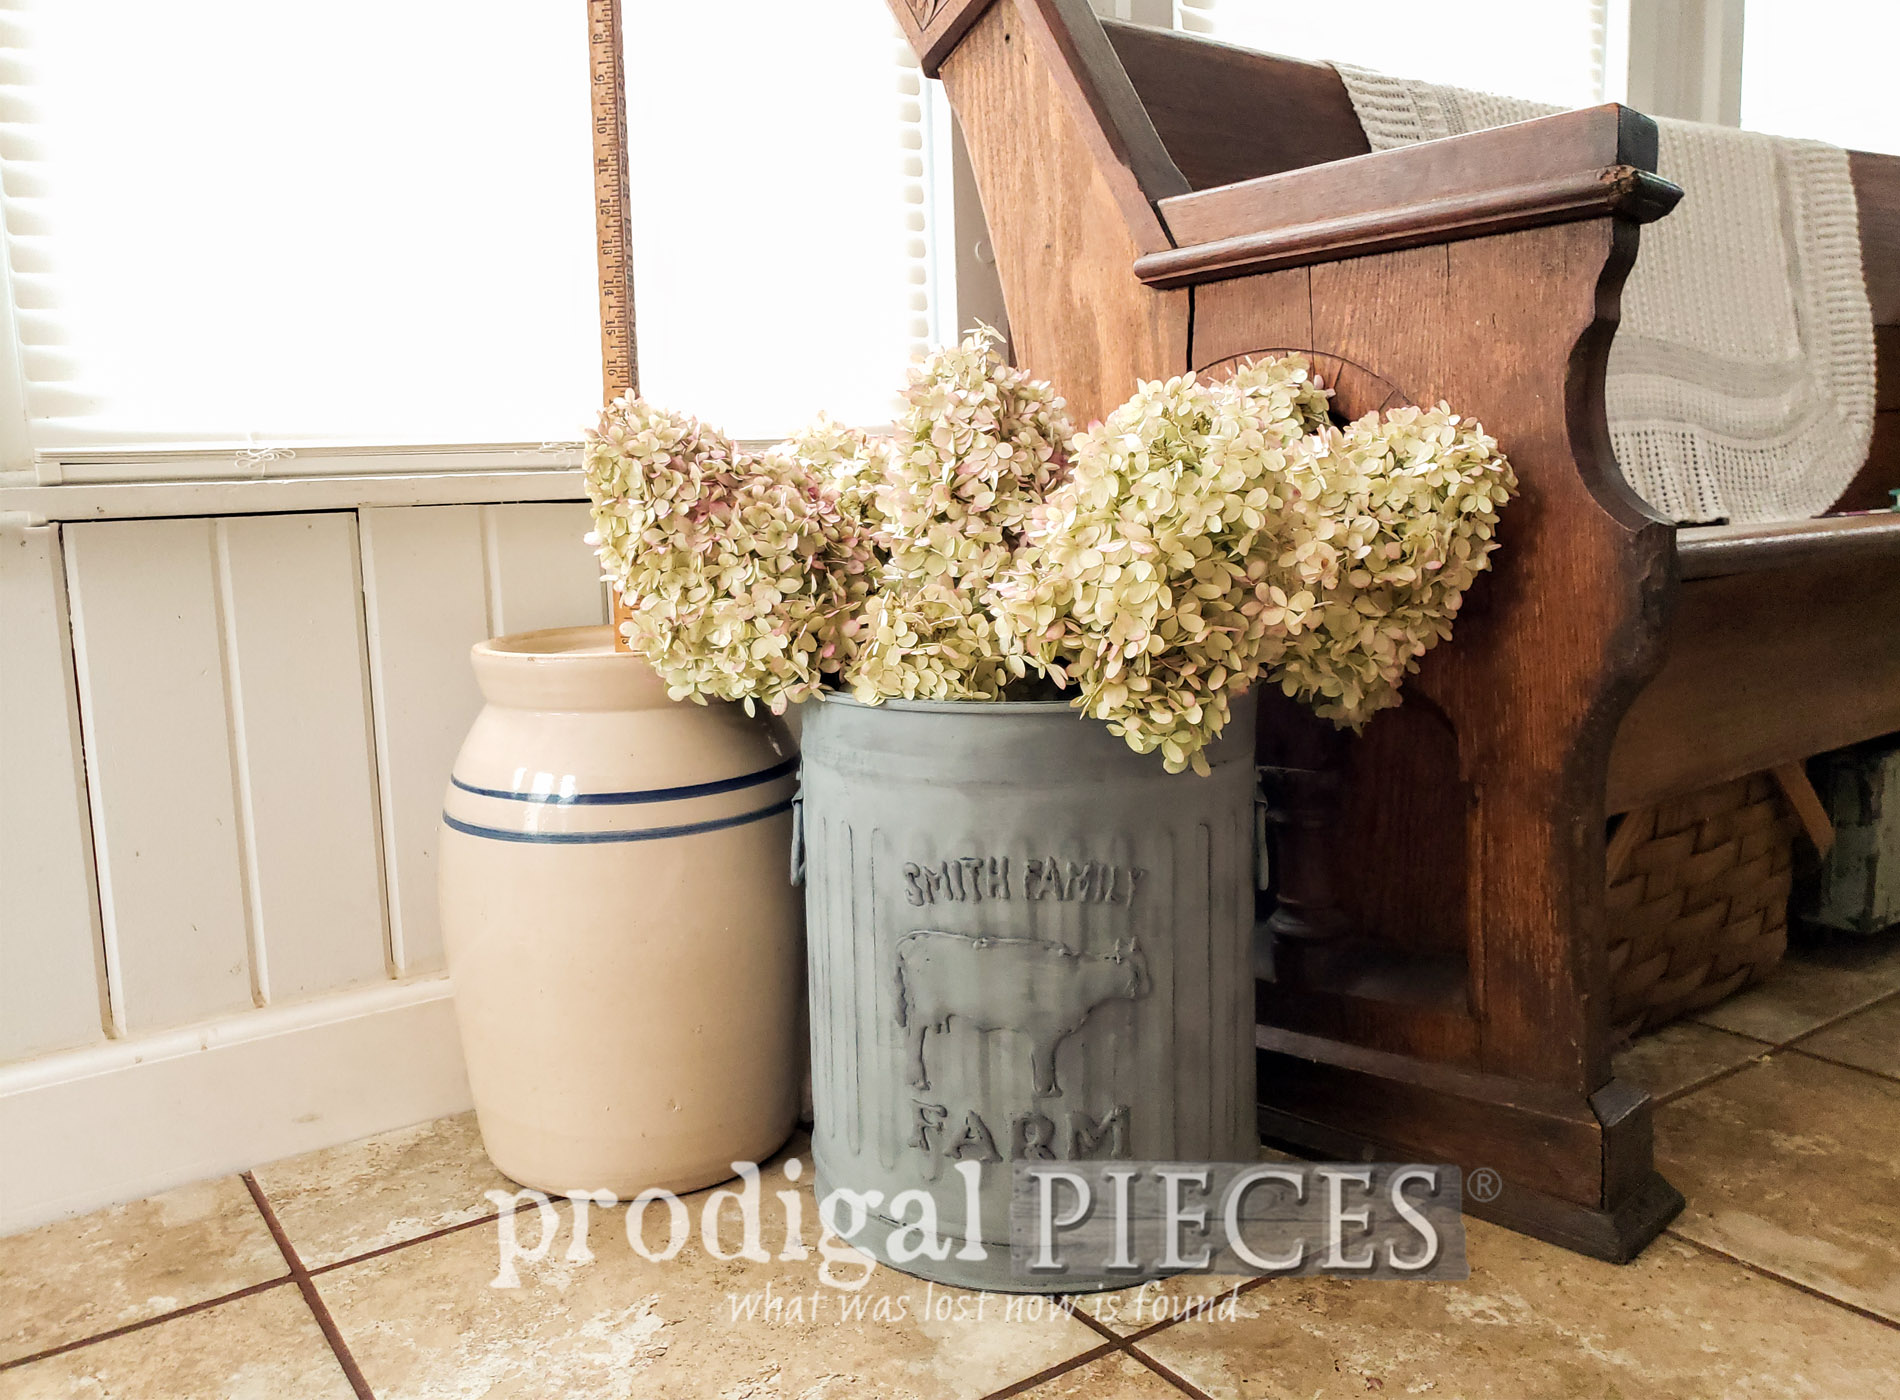
THE REVEAL
At last, we have our farmhouse trash can makeover complete. Not only does our hot pink lil' gal is now sporting a rustic vibe, but it also suits my decor much better.


However, the best part is that it can suit any room for any time of year.


MORE USES
Aside from stuffing it with decor items, you can also use is practically in your home as even...gasp...a trash can. haha! Really, though, the uses are endless for an item like this. For instance, here I have it full of TP and towels in my bathroom.

So, I ask...what would you use it for? Essentially, my entire intention is to get you thinking outside the obvious. What could something you own become now that you've learned how to emboss?

Keep in mind that DIY is only limited by your effort to learn something new. What is more, taking those steps outside of the box to engage, transform, and enjoy are what it's all about. Additionally, if you'd like to own this fun piece, you can find it available in
my online shop.

Likewise, pin and share to inspire others how to emboss anything they set their eyes on. It's fun, easy, & affordable! :)

UP NEXT
Up next, I'll be sharing a bit of my heart with hopes to encourage you in your daily walk.
Find JOY.

Before you go, be sure to
sign up for my newsletter. Until next time!

In addition, check out these funtastic DIY projects to inspire you:


- Bless'er House
- Artsy Chicks Rule
- Confessions of a Serial DIYer
- Girl in the Garage
Also, more projects similar to how to emboss anything:


 In addition, check out these funtastic DIY projects to inspire you: