 I mentioned before that when I need a chair to complete a project, I can't find one for anything. I'll shop all over the place and come up empty-handed. However, it is quite the norm that when I have no need (nor room) for a chair, I will find not one, but two. ahem.
 First, let me say that I normally would have grabbed these just to save them from the trash and gave them to a thrift store, etc. This time around, however, I decided since I had a set that they deserved to get a new lease on life. They are in great shape with damage to the caning and wear on those gorgeous legs. Certainly no need to throw them away, right?
DIY FUN
To get my DIY party started turning these into grain sack antique chairs, I used my putty knife to remove all the broken caning.
*post sponsored by HomeRight (see full disclosure)
I could have replaced the caning because this was a simple design, but kinda wanted to do a different vibe this time around. Once I had the caning removed, I sanded it all down with my sander, and made minor repairs. Also, I removed the seats and set those aside for later.PAINT TIME
Next. I originally wanted to spray outside, but our crazy weather wasn't having it in the first part of the day, so I set up inside. Notice, I'm also using my DIY furniture turntable which makes my job a breeze. Get the turntable tutorial HERE. You can also view my video demo of this set below as well.

BACK AT IT
Okay, so back to my chairs. After I did a coat of Kilz primer as a stain blocker (use if you are covering up mahogany or cherry stains), I was able to move my spray setup outside. Yay! At this point, I'm giving it the first coat of my custom-mixed color. You can see my video demo how to set it all up HERE.
UPHOLSTERY
Then, in between coats of primer and paint, I tackled the upholstery. Those seats were so stinky and wet with some blucky stuff. eeewwww... However, I was so thankful that there were staples used instead of those upholstery tacks so that I could use my handy staple puller to get them out lickety-split. This little tool is only about $6 and has save my wrists and hands oodles of owies. This chair came apart with no issues and was a simple piece of plywood. The second one, however, was a bit of a hot mess.
 | prodigalpieces.com") I don't know the story, but I do know someone jerry-rigged this seat together. You can see the empty wooden frame kept together with electrical tape, then they nailed on a super thin piece of ply to the back of that. I even found another layer of a different upholstery under there. Weird.
Needless to say, I yanked everything apart and put most of that in my burn pile. Then, I used the good seat to make a tracing so I could cut out a new one with my jigsaw. Once everything was ready to go, I covered them with new foam, batting, and then a gorgeous linen upholstery leftover from my channel back chair redo.
Before I moved onto the upper back, I glazed the paint with my homemade glaze.
I don't know the story, but I do know someone jerry-rigged this seat together. You can see the empty wooden frame kept together with electrical tape, then they nailed on a super thin piece of ply to the back of that. I even found another layer of a different upholstery under there. Weird.
Needless to say, I yanked everything apart and put most of that in my burn pile. Then, I used the good seat to make a tracing so I could cut out a new one with my jigsaw. Once everything was ready to go, I covered them with new foam, batting, and then a gorgeous linen upholstery leftover from my channel back chair redo.
Before I moved onto the upper back, I glazed the paint with my homemade glaze.

ALMOST DONE
Next, it's time to tackle that open back. My K.I.S.S. part of my brain (keep it simple, stupid) kept telling me to fill in where the cane was with wood filler, sand it down, paint, and be done. But noooo...my lets-make-the-job-harder-as-if-we-don't-have-anything-better-to-do part of my brain trumped my K.I.S.S. side. I am always up for a challenge. {{head smack}} I chose to fill in the void with some upholstery fun. First, I tacked in a layer of gray ticking stripe with my stapler so you could see it from the back. Then, I added webbing for extra support.
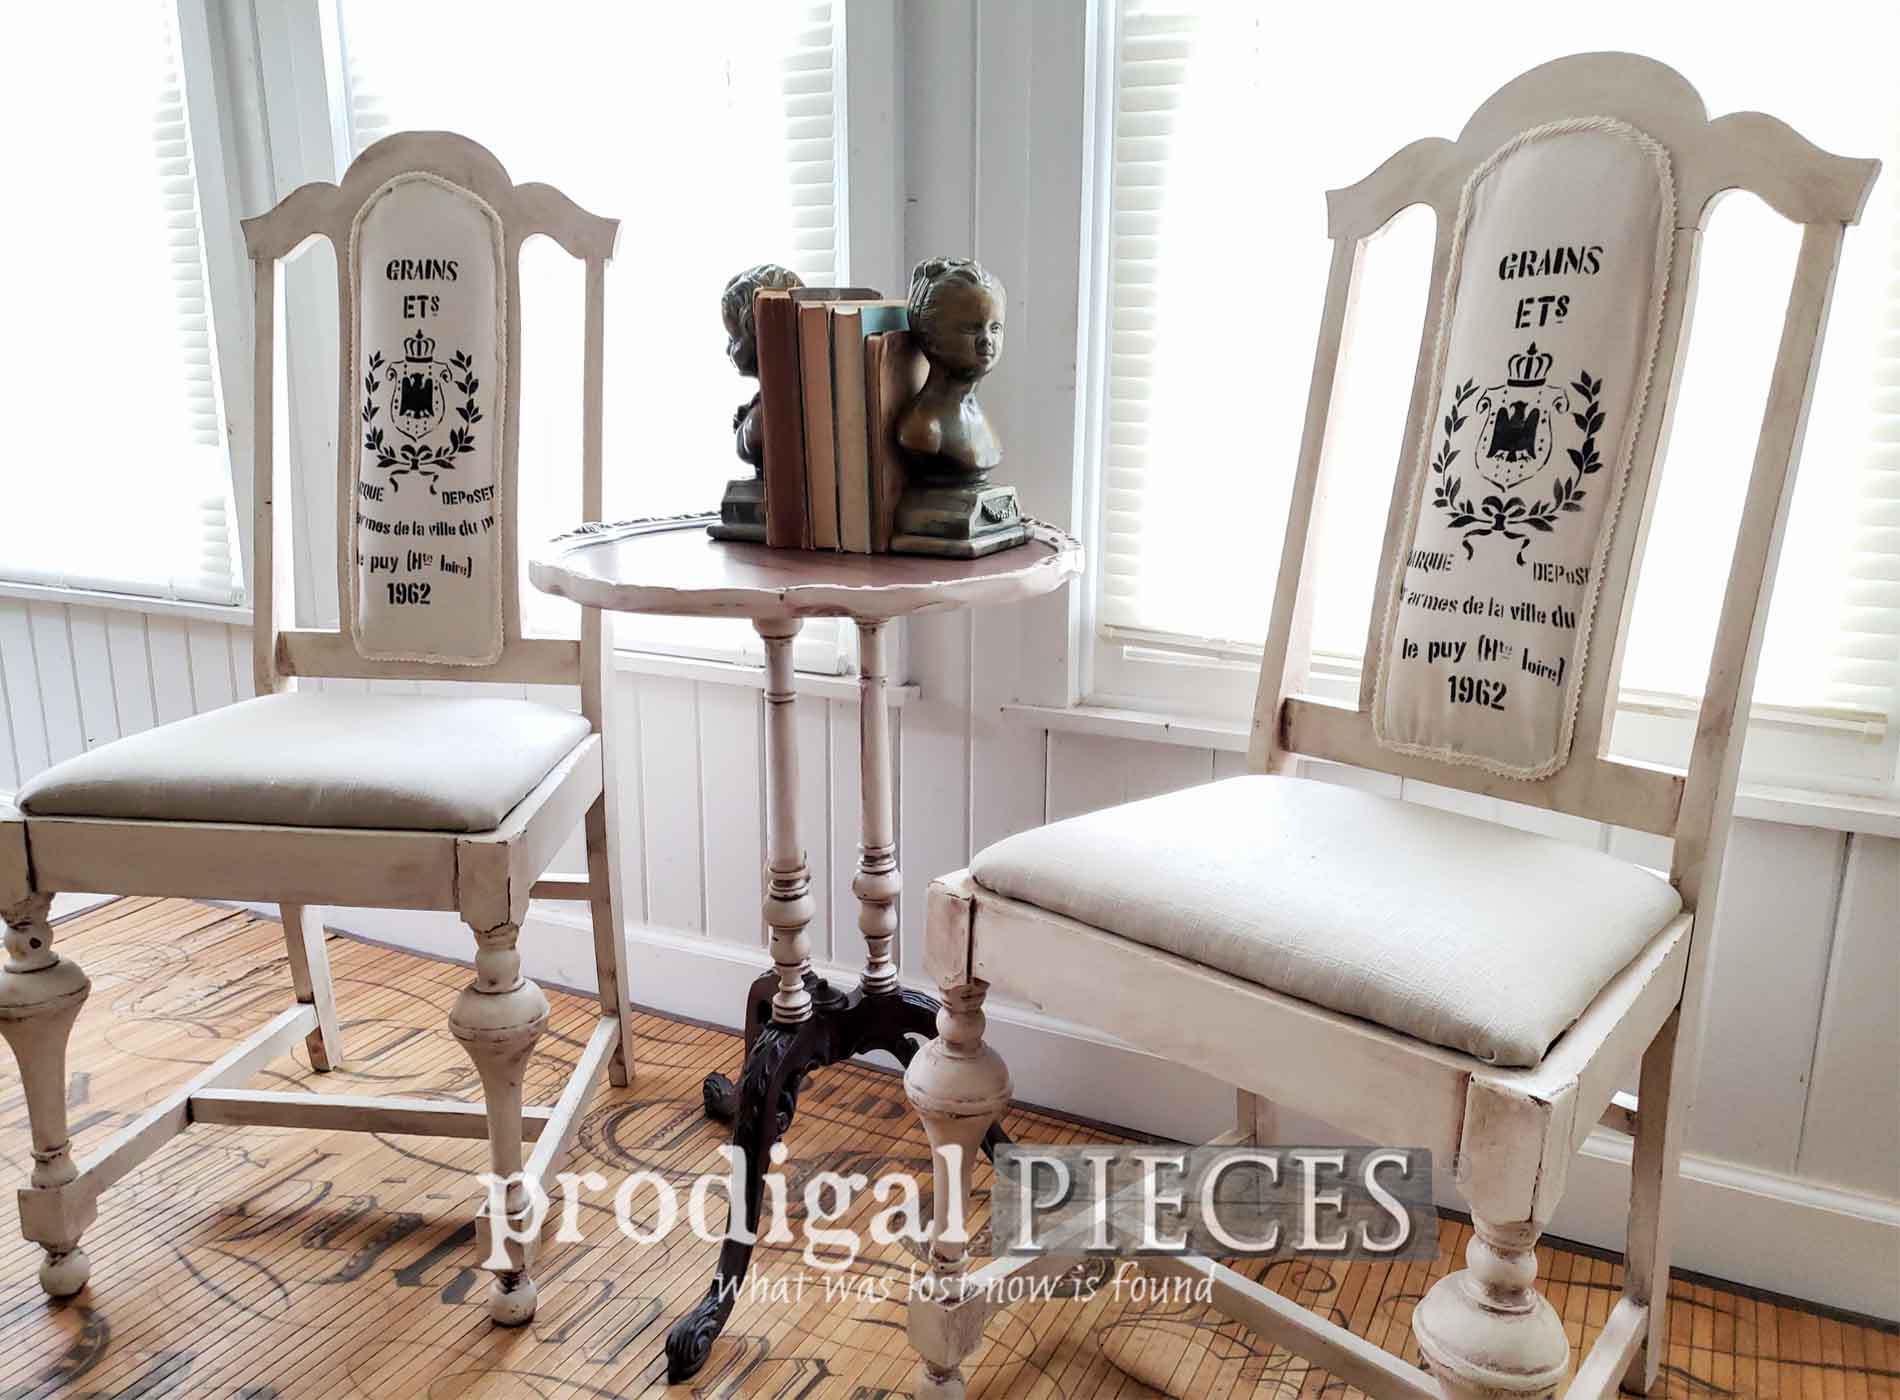
 Last I used some scrap fabric and Feed Sack Art Stencil to create a panel to cover the center. If case you didn't know, you can use basic acrylic paint and add a textile medium to make it fabric worthy. Just follow manufacturer instructions.

THE REVEAL
Now I can finally say my grain sack antique chairs are complete. Yay!
 The broken cane afforded me the chance to change up their whole look with upholstery. I'm glad I didn't K.I.S.S so that my vision could come to life. The linen seats, the ticking backing, and the faux grain sack all gel beautifully together.


 So, did you think those cast-off chairs would turn out like this? It's always fun to envision someone's trash made new...trashure.

 And...did you notice I staged it with the same pie crust table I recently restored from that same curbside haul?

 If you'd like to own this set, both chairs and table, plus much more are available in my online store.


SHARE
Additionally, pin and share these grain sack antique chairs and their new look. Pinning means you can save it for later AND inspire others to see the potential in their pieces too. Up next, the last of my trashure haul makeovers is the drop-leaf coffee table. Any guess as to what it will become? See its new look HERE.
 To get these DIY tips & tricks in your inbox, be sure to sign up for my FREE newsletter. Until next time!

Also, more upholstery projects like these grain sack antique chairs:

