 We love how much more bright and light our kitchen is without the faux beams we had originally. We've added recessed lighting to our kitchen, and new fixtures to our laundry, as well as updated our hot wiring mess.
Whomever wired this house is, well...scary! Our panel is a mish-mosh of connections that don't make sense and my husband has spent his last four weekends in our attic roasting like a turkey fixing it all. That whole thing has eaten up our precious time, but we want to make it right. He even found a live wire just sitting up there - ask him how he knows. ahem.
We love how much more bright and light our kitchen is without the faux beams we had originally. We've added recessed lighting to our kitchen, and new fixtures to our laundry, as well as updated our hot wiring mess.
Whomever wired this house is, well...scary! Our panel is a mish-mosh of connections that don't make sense and my husband has spent his last four weekends in our attic roasting like a turkey fixing it all. That whole thing has eaten up our precious time, but we want to make it right. He even found a live wire just sitting up there - ask him how he knows. ahem.
DIY TIME
While he's doing that, I've been up to some repurposed fun. Enter in my kitchen drawers... Pretty boring, but served a purpose. Ever since I saw this inspirational picture, I knew I was going to replicate it somehow. The only thing I didn't like about their design was that it was actual crates. That wouldn't do because I wanted the same storage I had with the four drawers and didn't want wasted space or to store my perishables next to my oven. Time to get my woodworking grove on! (she does a jig while giggling like a school girl)
NEXT STEPS
I removed the drawers and here is my blank slate. Sorry for the fuzzy pic, I was in a rush because I do this kind of work while baby girl sleeps. Ha!
We had already built a new drawer face for the top drawer a few years ago, so it didn't bother me to go ahead and remove the others too. I built new drawer faces out of plywood using my miter saw.
Here's how they look. Pretty ugly, huh?
Sorry for the fuzzy pic, I was in a rush because I do this kind of work while baby girl sleeps. Ha!
We had already built a new drawer face for the top drawer a few years ago, so it didn't bother me to go ahead and remove the others too. I built new drawer faces out of plywood using my miter saw.
Here's how they look. Pretty ugly, huh?
 Since I am just covering these up, I just used my nailer and wood glue to attach them. If I wanted a finished look, I would use Kreg Jig.
CUTTING
My goal is to achieve a crate look, so in order to do that I needed to create depth. I used a RustOleum Flat Black to paint the drawer fronts and then moved onto adding the wood slats. A few years ago, a local business that sold stuff right up my alley went out of business and left a humongous pile of "junk" out for the trash. Yours truly had no problem braking and digging through it all. I got a tent, two Christmas tree bags, odds and ends, and the crate on the right. The other crate came from my fellow junking friend who found it during our city-wide cleanup. I don't like to destroy anything if it is just fine in original state, so my goal was to not touch the intact one, but use up the one I found that my kids busted up. I liked the darker wood of it for contrast too. It was going to be tricky, but I knew I could do it.
My jigsaw and my Kreg Clamp Trak on my DIY workbench were my best friends through it all. I was so nervous because I only exactly enough wood to make the slats and frame, so I had to be careful.
I don't like to destroy anything if it is just fine in original state, so my goal was to not touch the intact one, but use up the one I found that my kids busted up. I liked the darker wood of it for contrast too. It was going to be tricky, but I knew I could do it.
My jigsaw and my Kreg Clamp Trak on my DIY workbench were my best friends through it all. I was so nervous because I only exactly enough wood to make the slats and frame, so I had to be careful.
 You can't imagine how many times I sat in front of my cabinet measuring and making notes, hopping up to make cut, run back in and sit again. I got a good workout!
ASSEMBLY
Once I had made all my cuts, I did a dry run by just nailing them on using upholstery tacks. After that, my little helper assisted me in gluing the slats to the faux crate drawer fronts.
 Since some of the slats already had nail holes that showcased an awesome patina, I wanted to replicate that on the other boards. See how the top has dark stains, and the bottom doesn't?
 To get the effect I was after, I used my flat black paint thinned with a bit of water and brushed it on. Who knew making faux crate drawers could be so fun, right?
FINISHING
Last, the drawers needed pulls. I debated on using a bin pulls, but I really wanted this to look authentic. With much trepidation, I decided to sacrifice another of my antique barn beam pegs. gulp. Scored these babies for a dollar and have used some of the damaged ones to make my popular Christmas tree toppers. My stash is dwindling, so this will most likely be my last project with them. I'm hoarding the rest. tee hee hee.
I went back to miter saw (that went with my awesome Christmas gift) and cut them to length, then attached them using my drill.
Scored these babies for a dollar and have used some of the damaged ones to make my popular Christmas tree toppers. My stash is dwindling, so this will most likely be my last project with them. I'm hoarding the rest. tee hee hee.
I went back to miter saw (that went with my awesome Christmas gift) and cut them to length, then attached them using my drill.

THE REVEAL
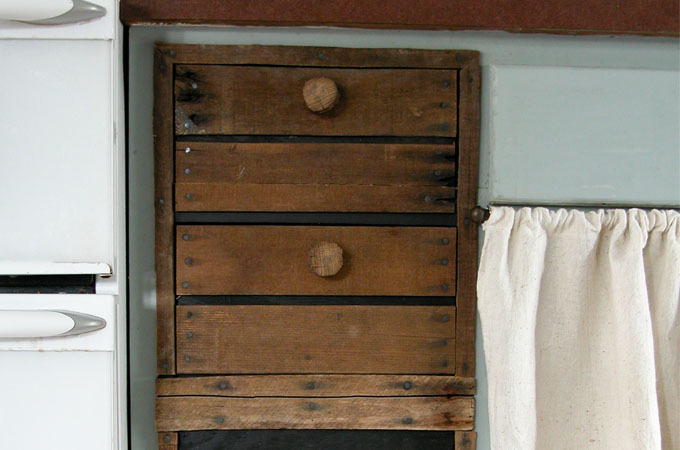
After all was said and done. Here is my final result... I am in LOVE! Not only are these faux crate drawers are just as I had envisioned, but also better because they are cohesive, functional, and full of a whole lotta character.

 My kitchen used to have a cottage-y feel, and since I'm headed in a different direction, I decided to take my vintage feed sacks I had been saving to make some feedsack purses, and make new curtains too.
 Finally, the best part is I use up every bit of only one crate. I even made a cute sign with the remnant and my transfer method for my online shop.
[metaslider id=30251]
 There's still much to do and you must have vision as the range will be replaced with cabinets when we add gas our cooktop, the counters and sink are coming up soon. And we are working on building a new cabinet for our double wall oven presently. Oh the fun!
I hope you enjoyed my latest addition to our kitchen with my faux crate drawers. I can't wait to show you the FULL REVEAL HERE.
There's still much to do and you must have vision as the range will be replaced with cabinets when we add gas our cooktop, the counters and sink are coming up soon. And we are working on building a new cabinet for our double wall oven presently. Oh the fun!
I hope you enjoyed my latest addition to our kitchen with my faux crate drawers. I can't wait to show you the FULL REVEAL HERE.
SHARE
While you're at it, pin and share to inspire others to create things like my faux crate drawers! ♥ Also, coming up next week, I have a fun furniture makeover for you with this dresser. It needs a good spankin', doesn't it? UPDATE: You can see the makeover - it's done!
 To get these DIY tips & tricks in your inbox, be sure to sign up for my newsletter. Until next time!

While you're at it, here's more of my wacky fun like my faux crate drawers:

